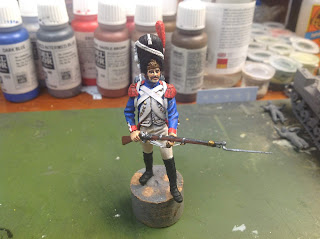
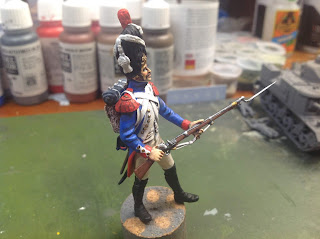
Well, my 400th post on this here blog. I wanted it to be on something special, to celebrate attaining this... er, well, whatever it is... !? You probably know what I'm driving at!
This kit has a very special place in my heart, as it's a smaller version of a kit my dad built when I was a kid. A kit which was probably instrumental in fomenting my interest in the era. My dad's was the 1/12 kit, which stood on a round base. He had done, as I remember it, a very good job, if also rather basic: blocked out in the appropriate colours, with little or no shading, but very neatly painted. The face looked like it had been done in oils, and had a more detailed washed range of colours, to look lifelike, rosy cheeks, etc.
This kit has a very special place in my heart, as it's a smaller version of a kit my dad built when I was a kid. A kit which was probably instrumental in fomenting my interest in the era. My dad's was the 1/12 kit, which stood on a round base. He had done, as I remember it, a very good job, if also rather basic: blocked out in the appropriate colours, with little or no shading, but very neatly painted. The face looked like it had been done in oils, and had a more detailed washed range of colours, to look lifelike, rosy cheeks, etc.
The instructions.
Unlike some of these kits, this one's only got parts for one pose. What it does have, however, by way of variety, is alternate legs - one pair in gaiters, one in trousers - and an alternate (cord/tassel-free) bearskin. I was intending to use the trousers, and not the gaiters. Perhaps on account of the fact the last figure was in gaiters. But in the end I didn't, because of issues of fit.
The two sprues.
I always dreamed of making Historex 54mm kits as a kid, which I'd see in old copies of Military Modelling. But I never did. Nor did I build any kits like these. So this is all part of an unfulfilled childhood dream finally coming to fruition. Which is rather nice! The parts are nicely sculpted, and pretty well cast, with only a little flash. Clean up was pretty easy and straightforward.
Parts separated and ready for clean up.
At this point everything's cleaned up and laid out ready for assembly, excepting the straps. I was still hoping the trousers would fit, so to speak. But whereas the gaitered legs had a corresponding male notch for the female cleft in the waistcoat, the trousered legs didn't. Something I only twigged when I went to assemble these parts.
Everything cleaned up. Thinking I'll use campaign style legs.
Once the legs, torso and head sub-assemblies were built, I cut the supplied thin styrene sheet into the strips for the straps. I make the musket strap longer than suggested, so I can add more detail, looping it over with buckles, etc. Fitting the straps is quite a tricky stage of the build. Especially when, as I usually do, you balls it up repeatedly!
Straps cut from the very thin plastic sheet that's supplied.
By this point I've got the full figure assembled, having changed over to the gaiter-clad legs, and with straps and epaulettes all in place as well. In the picture below I've cut his right hand off, and I'm making a wrist sized wedge to get a better angle/grip on his musket.
Wound up using the gaiter legs, and doing surgery on his right hand.
When it came time to undercoat him in Halfords grey primer, I opted to also undercoat the Hasegawa 1/72 Grant tank I've been building on my visits to the Wisbech IPMSmeetings. That'll probably appear in another post, when it's done.
Getting ready to aerosol undercoat a few models in one go.
On this occasion I kept a couple of items - sword/bayonet scabbard, and cartridge box - separate. This was because completely assembling the previous model had made accessing certain areas very tricky. This time I wanted better access to these areas. So I decided to paint the figure pretty thoroughly, and those parts to, but whilst unattached, before bringing them all together.
Starting to block in colours.
Whilst I'd modified the pose of the previous line Infantryman model, I was building this as suggested. But I did still want to jazz it up a little. I thought about doing him as a Dutch Grenadier (all in white, with red facings). But the desire to do it in the same pose and uniform as dad's model won out. The four mods I did were: texturing his backpack (with a heated pin); making a more detailed musket strap; improving the right hand grip on the musket; and a pair of tiny - and I mean teeny-weeny -golden earrings, such as an old grognard might well have sported.
In this pic I'm making a tiny earring for his right ear. Can you spot it?
I forgot to take any more pics for quite a while, becaming deeply absorbed in the processes of detailing, shading, etc. The next few photos are much later, after much to-ing and fro-ing, working very slowly. The shading is starting to cover more areas: backpack, face, waistcoat and leggings, etc.
Starting to do a bit of shading.
My first attempt at attaching the cartridge box and scabbards was a bit off. The cartridge box was ok, but the sword and bayonet scabbard were unsatisfactory, and only very tenuously connects anyway.
The sword and bayonet in fixing attempt no. 1...
In the pictures above and below I hope it can be seen that I textured the backpack, which is supplied as a very smooth boxy thing, to make it look more like a raw cowhide rucksack. I did this by heating a needle-tipped tool I made over a flame. Laborious, yes. But a great result, I think. When appropriately painted, I think it looks rather lovely!
Not sure if you can see, but I textured his backpack with a heated needle.
The last few pictures show how he was looking when I stopped, at about 11pm, having spent most of the day slowly painting him. I spent ages working very laboriously on him. Not exactly time-efficient. But enjoyable. Several areas were worked over repeatedly, such as the tunic buttons, as I kept lousing them up!
This is how he looks at close of play today.
Still needs a little more doing...
I also removed the scabbards, retouched the areas underneath, and re-attached them, but in a better position. They're also more firmly attached as well. Although there's still a bit to do, mostly on his bearskin, such as detailing/shading the cords and tassels, and improving the grenade emblem atop it, that'll have to wait. But in conclusion, I love the kit, and have thoroughly enjoyed building and painting it.
...such as shading of his cords/tassels.
Sword/bayonet in position no. 2.
The two Airfix figures I've made so far.


You have made a good job constructing and painting this figures , nice work .
ReplyDeleteThanks Svjek :-)
DeleteLove them!
ReplyDeleteGoing to pick up on that Spitfire this weekend.
Thanks Matt :-)
Delete