Showing posts with label scratch-built. Show all posts

Sunday, 18 October 2020

Kit Build/Review: Airfix 1/76 Panther #2

White Milliput zimmerit goes on to the hull.


On this second build of an Airfix 1/76 Panther I haven't bothered detailing the box contents or initial build. Instead I've just jumped in at the point where things get more interesting (to me, at any rate!), with detailing the kit. This is part of a current series of 'panzer wrecks' for the battlefields of my putative 20mm WWII wargaming collection.

Rear turret access hatch open.

Chipped zimm...

Zimmerit on the turret as well.

After applying the white Milliput zimmerit to the major areas, I decided to detail a number of other aspects of the kit. Mostly this meant opening a number of hatches; in addition to the easy commander's cupola hatch. In fact nearly all the crew hatches are open. I suspect they all baled out - and sharp-ish, as they haven't destroyed the tank, as per reg's - after hitting a mine and coming under fire once immobilised. The driver's vision hatch and the rear turret hatch (is this the 'loader's hatch'?) both required rather more effort! But I think the results are worth it. 

Both main turret hatches are open.

Driver's hatch also open, as are the two upper hull hatches.

Note different zimm' patterns on turret and hull.

Zooming in on the turret a bit.

Hull glacis up close.

Keen observers might spot that the turret and hull zimm' patterns are different. I've seen this often enough on photos of actual WWII German tanks. But I didn't follow specific reference. I also removed the turret lifting eyes and replaced them with bent stretched sprue, which I think looks a helluva lot better. In addition I scratch-built towing clevises (clevii???), a tow-cable, and added some tools and spare track.


Note missing rear road wheel.

I've scored the kit itself just two and a half 'kreuz this time. Maybe that's a bit harsh? But it is pretty poor. The tracks, for example, are so bad as to be unusable, f-f-f-frankly. Still, it does make a usable base kit for having fun like this with, albeit in the slightly smaller 1/76 scale, as opposed to my preferred 1/72.

Added details: tools, tow-cable, turret lifting eyes, etc.

Am I therefore wasting my time polishing a turd? Perhaps... I've even ordered several OKB Grigorov 1/72 resin Panther track sets. They look amazing online. I want the tracks on this to look nicer than is possible using the awful rubber band jobs that come with the kit. I also took the trouble to make sure the wheels went on without recourse to the oversized 'cap' type doodads that Airfix supply. 

I'm quite keen to add a jack and maybe a bucket at rear. And I may well add the rear stowage bins. Or perhaps jus one? And have the other 'missing in action', with no zimm' where it was... hmmm!?

Sunday, 20 September 2020

Misc: Silicone Moulds & Resin Casting, the Saga Begins (Kind Of)

Ammo from the Hasegawa 88s I previously built.*

* The observant might notice I've drilled out the ends of the spent shells.

Things have gotten a bit asynchronous, if that's a word? What with techy issues plaguing me, from Apple iStuff that holds charge for 2 seconds to Blogger updates that pout the kibosh on the workflow, things aren't as smooth as they might be.

Anyway, the result is that this post ought to precede the last one, but I can't be arsed, faffing about any more than I already have. So here it is. These pics and the accompanying text document the run-up to the previous post, where I poured my first few silicone moulds...

My two main mould forms, ready for the first pour.

I used rice to calculate the approx' volume of silicone I'd need.

Not using the scales yet, but I've marked two lines...*

The thicker lower line is actual volume required; the thinner higher line allows for a little extra, just to be safe.

As can be seen, I built forms using foam-card and, for the two-part mould for all the scratch-built 88mm gubbins, embedded the parts in plasticene, with the added channels for vents/sprues. The ammo is purely for an experimental test moulding: can I reproduce stuff in a one-piece mould and get it all out on long single beam style 'sprues'? The 88mm bits, on the other hand, I'm intending to produce in small quantities, to detail my models.

I mixed the silicone in a disposable cup, and... gulp, poured it.

About two hours later, it looked like this... i.e. much the same!

I spent a fair bit of time after pouring the silicone tapping the forms, and popping air bubbles as they rose to the surface. This was kind of satisfying in the same way that dealing with blackhead can be (overshare?). I now had to wait, between 8 and 24 hours, to de-mould. I'd then be ready to pour a test batch of the ammo. But the 88mm bits and bats would need the second half of the mould pouring first.


Misc: Silicone Moulds & Resin Casting, the Saga Continues...

Two extra last-minute moulds...

The above photo shows my first two silicone moulds to be, er... de-moulded? Is that the right term? At left is my first attempt at an 88mm erdpfahl, or stake. That mould is one-piece, with a slit cut along it longitudinally, on top. In the centre is a repro of a German truck wheel. That is a two-piece mould, but made by cutting a one piece silicone mould in two laterally, around the circumference.

Both of these are purely experimental tests, not for 'production'. The erdpfahl, 'cause it's too crappy, and the wheel, because it's a copy of a commercially available model piece. Anything that I might plan to reproduce for actual use will have to be original, so as to not infringe on copyrights. But in terms of testing out the mould-making process, it's helpful to try out a complex shape with fine detail. In addition, both pieces, the erdpfahl and the wheel, have holes that pass though the whole piece. And I wanted to see how moulding and casting such things worked out in practice.

These two moulds were actually afterthoughts, made with leftover silicone - which had already been left an hour or more - from pouring the two larger moulds I'm making. I really wasnt sure if the silicone was too far gone already. But they appear to be usable, from a brief visual inspection. These moulds have been opened up after about 8-10 hours curing time. I'm going to leave the other larger moulds for the full 24 hours (the product recommends between 8-24 hours).

Tiny ill-formed moulds, made with leftover silicone.

I'm putting this post together without access to my iPhone - battery dead/charging, elsewhere! - on which I have most of the photos of all this process. So I might return to and amend this post, to show more of what I did. But here's a brief summary: The erdpfahl stake is scratch-built from styrene, the wheel comes from a kit, they're both 1/72. I used foam card and plastic (styrene) card to make forms, or enclosures, to hold the silicone. And on these two instances, I rather messily slopped the partially cured silicone into one side of a rectangular or near square form. I then placed this on a small foam card substrate, popped the piece I'm moulding into the silicone, and then plonked more of the blue goop on top. 

The silicone and resin moulding and casting set came with wooden spatulas, like oversized lollipop sticks. I used these to press the silicone and mummified parts into the form. These were then left overnight to cure, and freed from their forms this morning. The moulds needed tidying up a fair bit, as I'd made them in a very messy ad hoc way... the were after all afterthoughts/experiments. And finally I had to to cut into the silicone moulds in order to retrieve the cast objects. One cut along the top of the mould, from the pouring sprue/vent, for the stake, which I popped out by deforming the mould, and an all round lateral circular cut for the wheel (I'll also need to cut a pouring and possibly also an air-release vent for the latter). 

I also had to do some fiddly cutting inside the moulds to release both pieces, on account of the through-holes they both feature. After all this stretching and butchery, will these moulds produce usable castings? I'll have to have a try, and see. In the meantime, I'll try and add more pics from my phone, once that's back to life, and exercise patience re the larger pair of moulds.

Thursday, 17 September 2020

Misc: The Postman Sometimes Rings Twice...

Oooh... exciting!

I'd wanted to title this post 'The Postman Always Sometimes Rings Twice', but I couldn't find a way to get the crossed out text in the title of my post. Hey-ho, never mind. Sooo...

Phwoarrr!!!

A couple of days ago I ordered a few models from Hannants, all German WWII, all 1/72, and all of which, I guess, come under the soft-skin/rear-echelon banner: three trucks and a car. These arrived, very well-packaged, this morning.

Chester enjoys the empty box... bless him!

Chester, our new* and still very young kitten, was almost as excited about this as me. Only, rather like Eeyore, in that touching Winnie the Pooh tale, where he gets a burst ballon and an empty honey pot, Chester was more interested in the empty honey pot than the contents!

* Tigger, our super-fluffy moggins, and occasional star of a post or two online, perhaps even on here, alas, passed away earlier this year.

I'm looking for'ard to building these babies.

Whilst I won't be starting in on any of these new arrivals today, I will be continuing to work in detailing my 88s. I refined some of the parts today, sanding, filing, paring back, shaping, etc. I've also constructed a form for my first resin-casting silicone mould. Today I'm planning to pour the first half of said mould. 

Yesterday I used a hot glue gun for the first time, which was interesting. I think the big bag of glue-sticks I have are poss' meant for a different glue gun, as they seem too thin, and don't feed through the gun properly when I pull the trigger... which is annoying!

I bought some foam card from a shop in Peterborough.

And mixed some plasticene, to set the parts into.

The good, the bad and the ugly...

In the above photograph, the three items in the upper left are rejects: a malformed brass shell, ditto the crappy wobbly-holed erdpfahl, and an ammo box lid that melted into a near shapeless blob. The other bits have been improved, and, bar the wicker ammo box and lid - which need a little more detailing - are ready for moulding. 


Ready for moulding? Hmmm... infamous last words. It's now several hours later, and I'm hardly much further on. I used a technique of mixing Milliput with water until it's so dilute you can paint with it. I then loaded the wire 'wicker' several times. The idea being that whereas before it was full of air, in the voids or interstices between wires, it should now still have the woven texture, but hopefully won't trap any silicone, when I pour the mould.

Re-shaped shell, detailed wicker ammo box and lid, etc.

I also decided, on referring to images of real 88mm ammo, that my live shell needed reworking. That was super-fiddly and took ages. I think I need a mini-lathe of some description, so I can make parts like this more easily. My original version took the Hasegawa ammo as it's starting point, which is much more 'stepped' than the real thing. A strap and buckle on the lid and wicker ammo box completes my pre-moulding prep.

I'm having a break now, and thinking about how on earth I'm going to embed and lay out these tiny ultra-delicate parts. Even though I'm getting next to nothing done, it's quite intense work! I feel drained... 

A bizarre looking little kit!?

And to finish this miscellany type post, the above image shows a strange looking little kit from a range of 1/72 kits I'm intrigued to try out. These kits are currently available very cheap at the Tank Museum's online shop (click here to have a look). It was whilst watching one of curator Davis Willey's back garden based Q&As that I was reminded of these oddities - I'd encountered them before online - as he had one on his table, amidst sundry stuff he's trying to help the museum shop flog. 

Monday, 14 September 2020

Misc: Detailing my 88s...

My collection of scratch-built bits for resin casting nears completion....

Here's where I was at around midday today, having added a three shell wicker ammo-box (inc. lid), a single shell metal canister, and a spent round. These are in addition to the carriage mounts, erdpfahl (the trefoil perforated stakes), a winding handle, and a linkage for the folding legs, that I'd already made earlier.

Making the live shell - the only new element in the second pic, below - took ages. First I tried sculpting sprue using a Dremel style hobby tool. But this span too fast, even wound down to its slowest speed, causing the sprue to overheat and snap. I then tried working with brass. Not having any brass rod, I hacksawed a strip off a piece of brass sheet. I then span that in the drill to round it down. This also overheated and snapped off, long before it had gotten properly shell-shaped.

And bingo... all the sundry elements I'm intending to cast.

So, after numerous failed attempts, I reverted to searching out bits of sprue of roughly the right diameter, that might be viable for the different segments: base, propellant case and warhead. I wound up gluing three different diameter bits of sprue together, which, with some minimal profile shaping, finally gave me a shell I was happy-ish with. 

I think I'll make an initial mould and cast several sets, and then perhaps I'll make a second mould with a proper complement of items; two carriage mounts, four stakes, x ammo boxes and shells, etc. Or maybe the first mould will suffice? I guess I'll see which way the wind blows when the time comes...


Sunday, 13 September 2020

Misc: Scratch-Building Details for 88mm Guns

Making fins for the erdpfahl.

I'm really enjoying learning about the 88mm guns of Germany's WWII arsenal, and building a few models of them. I've decided to take my first steps into casting resin parts. Today I started making several small bits and bobs with a view to moulding them. First, my beloved erdpfahl, and then the carriage-hooks that support the gun between the two bogies. 

As can be seen, above, I tried two sets of erdpfahl, or stakes. The first, on the left, were pretty poor. The second, at right, were more satisfactory. I used the wire mesh to space a series of five pin-prick locator marks, made with my DIY pointy tool. I then drilled through these with a 0.5mm drill bit. Despite it being pretty poor, I put the first one together anyway, as pictured below. This revealed that the 'wings', or fins, needed trimming down, which I've started to do to the second set, as yet unassembled.

Refining the second set of stakes.

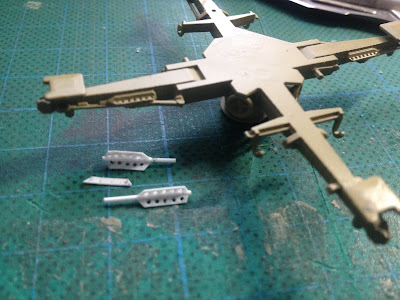
Below, the two erdpfahl, along with a wing or fin template. Upper is the less successful of the two. The lower is the better one. The central core is yet to be sized/shaped. I turned the cruciform base upside-down, so as to compare them with the ones integral to the Zvezda 88mm.

Erdpfahl #1 and #2, and the fin template, alongside the Zvezda example.

Next up, I started on a pair of the mounting hooks. The plan will be to make sets of four stakes, and two pairs of these hook mounts, a few other bits and pieces, such as a couple of crank-handles, linkages (for the folding arms or legs, or whatever they are), and numerous ammo boxes and shells, etc. Once I have a full complement of these oddments, I'll make a master mould, so I can cast complete sets in one pass.

Making a pair of scratch-built carriage mount hooks.

I'm keen to find or make some decent crews as well. I'm not too keen on any of the figure sets I've seen so far. I'm thinking crews in overalls/boiler suits, crews in shorts, crews with braces but no shirts, etc. The sort of stuff you see in many wartime photographs. I've wanted to sculpt some wargaming figures pretty much all my life. I've even tried a few times, albeit never very successfully. So this next step is something I'm both excited and anxious about...

Saturday, 12 September 2020

Kit Build/Review: 1/72 Kfz. 305, Opel Blitz Ambulance, Pt II

Part II of the build of this model.

Ok, so here's a follow up to my recent archival report on an Opel Ambulance Build in 1/72. All of this second post still pertains to the original build, way back at the beginning of the year, during which I started detailing the interior of the ambulance body. In a third post, due soon, I'll be finishing the model with paint and decals.

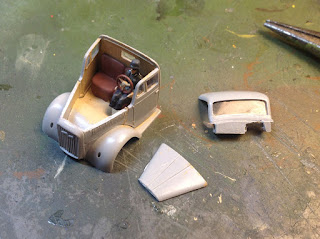
I left off the last post having blocked in some colours for the interior of the cab. Having done quite a few similar builds I felt I was wasting time doing fairly detailed interiors, which wound up nigh on invisible. So I decided to keep this simple. Block colours, no shading, and very little detail.

Introducing a driver figure. Keeping it all very simple.

Starting to put the glazed cab together.

What's with the steering wheel moving 'twixt driver ...

... and dashboard?

Cab more or less completed, next thing was to fix it to the chassis. 

Cab assembled...

... er, that should be fixed to the chassis by now!?

At this stage I decided that, like the British ambulance I built a long while back, this should have opening rear doors and an interior with some detailing/interest. Finding contemporary wartime ref of original German vehicles where the interior was visible seemed nigh on impossible. The image below was the best I could do at the time.

The only view into the interior I could find; poor and limited.

So I wound up referring to this.

In the end I was forced to look at assembly or parts images from 1/35 models, such as the Dragon stuff shown above. More recently I got a load of modelling mags, one of which has a Maultier ambulance with detailed interior as a featured build. That'll be a great help when I get round to finishing the interior, in the third and hopefully final part of this extended build!

Started adding detail to the interior of the ambulance body.

I should've done this before putting the body together!

It's not going to be anything too great, I can see that. Especially since I decided to go down this rabbit-hole after putting the ambulance 'office' space together. Adding detail - and painting it, for that matter - would've been a lot easier whilst this whole assembly remained as separate parts. They say you learn from your mistakes. That's why I make so many... I'm keen to learn!

Thursday, 10 September 2020

Kit Build/Review: Hasegawa 1/72 Flak 18


I do love my 88mm guns! Here's my second by Hasegawa, only this time the 18, not the 36, and my fourth 88mm Flak gun. Whereas the others all had their protective shields, this one is without that feature, as indeed many were. I've also modified one of the wire reels, to show it empty. I did want to have some wire on it, but was unable to stretch any sprues to the right length or thin-ness.

I'm getting into a habit of laying out all parts in groups, for clean up.

Ordered 100 Swann Morton 10A scapel blades. The best!

I noticed in this second build a mistake I'd made on the other Hasegawa gun. But it's only minor - to do with the cruciform gun mount legs/supports (feet?) - and can most probably be easily corrected. I also noted that whilst most of the design of this model is pretty good, one or two steps are s little unclear in the instructions. And some parts could be made to fit better. An example of the latter is the way too large holes for the two levelling wheels on the gun base, which kind of float in a void, until the glue sets.

Here are all my other 88s.

What... no progress? Well, actually this is over an hour later, after all the clean-up.

My obsession with the erdpfahl, or stakes, has made me realise that that's what the two sledgehammers on one of the bogeys are for. Strangely, the two folding limbs of the base have the 'female' holes into which the erdpfahl are driven, in very low relief. But they're not depicted on the fore/aft axis. Bizarre! When time allows I'll be casting some in resin, to further detail all but the Zvezda 88, which actually has them.

The real fun begins...

Bogey number one is done.

Bogey number two (titter...).

The gun itself; upside down to protect those still-gluing delicate little hand-wheels.

Thar' she blows... Note one empty cable reel.

I've another 1/76 Airfix 88 to build, plus bogeys. Think I'll probably do that afore I decide on painting and marking schemes. Plus there's the prospect of some resin casting for extra details, such as erdpfahl and ammo/ammo containers, etc. 

Build wise, it's good to be getting back into modelling. I must confess I'd prefer there to be less clean up time, a stage I find pretty tedious. Review wise, I rate these Hasegawa as both fun to build and decent models of the weapon. A lot of the detail one would hope for is present, such as the fuse setter, sextant, and even the bell (and wiring) on the left side of the gun mount. Zvezda's Flak 36 may have more and better detail. But it doesn't have the bogeys, which is a real shame.