Tuesday, 30 July 2019

Book Review: Polish Guard Lancers, George Lubomski


This book is clearly a labour of love. Put together by an enthusiast who is also a re-enactor, the focus is on uniforms and equipment, as opposed to a history of the actions of the two regiments of Polish Guard Lancers. There are contemporary illustrations, modern ones, and photographs of both original and reproduction items of apparel and gear. Making this a treasure trove to those interested in this most splendid of troop types.

On that last point: the 1st and 2nd Polish Lancers of The Imperial Guard were amongst the finest looking regiments in the finest looking army, in an era that saw what many - myself included - regard as the very peak of martial finery. Or in other words, they are the most beautiful of the beautiful in an age of unparalleled beauty. To my eyes/mind, that makes them a very compelling subject. And this book allows me to wallow in that peacock splendour.

A sample page from the book. [1]

There are one or two critical observations to make: a bit on their operational histories would've been nice (but that's not really what this book intends to supply); and the whole thing has the feel of an amateur enthusiast's self-published work. If I compare it to another book I recently received for review - Toy Soldiers, by Luigi Toiati - the weight of paper, quality of photographs and illustrations, etc, are very markedly different. But despite these differences, this remains a terrific and very useful/welcome addition to my library, on a favourite topic.

The level of detail on uniforms and equipment is amazing. There are even tailor's cutting patterns for various garments, and images that show the several ways the czapka tassels and cords were worn. I have a desire to make myself some Napoleonic outfits - I can't afford to have them made for me by those folk out there who do it commercially - and a book such as this will be a terrific aid in doing so. It's also brilliant reference for the modeller/wargamer.

An oiginal kurtka. [2]

I have a load of AB Miniatures Polish Lancers in 15/18mm, which I intend to paint and base some time fairly soon. I also want to buy/build the Airfix 54mm Polish Lancer. This book will undoubtedly be a great help with these projects. For example, I was fairly gutted to discover - and I only found out when the figures (already paid for) arrived - that the beautifully sculpted AB Lancers have no plumes or cords/tassels on their czapki. I went as far as asking Tony Barton if he would produce a version with these omissions added, but... he declined! So I'll have to find a way to add them myself. This book will be a terrific help.

I've docked half a bicorne for the less than perfect print/paper/illustration qualities here on my blog, where I can deal in 'half-star' values. But over on Amazon UK I give this, and deservedly so in my view, the full five stars. I feel a trifle guilty giving it less than the full five bicornes here, to be honest, as I love it so much, and greatly admire all the work that's gone into making such a fantastic resource available.

An original czapka. [2]

Anyway, in conclusion, if you're passionately interested in this most alluring of branches of the Imperials Guard's splendid cavalry, I'd say this is an essential addition to your library.


NOTES:

[1] The cover and numerous illustrations, such as those on this sample page, are, I believe, by the author.

 [2] I've used original examples of clothing I found on the web, and these may or may not be reproduced in Lumboski's book. They're simply used to here to illustrate the type of material the author uses.

Kit Build/Review: 54mm Airfix Napoleonics, Pt II - Imperial Guard Grenadier, 1815


Well, my 400th post on this here blog. I wanted it to be on something special, to celebrate attaining this... er, well, whatever it is... !? You probably know what I'm driving at!

This kit has a very special place in my heart, as it's a smaller version of a kit my dad built when I was a kid. A kit which was probably instrumental in fomenting my interest in the era. My dad's was the 1/12 kit, which stood on a round base. He had done, as I remember it, a very good job, if also rather basic: blocked out in the appropriate colours, with little or no shading, but very neatly painted. The face looked like it had been done in oils, and had a more detailed washed range of colours, to look lifelike, rosy cheeks, etc.

The instructions.

Unlike some of these kits, this one's only got parts for one pose. What it does have, however, by way of variety, is alternate legs - one pair in gaiters, one in trousers - and an alternate (cord/tassel-free) bearskin. I was intending to use the trousers, and not the gaiters. Perhaps on account of the fact the last figure was in gaiters. But in the end I didn't, because of issues of fit.

The two sprues.

I always dreamed of making Historex 54mm kits as a kid, which I'd see in old copies of Military Modelling. But I never did. Nor did I build any kits like these. So this is all part of an unfulfilled childhood dream finally coming to fruition. Which is rather nice! The parts are nicely sculpted, and pretty well cast, with only a little flash. Clean up was pretty easy and straightforward.

Parts separated and ready for clean up.

At this point everything's cleaned up and laid out ready for assembly, excepting the straps. I was still hoping the trousers would fit, so to speak. But whereas the gaitered legs had a corresponding male notch for the female cleft in the waistcoat, the trousered legs didn't. Something I only twigged when I went to assemble these parts.
Everything cleaned up. Thinking I'll use campaign style legs.

Once the legs, torso and head sub-assemblies were built, I cut the supplied thin styrene sheet into the strips for the straps. I make the musket strap longer than suggested, so I can add more detail, looping it over with buckles, etc. Fitting the straps is quite a tricky stage of the build. Especially when, as I usually do, you balls it up repeatedly! 

Straps cut from the very thin plastic sheet that's supplied.

By this point I've got the full figure assembled, having changed over to the gaiter-clad legs, and with straps and epaulettes all in place as well.  In the picture below I've cut his right hand off, and I'm making a wrist sized wedge to get a better angle/grip on his musket.

Wound up using the gaiter legs, and doing surgery on his right hand.

When it came time to undercoat him in Halfords grey primer, I opted to also undercoat the Hasegawa 1/72 Grant tank I've been building on my visits to the Wisbech IPMSmeetings. That'll probably appear in another post, when it's done. 

Getting ready to aerosol undercoat a few models in one go.

On this occasion I kept a couple of items - sword/bayonet scabbard, and cartridge box - separate. This was because completely assembling the previous model had made accessing certain areas very tricky. This time I wanted better access to these areas. So I decided to paint the figure pretty thoroughly, and those parts to, but whilst unattached, before bringing them all together. 

Starting to block in colours.

Whilst I'd modified the pose of the previous line Infantryman model, I was building this as suggested. But I did still want to jazz it up a little. I thought about doing him as a Dutch Grenadier (all in white, with red facings). But the desire to do it in the same pose and uniform as dad's model won out. The four mods I did were: texturing his backpack (with a heated pin); making a more detailed musket strap; improving the right hand grip on the musket;  and a pair of tiny - and I mean teeny-weeny -golden earrings, such as an old grognard might well have sported.

In this pic I'm making a tiny earring for his right ear. Can you spot it?

I forgot to take any more pics for quite a while, becaming deeply absorbed in the processes of detailing, shading, etc. The next few photos are much later, after much to-ing and fro-ing, working very slowly. The shading is starting to cover more areas: backpack, face, waistcoat and leggings, etc.

Starting to do a bit of shading.

My first attempt at attaching the cartridge box and scabbards was a bit off. The cartridge box was ok, but the sword and bayonet scabbard were unsatisfactory, and only very tenuously connects anyway. 

The sword and bayonet in fixing attempt no. 1...

In the pictures above and below I hope it can be seen that I textured the backpack, which is supplied as a very smooth boxy thing, to make it look more like a raw cowhide rucksack. I did this by heating a needle-tipped tool I made over a flame. Laborious, yes. But a great result, I think. When appropriately painted, I think it looks rather lovely!

Not sure if you can see, but I textured his backpack with a heated needle.

The last few pictures show how he was looking when I stopped, at about 11pm, having spent most of the day slowly painting him. I spent ages working very laboriously on him. Not exactly time-efficient. But enjoyable. Several areas were worked over repeatedly, such as the tunic buttons, as I kept lousing them up! 

This is how he looks at close of play today.

Still needs a little more doing...

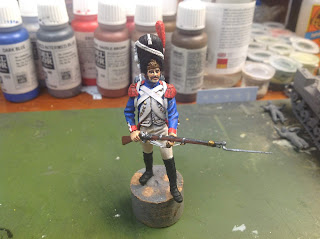
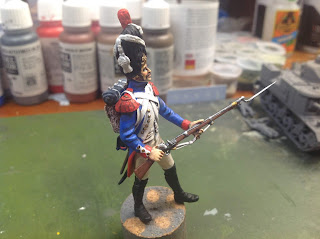
I also removed the scabbards, retouched the areas underneath, and re-attached them, but in a better position. They're also more firmly attached as well. Although there's still a bit to do, mostly on his bearskin, such as detailing/shading the cords and tassels, and improving the grenade emblem atop it, that'll have to wait. But in conclusion, I love the kit, and have thoroughly enjoyed building and painting it.

...such as shading of his cords/tassels.

Sword/bayonet in position no. 2.

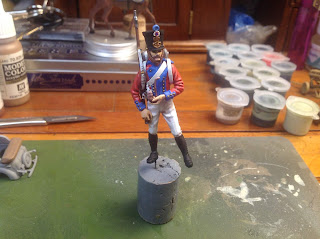
The two Airfix figures I've made so far.

Monday, 29 July 2019

Book Review: Creating Hitler's Germany, Tim Heath


This is a very exciting and readable collage of firsthand accounts, telling the story of ordinary folks, mostly German, and their experiences as part of the evolving story of how Nazism came to take over German society.

Rather unusually for a book of this sort there's no massive lists of official records and bibliography, etc, as the author says all his material was gathered personally, through interviews, letters, email correspondence, and so on. This means we have to take his word on the authenticity of his materials. For now I'm willing to do so. But this does compromise this book somewhat, as the field of Third Reich studies is known for controversy, including the faking of 'evidence'.

But for now I'm giving it the benefit of the doubt. If the materials quoted herein are all genuine, and they all seem plausible enough, the resulting stories are very stirring indeed. They range from folk who were enthusiastic racist Nazis, to those who got caught in the middle, right through to those who were able to escape Germany and observe her self-destruction from elsewhere.

Many would agree that the roots of WWII are embedded in WWI, and that the Allied handling of postwar Germany helped contribute to the unstable situation that gave the Nazis a foothold on the ladder to power. This book follows that line and works through from pre-WWI, WWI itself and the subsequent fallout, through the 'happy days' - at least if you were part of the 'in group' - when many inside and outside thought Hitler's was just what Germany needed, on into and through the maelstrom of WWII.

If it's all genuine, and I hope it is, this is a fascinating and very good piece of social history, showing the many nuanced facets of a dark and disturbing time in the world and particularly German history.

Friday, 26 July 2019

Book Review: D-Day, Philip Warner


Philip Warner's superb book is in fact mostly a compendium of accounts by men who took part in the manifold aspects of D-Day. The quality of these correspondent's writings is variable. But the best stuff is absolute gold.

Warner opts to deploy his sources in a chronological-cum-thematic manner, which is good, as we can concentrate on one strand of action at a time, such as airborne drops, or the naval contribution, tanks, infantry, and so on, and thereby see how the bigger picture unfolds through multiple colourful facets, adding up to an exciting kaleidoscopic view of the whole.

Here's a list of the chapter headings:
I  Invasion from the Air: The RAF, the Gliders and the Parachutists
II  The Navies
III  On The Beach - The Sappers and others
IV  The Armoured Corps
V  The Infantry
VI  Marines and Commandos
VII  Intelligence and Signals
VIII  The Medical Services
IX  The Royal Army Service Corps
X  The Canadians
XI  The Royal Artillery
XII  The Chaplains
The French Viewpoint

The above list conveys both the arrangement of the books contents, and the scale and scope of Overlord itself. One thing that consistently emerges from the many vivid and moving testimonies that appear here is awe at the scale of it all. The book appears under a banner for The Telegraph newspaper, as it was in their pages that Warner published a letter asking for survivors of D-Day to contact him.

Philip Warner's own part in the content is quite minimal, consisting of brief introductory remarks for each chapter, and the selection and arrangement of the firsthand testimonies. These are, unsurprisingly having been collected in the U.K., very much weighted towards the British perspective. Americans and Canadians are mentioned in passing (the latter even having their own very brief chapter), but this is an avowedly and unashamedly Anglo-centric account.

What makes this particular book really enjoyable - thrilling, I would say - is the patchwork quilt of very personal stories. These range from the drily formal 'At 06:00 hours, we...' etc, to the very colourfully anecdotal ('we breakfasted on whisky and Mars bars'!). But, whilst none are Pulitzer Prize winning professional journos, the quality is, by and large, superb. Sometimes poignant, often funny, filled with both pride and humility, and replete with fascinating detail, they bring this gargantuan operation vividly to life in a way little else can.

I absolutely loved this book, and highly recommend it to anyone with an interest in this most momentous day. In one word: brilliant!

Tuesday, 23 July 2019

Kit Build/Review: 54mm Airfix Napoleonics, Pt I - Line Infantryman, 1815

Bagged these cool kits!

At last mondays Wisbech IPMS my pal Sean very kindly gave me four old Airfix 54mm Napoleonic figures. I made a start on the Line Infantryman today. I have a yen to do this figure as a soldier from one of the Swiss regiments in French service. I'm even thinking of perhaps doing him as a drummer. But I'm not sure that that might not be a bit too much for me right now?

The box art kind of suggests many figures!

The instructions, showing the two pose options the kit offers.

Laying out the parts, for prepping/cleaning up.

Note Milliput moustache and shako badges pressed into Milliput.

Major body assembly completed. Not sure what to do with his arms?

I've been tidying the figure up a little; removing mould lines, filling in a dimple in the left crotch - some sort of casting defect? - with Milliput. I even added a Milliput moustache. Just like lots of other stuff, superglue, decals, etc, I found the Milliput would adhere to anything and everything except what I wanted, in this case the figures' upper lip!

Going to leave him now, and let the Milliput set. Tomorrow I'll start doing the plastic card straps and equipment. What fun!

Fully assembled, gun slung over shoulder, and holding a pipe.

As ever, things got pretty tough at various points. Scratch-building a more detailed musket strap was in order. But it turned out to be very tricky. In the end I opted to have his musket sling over his right shoulder, and a scratch-built pipe in his left hand. I guess this makes him a southpaw!? I reckon I'll start painting him today.


Having built the figure, and in a converted pose of my own design, I decided to crack on with painting. After a Halfords matt gray undercoat, I could see a few bits needed filling or sanding. Then it was on to blocking in the colours. And after that came the slow and painstaking work of detailing, and even a bit of shading.


The gray undercoat revealed areas that needed filling.

Starting to block-in colours.

I got so engrossed in the painting I forgot to take any pictures of the various stages. Below are a number of photos showing him as he looks now, at close of play today. I've painted him up as a soldier of the 4th Swiss regiment. I used several reference sources, but chiefly this Carle Vernet. 1812 image, below.

A beautiful Carle Vernet plate depicting the 4th Swiss Regt.

I have to confess I'm actually quite pleased with how he's turned out.

I'm leaving the painting quite basic, not going mad with shading, etc.

I like this angle, 'cause you can see the shape of his pipe.

A slightly closer frontal view.

A change of lighting to add shade/contrast.

Rear view in second lighting scenario.

I'm going to let him dry overnight, then apply a couple of coats of varnish (matt). And then it's a question of deciding how to base him. But that's another challenge for another day.


Cloudy varnish, most obvious on figure's footwear!

Almost looks like shading. 

Bugger! Just sprayed matt varnish on my Airfix 54mm Infantryman, and gloss varnish on a Revell Sopwith triplane. Both have gone 'cloudy'. Its ludicrously hot and humid right now. Plus I didn't shake the cans enough. And it's also very humid. So a 'perfect storm' of causes concatenate and all my hard work painting is jiggered. I've read online and watched some YouTube vids, mostly suggesting either a gloss coat and then another matt coat (if required), or... olive oil! Anyway, I think I'll try gloss coat first, applied with a brush this time... fingers crossed!


Gloss overpainting didn't do the job.

Hmm? Sadly the extra coat of gloss varnish didn't do the trick. The picture above was taken after a hand painted application of gloss varnish to the most affected areas. The shako and shoes/gaiters still look awful. So I'll be overpainting them in black, to remedy this. Hopefully this experience will teach me to be more patient when applying varnish?

Sunday, 21 July 2019

Kit Build/Review: 1/72 Airfix Spitfire


I built this kit, painted the pilot/cockpit, masked the canopy and undercoated it all in Halfords grey primer, some ages ago. In fact, if recall aright, I purchased the kit whilst holidaying in Suffolk many moons past. So it's been a long while gathering dust in the meantime. But as I've dusted off and completed the Me109 I started around the same time, I figured I ought to try and finish this an' all.

Oh dear! Masking bleed agogo!

Rather annoyingly I forgot to take any pics of the various masking stages on the airbrushing shift. The underbelly colour - a beautiful pale eggshell blue - went on pretty nicely. And this was using the cheapo acrylics Airfix supply in some of their 'glue, brush 'n' paints included' kits in my airbrush (with a couple of drops of water added). 

I opted to do the green next, and the brown as the final colour. Again, I used the supplied paints. One reason for this is that all my Vallejo colours are either general purpose, Napoleonic, or WWII German oriented. So I didn't have any of the right shades for RAF WWII, other than the little pots supplied with the aforementioned all in one Airfix kits.

And underneath as well, though less awful.

The Brian and green colours look lovely, and very RAF, and the green even behaved itself well. Only the brown gave me any issues. And I think I must've over-diluted it, as it ran or bled quite badly under the masks. Mind you, I was largely masking using some cheap low-tack decorators masking tape, which has the nasty habit of occasionally coming away from the model surface.

Tidied up with patient brushwork.

Ditto the belly.

Anyway, using leftovers from the little pots of acrylic, I was able to tidy up the paint job with some patient brushwork. I've discovered that I like a flat-head brush for this task. Next I need to get in and paint some little bits 'n' bats, like tires, nose cone, props, etc. Oh, and those little red bits where the guns are, in the wings. And then it'll be gloss-coat and decal time, a step I always enjoy as it brings a certain finish to the look of the model.

The side fuselage markings seem rather oversized!?

I tried airbrushing a gloss coat on. Didn't go well. Humbrol clear gloss bunged up the airbrush something awful, necessitating a comprehensive strip down and clean. I seem to do end as much time doing that as airbrushing. Probably more, in fact. And, ass ever, applying decals was a bit of a bugger. They seem, rather like superglue, to adhere to everything other - fingertips, for example - than the model surface. Even with Decal Fix applied.

I've lost the box and instructions for this kit, so I had to use ref for the placing of the decals/markings. The side fuselage markings seemed rather oversized. And the roundels? Well, I'd have liked some fir under the wings as well as the top surface. The tail fin tricolour will need trimming off a bit with a scalpel.a d there are tons of tiny decals for sundry technical markings, still to be applied. But, as ever, decals do add a nice degree of finesse.

This was handy reference...

... as was this.

Both of the above A4 glossy mag format publications were useful for colour and markings reference. That said, there's still a fair degree lacking, in terms of explanations of different colour schemes, and things like landing-gear, propeller blades, etc. And neither book seems to include all of the myriad  sundry body markings that are supplied in the Airfix kit in Decal form. So I guess I'll have to try and scour the interweb for an online example of the instructions.

I used the supplied decals for the little red squares over the gun ports.

...