Thursday 24 September 2020

Kit Build/Review: 1/72 Build & Play Sturmtiger


A few days ago I mentioned this kit in another post, and today it arrived, from the Tank Museum, Bovington, in Dorset. I also got their Dorling Kindersely Tank Book. I love both. In fact, I was so excited about this strange but very affordable kit I built it straight away! the brand, A to Z Build & Play is new to me. I'm only aware of a few 1/72 models by them, almost all of which are german WWII AFVs.
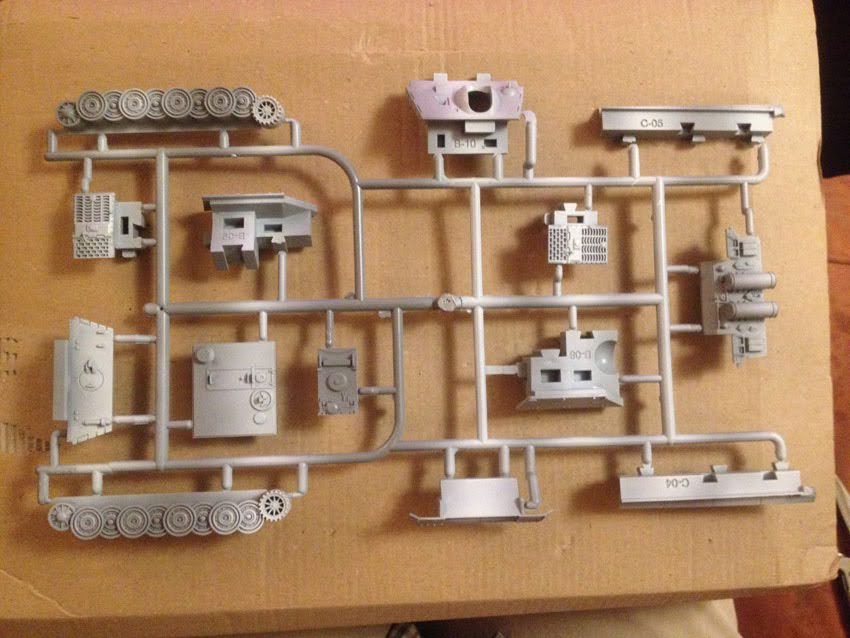
Just looking at the sprues you can see it's not your ordinary Airfix or Revell or whatever style of model. It's more like a kind of mutant Lego. The gray sprues, which seem to be good quality styrene, are lightly sprayed with some white paint, almost mimicking a camo' scheme. Hardly any, to be honest, thankfully! 

The plastic itself feels great, and the quality of the casting is superb. Almost no flash, very few ejector pin marks, and cleaning off when cut from the sprues really cleanly and easily. Many seemingly nicer looking kits, with lots more parts and detail, can actually be a real arse-ache in that they require aeons of time and way too much energy spent cleaning up.
The first bummer is that the rubber band tracks are pretty crappy. But if this is destined for tabletop gaming, and not the model showcase or a museum quality diorama, one the model's finished, they could be used perfectly serviceably. But they would require cleaning up a little. Unlike the rest of the kit, there's some flash along the edges in places.

The instructions are verging on clear enough, but contain some hilarious gaffes. Some linguistic, some just plain silly, such as the picture of the Stug model being labelled with the name of the font! Obviously someone had simply forgotten to type in the title for that particular image. For a fraction of a nanosecond I thought, 'Wow, I never knew there was a tank called the 'Name Of Typeface'... it looks just like a Stug!'
Unlike most kits in this scale, which will have a mainly hollow interior, and weigh next to nothing, this is a solid and even relatively weighty affair, that builds up like a hybrid between Jenga and a mutant form of Lego bricks. No glue is required. But I slathered some Tamiya liquid cement on to various surfaces anyway, as I want the model to remain a cohesive unit.
Once the core of the body is assembled, the 'cladding' elements turn it from a nonentity, into one of my favourite looking German AFVs, all squat and mean, with that fat snub nose. And this kit is the best I've built in a while for the containment and functioning of the gun elevation. And unlike the AMC Models 1/72 Sturmtiger kit I built many moons ago - that one wound up having the gun glued in place, allowing no movement at all - this also has the cooling channel detailing in the end of the muzzle. How cool, literally, is that?
In next to no time, the kit is build. I found it tremendously fun, largely on account of how quick and easy it was. I do love the more detailed convoluted builds. But sometimes they can be pretty draining. And if they're involved enough, they may see one going through hills of joy and valleys of despair. this was pure unadulterated fun from start to rapid finish.
I think the following pictures - and the sheer number of them is a testament to how much I like this model - show the Sturmtiger in a pretty durn good light. If one so desired, and I might, one could have their way with this, and get in like Flynn on upgrading and detailing, etc. I think I'll do a few bits in that line. I might add some zimmerit, and there are one or two other minor details that could easily be improved. I don't think I'll bother with the ammo crane. Or, if I do add it, I'll probably have it in a stowed/out of the way manner.
Is this Sturmtiger pleased to see us, or has it just got a high-elevation gun in it's pocket? And check also the cooling vent holes around the muzzle. If I'm able to see clearly enough, I might drill those out a little deeper. I might also upgrade the machine gun, as the integrally moulded one is, per'aps a touch too basic. The rear engine deck detailing, and some of the welding seams are a bit overstated. But I actually like this, as I think at this scale, if that sort of detail were rendered in perfect scale, it'd practically disappear.
The tracks and running gear are the only area where this kit falls somewhat shorter. Viewed at a glance, or from distance, the crisply moulded side-view detail of the wheels is actually magnificent. But closer inspection reveals that the outer wheel surfaces are purely smooth tubular affairs, as is the inner face of the tracks.
These final two shots are taken in lower light... obviously! I think the model looked even more atmospheric, so I continued snapping away! I reckon I'll buy and build a few more kits from this range. Some of them are stooopid cheap, at £2.99 a pop! (At the Tank Museum's online shop, at any rate.) They may not be showcase quality models if simply built out of the box. But they suit wargaming, being chunky and very solid. And with a little finessing they will undoubtedly scrub up even better.

If I manage to find the time tomorrow, I'll do a bit of detailing, and maybe even get to painting and decaling... that'd be a first for me, in absolutely ages, turning a kit around in just two days. Hmmm!? We shall see...

Tuesday 22 September 2020

Misc: The Saga Slows Down...

Newly arranged sub groupings start to take shape.

Ok, so here I am, on Tuesday, having separated all the 88mm stuff into four groups last night. And made three sprues up. I've endeavoured to make the casting and venting pipes, the ingress of resin and the air egress, bigger. Hopefully on my next casting session, the resin will reach all the nooks and crannies.

All four sub-groups, on their own sprues; larger casting and venting 'pipes'.

With all four groups 'sprued up', it was time to make the silicone pouring forms. I took a tip from some of the online videos I've seen, and made the foam-card forms two-part. As a one-part arrangement, previously, it was very tricky trying to work in such a tiny confined space. This method allows one to work on the bottom half first, embedding your objects and levelling your plasticene, etc. And then you put the top part on to pour the first silicone part of the mould.  

Working on creating two-part forms for moulding.

The final pic, below, shows all the lower halves, filled with plasticene, awaiting the trimming of the casting and venting sprues and the embedding of the parts. I did this around lunchtime today. And I'll probably come back and add to this post later, once I've got the objects embedded, and the other halves of the forms in place.


At that point, it'll be time to add mould release - I'll add more, and be more scrupulous about it - and mix and pour another batch of silicone. I desperately hope that this time I succeed! 


Lubed up, forms built... ready for the pouring.

Some considerable time later the same day: I lubed the moulds with vaseline - and not mould release (that's for the second silicone pour, and not for using on the plasticene... I discovered!) - super-glued the top parts of the forms in place, and poured part one of each two-part mould. Those two steps looking as illustrated in the two pics, just above and below.

And there they are. Now comes the waiting...

I guess-timated the quantity of silicone I'd need, at half as much as I'd used on my previous attempt. And, somewhat miraculously, that proved to the perfect amount... phew!!!

Misc: the Saga Takes an Unfortunate Twist

Casualties of war... a load of busted micro-drills.

Oh dear... oh dear, oh dear, oh dear. 

My first moulding and casting experiment has been pretty disastrous. The casts were, with one iffy-ish exception - ironically the duff old erdpfahl (see two pics down from here) - appalling. I think this was caused by several factors. The chief one being crap mould design. I tried to pack too much into one mould, and I didnt go about the mould design and construction carefully or cleverly enough.

More casualties of war... first resin castings, a dizzzaster!

Sadly this means my two bigger moulds are most likely costly junk. Certainly the ammo mould doesn't work, as witness the above picture; contrast the part to be cast, bottom, with the casting itself, above/middle. I've yet to try casting the multi-part 88mm gubbins mould. But the second half of that cured in such a way that prising them apart was all but impossible, despite my use of the mould-release liquid that came in the casting set. So the mould is likely to be both damaged, as well as being crap to start with! I will cast with it, at some point. But I don't have high hopes for the results.

All the bits I cast: only the erdpfahl is tolerably ok.

One thing to come out of all this is a substantial re-design of the 88mm sundries, as can be seen in my next post. I've unpacked all the various bits, and wound up with four sub-groups. I've also taken more care with the forms, adding bigger and more plentiful pouring and venting openings. I'm hoping with better care and diligence this next time, I can get better results.

Monday 21 September 2020

Book Review: Mittlere Geländegängige Lastkraftwagen (o) - Holger Erdmann (Nuts & Bolts, 32)


I'm gradually discovering that I'm borderline obsessed with WWII German rear-echelon stuff. I especially love their trucks. So Nuts & Bolts #32, dedicated as it is to a group of German trucks, would seem made for me. Published by a German company, the title is rather verbose and unwieldy, as indeed the German language itself so often seems to be: Mittlere Geländegängige Lastkraftwagen (o), The medium cross-country lorries 3 ton (6x4) of the Reichswehr and Wehrmacht. What a mouthful! I can imagine an American version being titled 3-ton Trucks of the Wehrmacht, or something equally pithy and to the point.


I'm illustrating my review with sample pages from the publisher's website


I bought this rather costly but very nicely produced tome - as well as being very well printed on good paper it's also satisfyingly thick and weighty - at a model show in Folkestone, several years ago now. Since buying it, I've enjoyed numerous episodes of slavering over the huge array of contemporary photos, ranging from the 1920s to wars' end. And as well as plenty of black and white archival imagery, there are scale line-diagrams, colour profiles, plentiful colour-photographs of surviving vehicles in great detail, and several model builds. A real treasure trove!


Some of the photographic material is stunning.


The bilingual body text and captions are in English and German. I found the textual content pretty heavy going. It's incredibly detailed, and not always couched in prose of the finest clarity (this might in part be due to translation issues). Indeed, the body text is so arduous I've only dipped into it thus far.  


If the main text can be challenging, the photographic captions are where, for me, things occasionally become note-worthily poor. It's rare that the year or exact location of a photo is given, and sometimes the associated captions comment on some tiny detail whilst ignoring other more fundamental or interesting aspects of the image. Personally I think that all the archival images in such a book should give both date and location info (or a best guess), as a matter of course. 


Scale diagrams are useful. 

As are the excellent colour profiles.


And in a similar vein, the way the model builds appear (one is thrown straight in on the inside cover, for example, part way through and with no contextualising info at all), combined with the lack of clear signposting re the scale or the name of the manufacturer of the core kit, seems remarkable. And, until now, I haven't even mentioned the total lack of either a glossary or index. These publications exist in a hinterland between books, where such things are more normal, and magazines, where they aren't. But as this is clearly a reference work, they would make it a far better one, if included. So, for me there are a few issues that, if addressed, could markedly improve this book. 


Surviving examples are sumptuously illustrated.

Several models of these vehicles are built and illustrated.

Nevertheless, this is still a terrific resource, and a very welcome reference work for the wargamer, modeller or WWII materiel buff. I hope they do more publications on similar subjects. I'd certainly like to acquire their titles on Maultiers and RSOs. But, as great as this is, there's certainly still room for improvement. 

Sunday 20 September 2020

Misc: Silicone Moulds & Resin Casting, the Saga Begins (Kind Of)

Ammo from the Hasegawa 88s I previously built.*

* The observant might notice I've drilled out the ends of the spent shells.

Things have gotten a bit asynchronous, if that's a word? What with techy issues plaguing me, from Apple iStuff that holds charge for 2 seconds to Blogger updates that pout the kibosh on the workflow, things aren't as smooth as they might be.

Anyway, the result is that this post ought to precede the last one, but I can't be arsed, faffing about any more than I already have. So here it is. These pics and the accompanying text document the run-up to the previous post, where I poured my first few silicone moulds...

My two main mould forms, ready for the first pour.

I used rice to calculate the approx' volume of silicone I'd need.

Not using the scales yet, but I've marked two lines...*

The thicker lower line is actual volume required; the thinner higher line allows for a little extra, just to be safe.

As can be seen, I built forms using foam-card and, for the two-part mould for all the scratch-built 88mm gubbins, embedded the parts in plasticene, with the added channels for vents/sprues. The ammo is purely for an experimental test moulding: can I reproduce stuff in a one-piece mould and get it all out on long single beam style 'sprues'? The 88mm bits, on the other hand, I'm intending to produce in small quantities, to detail my models.

I mixed the silicone in a disposable cup, and... gulp, poured it.

About two hours later, it looked like this... i.e. much the same!

I spent a fair bit of time after pouring the silicone tapping the forms, and popping air bubbles as they rose to the surface. This was kind of satisfying in the same way that dealing with blackhead can be (overshare?). I now had to wait, between 8 and 24 hours, to de-mould. I'd then be ready to pour a test batch of the ammo. But the 88mm bits and bats would need the second half of the mould pouring first.


Misc: Silicone Moulds & Resin Casting, the Saga Continues...

Two extra last-minute moulds...

The above photo shows my first two silicone moulds to be, er... de-moulded? Is that the right term? At left is my first attempt at an 88mm erdpfahl, or stake. That mould is one-piece, with a slit cut along it longitudinally, on top. In the centre is a repro of a German truck wheel. That is a two-piece mould, but made by cutting a one piece silicone mould in two laterally, around the circumference.

Both of these are purely experimental tests, not for 'production'. The erdpfahl, 'cause it's too crappy, and the wheel, because it's a copy of a commercially available model piece. Anything that I might plan to reproduce for actual use will have to be original, so as to not infringe on copyrights. But in terms of testing out the mould-making process, it's helpful to try out a complex shape with fine detail. In addition, both pieces, the erdpfahl and the wheel, have holes that pass though the whole piece. And I wanted to see how moulding and casting such things worked out in practice.

These two moulds were actually afterthoughts, made with leftover silicone - which had already been left an hour or more - from pouring the two larger moulds I'm making. I really wasnt sure if the silicone was too far gone already. But they appear to be usable, from a brief visual inspection. These moulds have been opened up after about 8-10 hours curing time. I'm going to leave the other larger moulds for the full 24 hours (the product recommends between 8-24 hours).

Tiny ill-formed moulds, made with leftover silicone.

I'm putting this post together without access to my iPhone - battery dead/charging, elsewhere! - on which I have most of the photos of all this process. So I might return to and amend this post, to show more of what I did. But here's a brief summary: The erdpfahl stake is scratch-built from styrene, the wheel comes from a kit, they're both 1/72. I used foam card and plastic (styrene) card to make forms, or enclosures, to hold the silicone. And on these two instances, I rather messily slopped the partially cured silicone into one side of a rectangular or near square form. I then placed this on a small foam card substrate, popped the piece I'm moulding into the silicone, and then plonked more of the blue goop on top. 

The silicone and resin moulding and casting set came with wooden spatulas, like oversized lollipop sticks. I used these to press the silicone and mummified parts into the form. These were then left overnight to cure, and freed from their forms this morning. The moulds needed tidying up a fair bit, as I'd made them in a very messy ad hoc way... the were after all afterthoughts/experiments. And finally I had to to cut into the silicone moulds in order to retrieve the cast objects. One cut along the top of the mould, from the pouring sprue/vent, for the stake, which I popped out by deforming the mould, and an all round lateral circular cut for the wheel (I'll also need to cut a pouring and possibly also an air-release vent for the latter). 

I also had to do some fiddly cutting inside the moulds to release both pieces, on account of the through-holes they both feature. After all this stretching and butchery, will these moulds produce usable castings? I'll have to have a try, and see. In the meantime, I'll try and add more pics from my phone, once that's back to life, and exercise patience re the larger pair of moulds.

Saturday 19 September 2020

HELP!!! New Blogger Interface Doesn't Work...


It's a while since I made this initial post. When I made it, it had no content whatsoever, just the appended comments. They were the only content I could add from either my iPhone or iPad. Things haven't changed, and it's definitely heftily impacted the ease with which I can post. Most annoying!

The skull and crossbones image was a later addition, done on my desktop iMac, the only device of mine on which I can now continue posting to my blogs. Below is a screenshot taken at the time of the original failure to post. I think taken on my iPad?

Ah, the joys of blogging...

I was able to add/edit a title... but there were nowt doin' in the big blank space below. And so it remains. I'm having all kinds of other issues relating to the whole 'Apple wants to run your entire life' situation, which includes their desire to dictate what gear you have and, even more insidious, how you use it. Anyway, the upshot is that I'll have to cave in, sooner or later, and update my Apple tech. Or... and oh boy am I tempted, bin the whole oh-so precious Mac mallarkey and enter new pastures.

My only issue with this latter idea is, that, like modern TV - so many channels, so little worth watching on - we live in times of, perhaps (and then again perhaps actually not) more choices than ever. But it does kind of depend what the choices are. So there may be more. But they might all be more or less the same, and all equally good/crap. 

This is certainly true of things like tech services and utilities. Yes, there's lots of choice. Too much,  in fact, inducing what I call 'consumer blackout. But all the choices are essentially almost imperceptibly different shades of the same shitty packages: overpriced, with execrable so-called 'customer service' (customer contempt, more like), and giving you only options that suit the seller or provider, noit the user or consumer.