Saturday 30 May 2015

1/72 WWII - Plastic Soldier Pz. 38t & Marder Variants


Although I bought a Plastic Soldier German tank detailing set (tank crew figures, stowage, spare-wheels, etc.), a little while back, this box of three vehicles is my first proper kit from this (to me) new brand. I've been reading more on Barbarossa generally, and Stalingrad in particular, and several great pics of Marder variants encountered whilst reading got me thinking about buying some.

And then, rather serendipitously, the day after the reading and pics had got me all excited about Marder self-propelled guns, I saw this set at the model shop in Ely*. 'Twas a no-brainer! The kit was rather pricey, at £16.95, but then again you do get three vehicles. I initially intended to make three identical vehicles, settling on the Sd.Kfz. 138. But after building one I changed tack, and ended up constructing all three of the possible tanks. I figure that's more educational, and certainly it's more fun!


Sd. Kfz. 138, Marder III Ausf H


A working Marder III Ausf H.

First off, I built the 138 variant, a Marder III, Ausf H, sporting the 7.5 cm PaK 40 anti-tank gun. 

This, to me, is the most aesthetically pleasing of the three models one can potentially construct using the parts on offer here. It has a lower profile, the front and side armour looking more akin to other small self propelled German guns than the 139, with its rather eccentric almost ziggurat like profile. It's actually the Ausf M variant that I like the look of best though (this latter variant most closely resembles other small self-propelled guns such as the Wespe; I'll have to buy/build the Attack kit for that!).

This build is, for the most part, extremely simple. Plastic Soldier kits are chunky and robust, making them ideal for wargamers who want to handle their models a lot. Their is a corresponding lack of fine detail, especially noticeable on the tracks which, due to the moulding process, don't depict the inner 'teeth' properly. But the advantage is that these tracks come as an über simple one-piece clip-on assembly, with track sag already modelled.


On all of these vehicles I opened holes in the exhausts and muzzle brakes, and on the two Marders I opened up the holes for the barrel on the gun support. On the 138 I did some detailing of the gun, opening the recoil channel, as well as some other holes on the breech end. 


In the pics immediately above and below, I wasn't sure about the possible use/positioning of th two seated crew figures. Rather annoyingly there's nothing at all on the box or in the instructions regarding the figures or the seats that come as part of this set. I ended up cutting the legs off one figure, as an experiment. This casualty of war is probably going to be retied from active service!

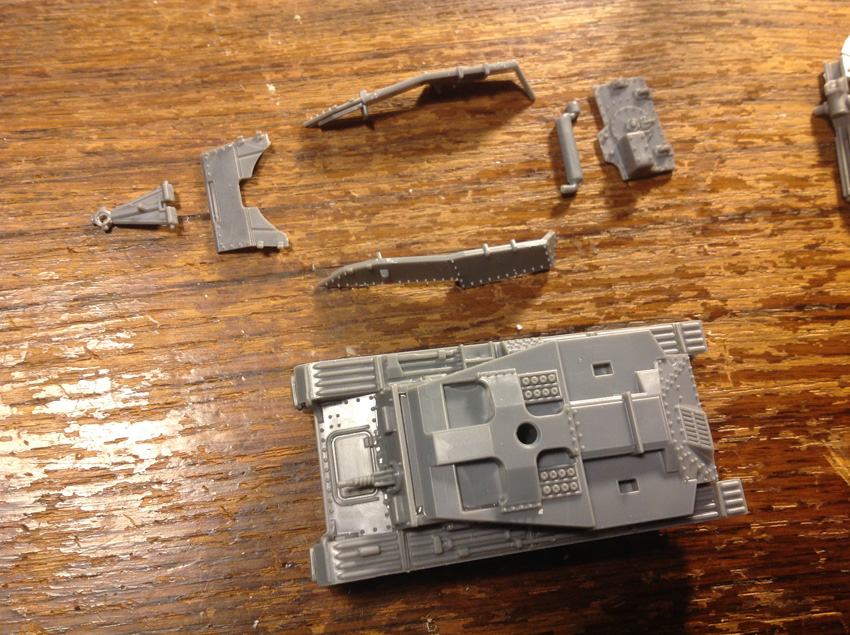
At this point the top plate of the fighting compartment is not attached. I'm wondering whether to attach it or not, in part influenced by the need to have access to the inner parts of the fighting compartment in order to paint it all properly.


The 138, mostly built, in the background, with a 139 being built in the foreground, and on the left, the various crew figures being cleaned up and assembled. The top fighting compartment plate is not attached yet, but just sitting in situ, helping me to decide whether or not to model it with this part in place or not. I'd also not yet put the rear hull plate or exhaust on the 138 yet.


The instruction sheet, whilst very nicely printed, and quite ingenious - the colour coding of the variant parts is a clever and useful idea - isn't 100% clear or comprehensive: certain parts aren't shown being put in place, but simply appear as if by magic, and could be missed if you aren't careful. The rear deck of the 138 is an example in this first build.

The 138 the simplest of the three to make, as the turret of the 38t and the gun of the 139 are both more involved. I'd like a few more of these for my Ostfront army, although I'll probably want them to be Ausf M rather than Ausf H variants. I reckon I'll try some other brands next, and go for the more detailed Attack (Ausf M) or Italeri (Ausf H) versions [1]. 

I will also want to detail them all, with crews and various odds and sods. One thing I see a lot of on old photograph reference material, but are very rarely contained in model kits (in fact I don' think I've ever seen a 1/72 kit with one!?), are buckets!

Panzer 38(t)

I was initially a bit resistant to making this rather poxy looking little Czechoslovakian light tank, feeling to was a bit too 'early war' for my projected late-war Ostfront campaigning. But, as I said above, I eventually opted to build all three variants, for added variety, and just for the fun of it. It's a funny looking beast, all covered in chunky rivets! If you want to know more about the history of this tank, the Wikipedia link (Panzer 38) is informative.


There's the option to add either a closed or an open cupola, and there are two commander figures that kind of 'plug in' to the large sockets in the turret (both cupola and figure plug in to their own respective sockets!). I opted for the figure that protrudes further from his cupola, with his left hand up to his 'cans'. It's a pity this left arm is sculpted/moulded so rigidly in line with the body, as it looks very unnatural!


For the commanders of the other two vehicles - see pics right at the bottom of the post - I'm opting for guys with binoculars, as if the self-propelled guns are out on a hunting patrol. Both are used as supplied. But I did do a minor conversion on one figure, removing his overly long right arm, and turning him into another binocular wielder!


Sd. Kfz. 139, Marder III Ausf with Pak 36(r)

It was actually several photographs of this rather odd looking high profile variant that got me started on this whole Marder III jag. These have a more open topped fighting compartment than the 138, with a bar over the top. Some of the photographic ref I've enjoyed studying shows the fighting compartment shrouded in a wet-weather hood. 

There are also numerous photos of these vehicles with various tarps or other things (like camo' nets) over sundry parts, from the muzzle to the gun hinge area, or even the whole fighting compartment. I'd like to attempt to model something along such lines in some form at some point. Some day, eh? But I'll probably save such experimentation for another iteration! And as already mentioned in relation to the 138, I also want to cover these with lots of ephemera, as most the photos of these vehicles show them festooned with all kinds of military gubbins.

This was a more complex build, because of the fighting deck and gun. Wheats the gun for the 138 was a simple one-piece moulding, this [guntype?] was a multiple part affair. What little scope their is for vertical movement is, rather sadly, constrained by the top of the guard. If I build another of these I might try and fiddle with this so as to get more movement. Mind you, the 138 and 38t guns are all fixed.


These was a fault - see above pic - with this kit not applicable on the others. This was caused by detail on the right side hull panel (a moulded in place spade) which doesn't allow the part to fit where it's meant to, as the space allocated (behind a moulded in situ box on the mudguard) isn't large enough. My solution was to remove the spade. My cheap chisels totally failed! So I used a scalpel and some files to get rid of the the spade. I would've liked to have lifted it off intact, for use elsewhere, but I failed to do so!


I wish I'd taken more pics of the construction of the gun! It's a fun thing to put together. This vehicle variant sported a captured Russian gun, hence the (r) in Pak 36(r). In fact, should it be Pak 36? Or ought it not be Pak 76? as the gun was a 76mm calibre affair. It has a very distinctively oversized muzzle brake, which looks pretty cool. This gun and the high ziggurat-like profile give this variant a very distinctive and slightly anomalous look, suited to the hybrid nature of its derivation.


The sprues contain some spare track and one or two other bits (rope, a Jerry can), plus I have lots of useful stuff from my previous Plastic Soldier purchase. But I think I'll get some Black Dog stowage, and some sundries like extra helmets, and - if I can find some - some buckets! They'll all be in basic dunkelgelb unit, I can decide on any further camo schemes.


Above and below, the three (more or less) completed models, on parade if you like. In the pics below I added a figure to the two open topped vehicles, just for visual appeal, really. There are various sundry bits to add, inc. a part that looks like the rear basket/net of the 138, which I assume is an equivalent arrangement for the 139. But this is one of the parts (like the seats of the 139) that there are no references to at all in t eh instructions.


* City Cycle Centre, the last and most local of that dying breed, the high street model shop.

----------
NOTES:

[1] The Italeri kit is in fact an old reboxed and rebranded Esci kit.

Wednesday 27 May 2015

Book Review - Modelling Trees, Gordon Gravett


I've reviewed this book here and over at Amazon UK, having just used it to help me complete my first two tree models (as blogged in my previous post!). I've given this book five stars over at the Amazon website because it is excellent, being both inspiring and informative. 

But I do have one or two little quibbles. My chief gripe is that various techniques are mentioned without a full break-down. E.g. the use of 'Artex' is referenced on numerous occasions, as a means to create the body of the tree, but - and I hope I simply haven't missed it? - nowhere could I find any guidance on what ratio of the various ingredients (Artex, PVA, water, or whatever) to mix. The same applies to mixing PVA and water in other situations. I'm sure I'll develop my own knowledge given time, but approximate pointers would've been very welcome and useful, and would improve the book.

But this aside, the book is great, and as mentioned above (and in my previous post!), at the time of posting this review I've just finished my first two trees. I'm working in a much smaller scale, by the way - making trees for 6mm and 100mm scale wargaming - whereas Gravett is making much bigger (and more detailed) trees for model railways in HO/OO scale (1/76). [1] I'm not a railway modeller, but I can see why people get as into it as Gravett has; the results he achieves are simply stunning!

----------
NOTES:

[1] HO and OO are actually different scales, but both use the same gauge. Confusing, eh? This link explains.

Tuesday 26 May 2015

Scenic Stuff - Small Trees

My first scratch-built trees!

One of my ambitions with my 'one day I'll...' wargaming world, a world of glacially slow movement towards nebulous goals, is to have beautiful battlefields, as much like movable dioramas as I can manage. To this end I have heaped upon myself, in addition to the myriad other fractured paths I'm following, the task of building bespoke a forest of trees.

To achieve this I thought I'd better tap into some experience and expertise, i.e. read online and/or buy a book. So, after a fair bit of online research, I got this one:


I'm very glad I did, because, whilst this isn't a perfect book, it's certainly what wanted and I needed, and has really helped me achieve results I'm reasonably pleased with right from the get go. So, whilst I haven't exhaustively documented the building of my first pair of trees in my mooted forest, below are a few pics of some of the stages so far.

My first two trees were made, I think, from electrical wire, which I stripped out of some old discarded leads. Little bundles of copper wire were twisted around themselves in groups of three or four strands, and theses sub groups - the bigger branches with their bifurcating offshoots - were twisted together in groups of four or five. 

The final twisted grouping was the trunk, with the first set of twists making the larger branches, and the individual wires the smaller branches. I drilled small holes in some free thin circular MDF bases I acquired free at one of the several wargames shows we've recently attended, and cemented the trees in place using superglue.


The trees were then 'painted', first with a dilute mix of PVA wood glue and water, and then with a mix of 'artex' type powdered plaster, with more woodglue and a little water. The plaster hardens to form the white trunk and branches above.

Below are the trees after they've been sprayed in a black base-coat. The Adler Young guard figures are just there to give an idea of realtive scale. These first small trees are really being made for my 6mm wargaming battlefields, althought they'll probably also double as smaller shrubs/bushes, etc, in the larger scales.


A lick of acrylic paint gives the first hint of how these might ultimately look. At present they look, to me, pretty horrible. I've decided that individual strands of copper wire as thin as what I've used here are too thin. My next sets of trees will use different and thicker wire, so as not to wind up so delicate and easily damaged as these have turned out.


Standard Milliput and some scenic sand was then used to model the bases for more interest. These two trees were totally ad-libbed, shape-wise. The one at left looks a bit like a fruit tree (some nice vintage apple variety, perhaps?) in an orchard, whilst the one on the right is like a small garden tree, with the branches starting higher up, and a more compact,dense and evenly spread canopy.


You can't really see this in the pic below, but next I sealed the scenic sand onto the base with a mix of PVA and water. The pic below was angled low so one can see the different shapes of the two trees better. Sadly this was taken on my iPhone, and the damn thing focussed on the backdrop rather than the trees!


The bases painted in acrylic brown. These will be gone over again later, in several different shades and washes, before grass flock etc. gets added.


And finally, although they aren't quite finished yet, I added some 'clump foliage' I used different types and shades for each tree. The small 'garden' tree on the right was fairly easy to do, whereas the 'apple' tree was damned hard work. I used PVA to attach the foliage.

I'll probably be working more on the trunks and branches, using paint to develop them a little (perhaps even adding some splattered lichen to the apple tree?), working up the bases, and then finally coating the entire thing in a coat or two of aerosol matt lacquer.


Anyhoo, all things considered, I'm pretty happy with these. Especially for a first attempt. I hope with time I'll get better, and - crucially - much quicker! I've learned several things, as a result of which the next batch will have slightly simpler armatures, and be made from thicker more resilient wire.

I've been collecting photographic tree reference - arboreal portraits, I guess - and I plan to try a series of more specific trees. If I can, I'd like to develop a formula, for speedy production, so as to work up a good number in as short a space of time as poss.

And as soon as time allows, I'll do a comparison shot with some of the more easily available commercial alternatives, to show why I'm going to such bother!

1/72 WWII - Revell Nashorn

Another great kit from Revell!


This as yet unfinished kit was built, I think, back in March, but kind of wound up on my 'pending' pile. There are no 'what's in the box?' pics this time (I forgot to take any!). So, it's straight into the build, starting - as usual - with chassis and running gear:


The obsessive/compulsive modeller in me likes to line up the parts as I go through them, cleaning them up ready for assembly! I suspect that one of the attractions to wargaming and modelling as a whole, for me, are the unlimited opportunities for lining up little toy soldiers and other bits and bobs!


The assembly of the tracks on this occasion was, I feel, noteworthy: these were my third or fourth set of link'n'length tracks. My success with these has been what I like to refer to as 'errotic': pleasurable, but hardly consistent! With this set I felt I finally got the hang of them. Mind you, it did depend on the link'n'length tracks being a decent set. Indeed, the whole of the running-gear needs to be well made by both manufacturer and model-maker if this type of track assembly is to succeed. Fortunately for me, this Revell kit is superb in this respect.

Whereas with the Italeri JagdPanthers I'd added the links and lengths onto the (oft-wonky) wheels one part at at time, here I assembled the various links and lengths into four sub-sections, two for the long top and bottom runs of track, and two for the eight-link curving sections that run around the drive-wheel and idler. These were then placed in position and adjusted, the solvent glue allowing me time to make adjustments in situ, and even leave segments bent away from the running gear, ready to be placed as other segments of track were added.


Various bits of link and length assembled in place, and
ready-glued, were then placed into position and adjusted.
This appraoch worked really well on this occasion. [1]

I hope future builds with this type of track can be as smoothly executed! Mind you, it was time-consuming, getting all the links cleaned up, and then lined up, and then gluing them together on the cutting mat before placing them. And there were some parts of the job - in both instances I started with the lower run of track, and began with one set of teeth 'biting' into the track from the drive wheel. This was followed by the two curved sections, each of eight links, and then, finally, the top length.

It was this final top length that proved trickiest, as the track needed to be manoeuvred along under the upper-rear mudguard, and yet pass over the upper-rollers, which had had glue applied to them. In retrospect I guess I should've applied that glue afterwards. As it was the first set - and each of these sets comprised three lengths, pre-glued but still flexible. - went in with no trouble. But the second set kept getting stuck and falling apart. But patience and perseverance paid off. And the result: my best link'n'length tracks to date... so, I'm pleased!


There were a couple of question-marks over exact placement of some parts at this point: one of the supports for the fighting compartment sides and the correct positioning of the MG racks on the rear weren't made 100% clear. I just did them all by eye.


Starting to assemble the gun: fiddly but fun. Went together sooo much better than the Ace Wespe gun! Revell kits generally fir together like a (good) dream.


Making a start on painting, with a base-coat in black...


And this as far as I've got with this one at present. It needs plenty of work doing to the fighting compartment, in terms of painting and detailing etc, before I can paint the outside. But I can at least say that it's a beautifully produced model, and tons of fun to assemble. Highly recommended!

In the pics below can also be sen a couple of the other models I was making around the same time, inc. the Milicast 1/76 RSO, an Ace Wespe, and an Attack AufklPz 38 Hetzer 7/5. 


----------
NOTES:

[1] I tried this approach on the second of my Italeri JagdPanther kits, thinking it could possibly fail... but it did, big time!