Showing posts with label Trumpeter. Show all posts

Tuesday, 16 April 2019

Kit Builds/Reviews: Various 1/72 T-34

After enjoying the T-34 Tank Craft book, I decided to try and build a few more, and work towards finishing a batch of Russian armour. The models in question are all T-34s, some are the earlier 76 variants, others the later 85 type. The makes are Trumpeter (one T-34/85), Armourfast (two T-34/76 and two T-34/85), Italeri (two T-34/76), and Zvezda (two T-34/85). I also got a SU-100 tank destroyer, by Zvezda. The Zvezdas are the snap-fit variety, but I'll be gluing them up anyway. 

My tank factory, inc. several T-34s.

So far I've been detailing the kits I've already got in hand. Although I did also build the two Italeri 'fast assembly' kits, which are very well designed, and, as they proclaim themselves, perfect for wargamers. They're better detailed and nicer than the Armourfast models which, whilst robust and easy to assemble, are just too clunky and lacking in detail.

These are great, far superior to Armourfast.

So, first thing for this post, a quick look at building the fast assembly Italeri kits. The colour of the styrene is gorgeous, a near perfect Russian WWII green. If you wanted to go super basic, you could simply apply decals, paint the parts that aren't green and there you have it. But that wouldn't satisfy me, nor, I suspect, most of us modellers/wargamers. In fact I want to use these tanks as practice at weathering and making monochromatic colour schemes look good.

Got to dig that green styrene!

Laying out the kits for cleaning up.

Tank number one cleaned and ready for assembly.

The turret mounting clip is a really great bit of design.

First tank assembled. I'll attach the turret after basic painting.

Adding stowage and little bits of detailing.

As well as detailing the models a little, e.g. with wire handles, lamps, boxes, blankets, and so on, I had to reattach an idler wheel on the Trumpeter T-34, which snapped off when I was supergluing the tracks in position. I'm also drilling out the barrels on a pair of Italeri (old Esci) Nebelwerfers, as they were ludicrously thick. You can see before and after above.

Not a great photo, but I'm pleased with my scratch-built saw and headlamps.

In the photo above you can see, albeit not very well, my scratch-built saw and headlamp, on the left. At right you can see how basic the rear engine-deck of the Armourfast kits are; no grill detail. I've also made a boo-boo with the towing cable, tying it off as if it's just strong, as opposed to steel cable. That's it for tonight. I'll do further detailing tomorrow, and then get them all undercoated and base coated, ready for detailed painting, decals, and weathering, etc.

---------------
And now it's tomorrow... today! Decided I'd try a bit of silk purse from a sow's ear, and replace the Armourfast rear deck grill panels, with some mesh and plastic card. Got the mesh from Ely City Cycle Centre's model department, along with some more Vallejo acrylics and some (new to me) Tamiya liquid cement.

Rear deck grill panel removed.

New wire-mesh replacement fabricated, with added storage.

Is this overkill on an Armourfast kit? Hmmm!? It certainly improves the tank, in my view. But it also makes me feel the need to do similarly for hand rails, lifting eye-hooks and tracks. Can I be bothered? It remains to be seen. I've already cut out mesh for the other three Armourfast T-34s. But one of them is going to be very difficult to do on account of stowage I've already added. Unless I remove it...

Adding more detailing to the various T-34s...


Tuesday, 5 February 2019

1/72 Elefants...


So here is my Elefantine trio, left to right: Trumpeter (unfinished), Zvezda, and Fujimi. The Fujimi is allegedly 1/76. But it looks as big as the other two. The Zvezda model appears to be an older variant, with a rectangular commander's hatch, and no front-mounted machine-gun. I added zimmerit to the Fujimi. I think I might also add some to the Trumpeter, as I really like the effect.


I'm not sure whether to go with this camo' scheme, pictured above, in three colours, or something more like these two below, which are both in just two colours:


I have to confess my original preference was for the Zvezda two-colour, dunkelgelb and green, as pictured above. And I think that remains my favourite. Although I have to say the Bovington Elefant does get me thinking about going three-colour. Hmmm!!?

I'm also tempted to get more crew members visible. Still, first I need to finish the recent Trumoeter build. Then it's time to paint the suckers.

Tuesday, 29 January 2019

1/72 Trumpeter Sd. Kfz. 184, Elefant


My original plan for today was to visit Bovington Tank Museum and see the Tiger collection, and in particular the Elefant. But my car hasn't played ball with me.

So instead I'm starting in Elefant #3 today. Although in truth I started a couple of days ago, trying to replicate the front driver hatch, etc. I tried to reproduce the hatches using white Miliput, by pressing the part into some, letting that dry, and then pressing some more Milliput into that: sort of taking an impression, then working from that. That took two days - hard to be so patient! And in the end it didn't really work. Or at least not well enough for me to go that route.

Sadly this process didn't yield the desired results.

Instead I decided to try and cut out the actual hatch moulded on to the model. I had hoped to have both the driver and the radio operator hatches open. But this was such hard work I only did the radio  op's hatch in the end. But this has at least worked much better. I was able to keep certain details, like the hinges, by working carefully around some parts, whilst taking other bits off with a scalpel, and re-attaching them later, and leaving some in situ.

Hatch in place, I prepare the radio operator for surgery... no anaesthetic!

Crewman has a seat, and I stretch sprue for handles.

I also constructed an inner 'lip', inside the opening created by (very carefully!) cutting out the hatch itself, which the hatch would rest on when closed. And using candle-stretched sprue I made two little latch handle points on the inner or underside of the hatch. I tried stretching some more sprue even thinner, to make the actual handhold parts of the handle, but couldn't get the styrene I'm using to stretch finely enough, for some reason.

Ta-dah. Funkmeister in his proper place. [1]

I think the figure is a Milicast resin chap. I hade to remove his left hand, his legs, from mid-thigh down, and shave his arms a bit at the sides, to get him to fit. I only hope there's nothing in the base of the chassis to cause grief later on? I'm pleased with the outcome. I just would like to have the driver's hatch up as well. Hmmm... should I? I don't want to wreck either what I've already done, or the other more fancy hatch, with its triple periscope arrangement.
----------

Not glued yet, just wanted to see...

I diverged from the recommended order of assembly a little, in order to see the radio man in situ (albeit not glued in place yet), just 'cause I wanted to be sure the figure would fit. But then I got back on track. And, like many AFV models, this one starts with the running gear. In my recent Krupp Protze build it was the delicate suspension that wowed. Here it's the unusual (and often faulty in the field) three part longitudinal suspension bits.

Getting all the running gear ready to assemble.

Assembling the unusual suspension.

Starting to get the wheels onto the suspension.

Ready to go in the chassis.

So I got the wheels and suspension assembled and on the chassis. The detailing is very nice and crisp. Sadly there's a fair bit of flash to be removed. I think that's me done for this evening. I got my car back from the garage, and it seems to be in order again. So I've rearranged tomorrow's lessons for Thursday, in order to get down to Bovington and see the Elefant. I'm determined! I'll finish today's post with a couple more period pics, this time of wrecked vehicles.


----------
NOTES:

[1] In my musical side of life I'm a bit of a funk-head, amongst other things, and I love that the German for radio is 'funk', as in funkwagen, etc. 

Tuesday, 5 June 2018

Kit Review: 1/72 AER/PST ZIS-5-BS fuel truck


NB This post was originally drafted in February! So it appears out of chronological sequence.

A recent trip to The Muckleburgh Collection in Norfolk resulted in the purchase of a T-34/85, in 1/72, by Trumpeter. Both that and the Muckleburgh trip will be blogged in dew coarse, so to speak. In the meantime, having just built some US matériel, I figured why not some Russian stuff also? Apart from the aforementioned T-34, the only Soviet stuff in my stash is the ZIS-5-BS, under consideration here.

I bought this at a show, poss at Bovington, for a knocked down price - £6, so not all that knocked down - due to it being simply bagged up, i.e. not in its proper box (instead a home-printed version of the box aw - pictured above - had been inserted inside the bag. It was only when I got it home that I realised it also lacked instructions, nor were there any decals. So I kind of felt that I'd overpaid, even tho' 'twas cheaper than the RRP for a pristine kit.

Making headlamps...

... in situ.

Anyways, this was all some time ago. Digging it out of my stash today, I decided to get stuck in. To do so required finding instructions for assembly, which I duly unearthed at the very helpful Henk of Holland website. These downloads are particularly useful in cases such as this, when not only are the instructions missing, but the parts on the sprues - shown numbered in the instructions - are not actually numbered! So, a bit of rigmarole required before I could even start.

The quality of moulding suggests a small short-run Eastern-European type operation. The kit and instructions were listed under PST on Henk's site. But one of the sprues has AER on it. Whoever made it, it's certainly not of the super-crisp variety, such as the Academy models I've recently been making, and requires quite a lot of clean up.

I don't seem to have build pics. Nearing completion.

It's not just removing flash and ejector pin stuff, either. Some of the tires needed sanding, on both external and internal facets, so as to get them properly shaped and onto the wheel hubs. And some parts - most notably the front axle - were just plain wrong. Also there appears to be a single unused/redundant part (not so unusual, perhaps), and another part - the drive-shaft - is simply not included. Instead of supplying a styrene part, mention is made in the instructions of making your own with metal rod.

The two front wheel arches need large appendages removing. And it's not entirely clear what the final shape ought to be. So I just winged it with them, using web ref. Using the suggested piece of styrene for the front axle meant the front wheels couldn't be fitted, as they were obstructed by the front wheel arches. Experimentation finally established a suitable length, and I butchered a surplus part of one of the Academy models to make the necessary longer axle.

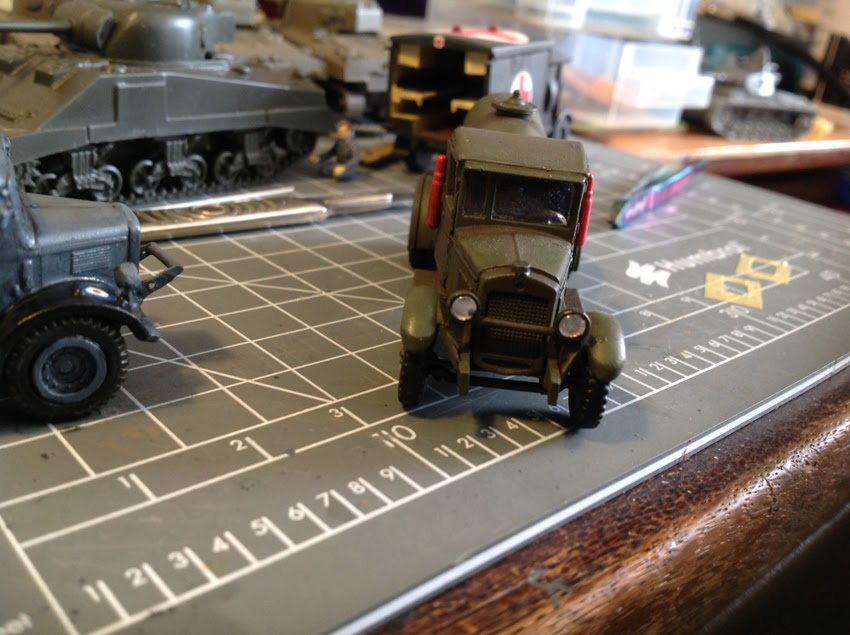
Production line: Shermans, RAF Water tank, K2 ambulance, and Russian fuel-truck.

The rear axle was also too short. For this I used some of the same wire I used for the drive-shaft. Once again experimentation and judging by eye were required. All this mucking around with the kit, and improvising solutions to little issues, is, I find, part of the fun of model making. So I don't judge the kit too harshly. As I've doubtless said elsewhere/before, I love all this rear-echelon stuff (oo-er, missus!). So, starting my Soviet war machine with a fuel truck is fine by me. Next, though, I'll do the Trumpeter T-34. I strongly suspect that'll be a rather different kettle of fish!

As usual with my builds, this remains unfinished: the fire extinguishers need some shading, and I need to mask/paint the lettering - as the kit came without any decals (so, number plates are lacking as well!) - on the side of the fuel tank. But, as basic and simple as it looks, I'm actually fairly happy with how this kits turned out.

Monday, 25 September 2017

Muckleborough Collection, Norfolk

My young brother Sam, posing beside Muckleburgh's T-34

A weekend or two back, my younger brother and I, along with our dad, had a short break away together, during which we visited the Cholmondeley Collection of toy soldiers, at Houghton Hall (aka The Soldier Museum), and The Muckleburgh Collection, both in Norfolk. This post is about our visit to the latter. 


On arrival, you're greeted by the V1 on its launchpad, pictured above, and a few other items, such as jet, and some artillery, including the impressive American 'Long Tom'. Once through the ticket office/shop area, there's a very cool 1/72 (or poss 1/76?) scale diorama of the Weybourne Barracks site, where the museum is situated, as it was in WWII. My dad looks it over below.


From there you go onwards through several rooms filled with weapons of all sorts, medals, unit insignia, and such like. One oddity is the life-size model of Wellington's horse, Copenhagen. There's also a small WWI trench warfare diorama, as pictured below.

Once you reach the 'main attraction' - the several rooms of vehicles and armour - it's time for the wargamer/modeller to get 'snap happy'. First hand reference of the real deal, such as is provided here, is wonderful. I find myself gradually getting more interested in the Allied matériel. Handy in this instance, as there's not that much German stuff at Muckleburgh.


Scammell...

Around about this time, I became like a vaporous feinting woman, of the Jane Austen period. I just came over all weak and woozy, and had to head for the cafeteria! In the corner of the café/restaurant, there's a lion )or was it tiger?) skin, a stuffed bear, and the firearms pictured below. Dad and Sam imagine firing this machine-gun...


After some grub and a drink, feeling suitably fortified, and recovered, more or less, from my ... well, whatever it was, we resumed our tour of the museum. There were loads of models in several rooms adjoining the café. I loved it! And was snapping away like a demented 'pap' at a Hollywood premiere.


Althought the museum is mostly about modern warfare, and armour, etc, there were some models (and even a few artefacts) depicting other eras. Above are two of the Napoleonic era models I saw on display: the popular closing of the gates at Hougoumont, and the even more ubiquitous scene involving Ewart's capture of the Eagle at Waterloo. 

The cabinet pictured below held four shelves of WWII armour and other vehicles (and a few sundries of post-war vintage. A cornucopia of small scale delights! It was fun to see how I have almost all the german vehicles represented, but hardly any of those of the other nations.


By and large single figures are not my bag. But something about Fritz, above, charmed me. I think it's the combo of pleasantly cartoonish proportions, and that winning smile. If anyone knows who made this fella, let me know! There were also two huge display cases chock-full of maritime models. Appropriate, given how close by the sea is.


After the many models, come more tanks and other vehicles. At this point the heavens opened. And drumming of the rain on the corrugated roofs was quite something! Numerous vehicles in these last rooms were ones I am either building currently, or will be building soon. So the opportunity to gather useful ref was fab.

The cramped inside of a Daimler Mk 1 armoured car.

'She caught the Katy, and left me a mule to ride...'

I've painted my 'Katy' in this sort of darker green shade.

I'm also making a Zvezda 88mm gun at home.

I definitely want to make one of these soon!

Have all the Shermans in the UK been renamed Fury!?

Having done the lot, it was time to peruse the chop. They had a very limited selection of models. But they did at least have some Trumpeter stuff, which is usually very good. So I bought the T-34/85 pictured below. I also bought the Andrew Roberts book on Churchill and Hitler (reduced from about a tenner to just £3.99... so why not?).

A kit to commemorate our visit.


I thoroughly enjoyed our visit to this groovy little museum. I'll definitely be going again, at some future point, as we quite often take short breaks in Norfolk. And I'd certainly recommend a is it to any with interests in military history in general, and AFVs in particular. 

Apparently they have quite a few working vehicle, which they take out on occasion. They didn't do this on our visit, alas. But I still enjoyed myself immensely, as, I believe did Pops and Sam. Thanks fellows!