Showing posts with label Stug. Show all posts

Friday, 26 May 2017

Show Report: Bovington Tank Museum Model Expo

Nicely executed turret numbers on a Pz IV at Bovington.

NB: I drafted this post mid-February, but never got round to completing it, 'cause of the ubiquitous demands of the new home. Sometimes I will schedule such belated posts so as to appear more chronologically correctl. In this instance I decided to let it appear out of sequence.

I drove down to Bovington Tank Museum yesterday, with my modelling pal Paul. It was a bit of an epic trek for a day-trip, at about three and a half to four and a half hours each way! February 11th saw the Museum hosting a Model Expo, with large numbers of modellers showcasing their handiwork, and a smaller quantity of traders helping us part with our lolly.

The Tortoise: a hard-shelled monster!

A Sherman 'Crab' flail tank, one of Hobart's Funnies.

One thing I noticed, and it almost makes me feel guilty admitting it, was that I was less interested in viewing the models exhibitors were displaying than I was in viewing the real tanks, or buying books and kits, etc. Given the efforts modellers put into their craft this struck me as kind of tragic.

The only decent pic I took of any models, was this one of a lovely SturmTiger.

Having said this, I did take a look at most of the models on show. But for the great majority it was the most cursory of glances. This disparity was echoed, somewhat ruefully, in a notice on one stand that read 'hours to make, seconds to destroy'!

And my interest in this aspect of the show was reflected in my photos: lots of pics of the museum's exhibits, hardly any of the models. I do regret not photographing or filming the larger remote-controlled tanks. The 1/6th scale stuff - Action Man on steroids! - was pretty amazing.

Nice waffle-pattern zimmerit, and useful detailing stuff: logs and stowage, etc.

Visits to museums are ace for scoring some interesting detail ref.

I've not seen a Stug in uniform green like this elsewhere.

Of course, I over-spent. My haul of kits was gratifyingly large, and included four Armourfast Panzer IVs, a Trumpeter tank transporter, a Zvezda gun and crew, and quite a few planes, including some by the defunct British company Frog, a brand that's new to me. All WWII German, all 1/72.

Book-wise, I bought some highly specialised reference material, including Valiant Wings titles on the Blohm & Voss Bv 141, and Dornier Do 17Z, a mag on 'Secret Bombers of the Third Reich', and a few misc second-hand titles, on Stukas, the Luftwaffe and WWI warplanes. One of these was a larger than A4 hard book dedicated to the Ju 87, or Stuka, which had some lovely three or four page spreads.

Pz III.

Pz IV sans tracks.

The only hobby accessory I purchased was some 0.4mm masking tape, for masking canopy frames. I wish I hadn't bothered with this, as it happens, as I'm not sure I'll use it for the purpose I bought it for: I want to mask the 'glass' panels, not the metal frames! Doh!!

Paul had advised me to invest in some adhesive foil for this job, but I couldn't find anyone selling any. Just goes to show how sometimes a fog descends on my brain at these events. The urge to spend overpowers ones critical faculties. I think our hyper-materialist culture ingrains in many of us, myself included, the sub-Descartesian pseudo-philosophy; 'I spend, therefore I am'!

Hetzer? Nice camo'!

A nice view of three different camo' schemes.

Jagdpanther road wheels and track... awesome hardware.


SdKfz 234/3, with insignia of the 16th Inf. Div.

Russian KV-1

Aah... the almost cute, and ironically named, Goliath. [*]

An early war (Pz I?) German command vehicle.

It's hard to credit that a vehicle such as that pictured above could be part of the 'armoured might' of blitzkrieg. It looks more like a tracked pram or bathtub than a tank! I do like the stencilled tank ID, in white outline. And the early war gray-brown camo is cool.

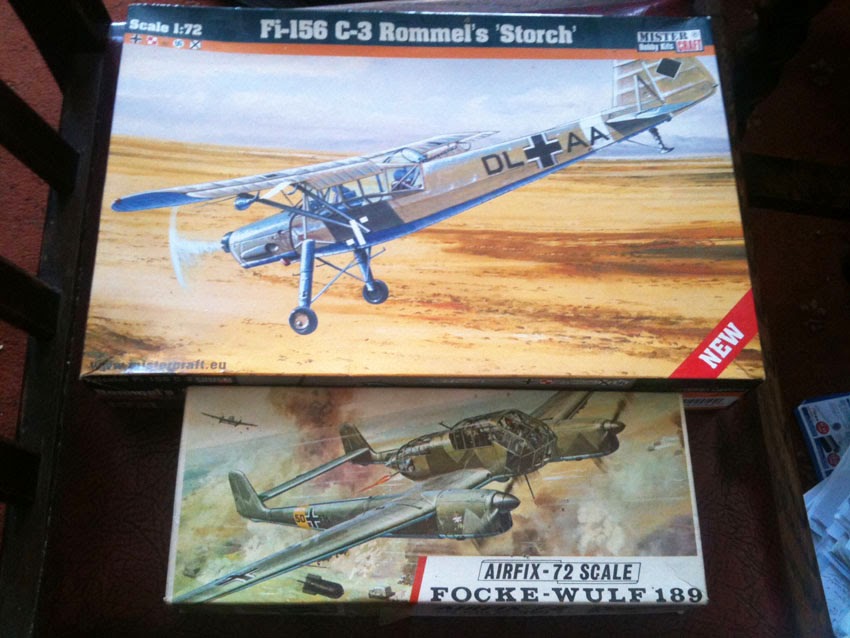
As mentioned above, I overspent, as is my usual MO these days. This time I bought loads of aeroplane kits: the Mister Kit Fiesler Storch was one of several different models of this gangly plane for sale on the Valiant Wings book stall. I love the Roy Cross artwork on the Airfix Fw 189. A beautiful painting! One of these is a recurring baleful presence in the superb film Come And See, reviewed elsewhere here on't blog.

Love the old Airfix box!

Me like Me 110s.

I bought three Me 110s, bringing my total of these fab looking 'Zerstorers' to four (two by Edouard, One a frog, and one (?)). The Do 17Z and one of the Me 110s are by Frog, a manufacturer I'd not encountered (or even heard of) before. I covet one of their Arado 234 Jet Bombers. But the stall which was selling the Frog kits didn't have that particular model. Like classic Airfix of yesteryear, the  Frog kits often have lovely box artwork.


Some land based stuff!

In my more normal land warfare niche I bought a Trumpeter Tank Transporter, and two sets of Armourfast Panzers. The latter filling a bit of a gap in my German armour collection with some medium Pz III and IV tanks. And finally, in terms of kits at least, I bought a rather lovely looking Roden Opel Blitz Tankwagen. I also bought a few books, mostly Luftwaffe ref. Rodent are another brand that often have fab box art, something I always appreciate.

My swag from the show is shown in the pictures above and below. What I really need to do is to start in on building stuff from my ever-increasing stockpile.

Bought this to help with my Airfix Bv 141

... and this for help with my Frog Do 17Z

The Valiant Wings titles are superb, being packed with more info than I ever realised I could want to know, including lots of great photos and a good number of colour illustrations. Somewhat to my own surprise, if I'm 100% honest, I found I really did want to know all the minutiae! It seems madly extravagant to me to be buying books like this that cost more than the models themselves. But it gives me so much pleasure, perusing them, and using them to help build my kits, that I just go with it.

It was a good day out, despite a number of Bovington's German Tiger tank variants I would've loved to have seen not being on display. I made up for this loss by spending yet more money, acquiring some nice green Dad's Army socks, and a Tiger Tank T-shirt from the museum's gift shop!

----------
NOTES:

[*] Of course no weapon intended to maim and kill can really be thought cute. Very tasteless of me.

Sunday, 14 June 2015

1/72 WWII - Revell Stug 40 Ausf G


In my bid to clean up my posts and get everything I've documented so far online, I'm a bit mystified-cum-annoyed to discover that one or two of the builds I enjoyed the most, including this one and the Zvezda Panther, were very partially documented. 

I don't suppose it really matters? But I do rather like the motivation keeping these records gives!


So, there's a picture of the box, and then a few pics of the running gear, and then nothing until I got around to painting it. And then only in a very basic manner! Hey-ho, thats how it sometimes goes I suppose!? 

What I can say is that, like pretty much all the Revell kits I've made so far, this one went together like a dream, and was intensely pleasurable to build. I've added a little bit of stowage to it, and I'm awaiting the purchase of a better (dual-control) airbrush before going further with the currently rather coarse looking camo. The scheme is derived from a pic in panzer Colours, Vol. 1.


Saturday, 13 June 2015

1/76 WWII - Airfix Stug III, Ausf G (#II!)


This is my second Airfix Stug III, Ausf G. It's not the greatest kit, suffering from quite a lot of flash, lots of missing elements (no tools or fire extinguisher, etc.), and with some fairly significant 'poor fit' issues (the upper and lower parts of the hull don't join particularly well). And of course there's the delightfully ungluable rubber band tracks!

Nevertheless, this is a venerable aulde model - vintage 1962! - and despite its issues, it's a pleasure to build. Picking one up for just £2.99, new, I just could'nae resist! It's funny: I'm posting about making this one before posting my first build of this olde model! Never mind, I'll hopefully address that in time.

Construction starts in the traditional manner, with the running-gear. The detailing of these parts is not particularly good, many shallow depressions around the road wheels, for example, representing what should in fact be holes. Then the lower hull goes together, and then - after beginning the gun assembly by attaching the gun to its mount and the mount to the casemate - you pop the (ill-fitting) halves together.


Detail is then added to the casemate and body of the vehicle. The hatches are supplied in such a way that suggests you can model them open or closed. Indeed, I did model them in the open position last time I built this kit. However, internal detail is non-existent, so I did them closed on this occasion. I also attach the spare tracks at this point, which is earlier than is suggested by the instructions. The instructions also direct you to attach these to the left and right vertical faces of the casemate. As this will obscure the vehicle numbers and the Balkankreuz, in both instances of making this kit I have instead attached them to the front and rear of the hull.

I cut off the rather too fat aerials (to be replaced with stretched sprue or wire later), and trim the two pillars that hold the spare wheels, adding scratch-built circular plates 'holding' them in position. This latter detail on my last build was a very early example of my recent attempts at scratch-building, and was executed in a rather coarse manner, looking at it now (esp. when seen against better quality kits from other manufacturers).


I tried supergluing the tracks, using both ordinary liquid superglue, and also a gel variety that I've recently bought. I believe I used ordinary superglue on my previous build of this kit, and I think that it worked on that occasion. This time neither type of superglue worked! The first, the liquid type, was left to set for about two or three hours; when I came back to the model, the tracks simply came undone as if no attempt to bond them had been attempted! 

My second second attempt, this time with the superglue gel, was left to set for approximately ten hours (overnight). Still no dice! The glue had set solid alright, but had in no way adhered to the plastic! The eventual solution was to heat the tip of a flat-head screwdriver, and use that to melt the male parts across the counterpart female openings. What a palaver!

Superglue (liquid) attempt #1: three hours, no bond.

Superglue (gel) attempt #2: ten hours, plenty
of weight to keep the joint still... still no bond.

In the picture shown above, the tracks are held in place with Blue-tack, in exactly the same manner as on the first attempt; then tweezers were laid across the joint, each 'arm' of the tweezer across either side o' the 'male' and 'female' nubbins and gubbins, and then finally weights were added to keep the whole shebang in situ overnight. Still didn't work!

I plan to jazz this vehicle up with some extras, such as a stowage frame with a whole load of junk in it, and elsewhere. But that'll be almost certainly be something that has to wait until after we get back from our Waterloo 200 jaunt!

Sunday, 10 May 2015

1/72 WWII - Dragon Stug

Three is a magic number...


Having just built three Tiger I models over the recent half-term, I was surveying my rapidly-shrinking stack of unmade models, and wondering what to make next. I picked the Dragon Stug. It was only some time into building it that I realised that this will be my third Stug. So in a way this build follows quite neatly from my recent trio of Tigers. 

But whereas I made all three Tigers back to back, I've had a big break between this and the previous two Stugs. The first Stug I made was an old Airfix kit (I don't think I've posted that build yet?), and I built mine whilst my dad built his version of the exact same model. Shortly after that I put together a Revell Stug. Whilst I still like both models, the Revell was clearly way better, in terms of both detail and quality of moulding/fit of parts, etc.


As mentioned in my posts about the Tigers, I was mildly underwhelmed by the Dragon Tiger I, and felt that, on balance, the Trumpeter and Zvezda were both as good as, and the Zvezda in some ways better than the Dragon model. Dragon are a new brand to me, and internet hype around their products (admittedly much of it singing the praises of their 1/35 models) lead to high expectations on my part.

Another new development in models since my childhood days is the advent of such additions as resin or photo-etched parts. The Dragon Tiger I (late prod. mit Tiger Aces!) had a few metal parts. This Stug doesn't. But it does have DS - 'Dragon Styrene' - tracks. Oh, and decals, of course (extremely minimal, confined only to Balkankreuz!). So this model is pretty simple, being essentially nowt but plastic. Despite the lack of markings options, and the absence of funky little metal parts, I'm happy to say that building this Stug really delivered on the alluring legend that is Dragon.


First of all the level of detail is, to my eyes, stunning. So also is the quality of moulding, and the fit of the parts. The kit is also very cleverly designed, with some lovely touches, such as the road-wheels that come as two parts, allowing one to paint the two elements separately before combining them. Very clever, and very satisfying to construct, which, when building a model, is so very, very important.

There are several steps that are optional, and this results in the spare parts generated by the build exceeding the two parts marked up as such on the instructions leaflet. The instructions are similar to those for the Tiger I kit. Printed in full colour, and showing what appears to be the real kit in various successive stages of assembly, these are certainly amongst the most beautiful instructions I've yet encountered.


I must admit though that there are a few places where the more old school black and white line illustrations favoured by most manufacturers might have been clearer. But then again, as Dragon kits seem to be so well designed, what might be a little unclear on the page is usually abundantly clear in practice, thanks to such elements of design construction as locator pins, holes, and suchlike.

As regards detail, you've got to love it when pieces such as the periscopes are fully moulded, such that you know that although it can't be seen once built, yet nonetheless inside the vehicle these scopes are beautifully realised! Several hatches are supplied in such forms as to let you choose to model them open or closed. If you were to model them open, some additional work on their in- or under-sides and the interior might be entailed. As some hatches are open on my other Stugs, I opted to have all the hatches on this vehicle closed.

Further elements that set my model-making maw a-droolin' were such parts as the tow-cable hooks, the commanders cupola, and the Several little doodads whose names I don't know, all of which are, thanks to the design and construction of the model, just... well, rather special. Also, the way the various elements of the hull and body are built up, it's both beautiful and highly satisfying. What could be better than that? 


Pictured above and below is the construction of the rear hull plate, and late-model design exhausts. Once these are in place the traditional running-gear first routine unfolds. The detailing and crisp clarity of the parts is a joy to both behold an assemble. The spiked idlers are just lovely!


The front hull plate goes on. The level of detail on the hull, as afforded by the multiple parts, and as depicted on the underside of the hull, are simply fabulous. 

Another aspect of this build I enjoyed immensely was where you're presented with the options of keeping the integral front-hull tow-rope anchor points, or chopping them off and fitting others of a different design. To have, built into the basic build of the kit, elements of what feels like a conversion, adds another layer of pleasure to the act of construction. I know I'd definitely like to make some more Dragon Stugs, but perhaps different iterations, e.g. older or different types. 


I set aside the next steps, relating to building and painting all the main road wheels, intending to return to them at a future/later point. This lead me on to the construction of the low-profile casemate. Once again the supremely high quality of the detail and moulding are simply wonderful.


The turret cupola is exquisite. And the gun on this kit puts all the others, but especially the really rather poor Airfix model, firmly in the shade. 


Above and below are 'above and below' shots of the internal gun mount. 


More exquisite detailing, in the form of the rear hull row dale mounts, and the superb vented paneling over the engine compartment.


I opted to use both periscopes, simply because they're such nice little details, and so well executed by Dragon.


One of the only gripes Imhave with this model concerns the fit of the bin for the spare wheels. The angle of the back of the bin and the bottom is 90(degrees), whereas the angle between the mudguards and the side of the casemate is more obtuse. This results in a poor fit when positioning the bin:'shouldmitmsit flat on the mudguards, and therefore not meet the casemate; or should it lie against the casemate, and thereby not sit flat on the mudguard?


Having more or less competed construction of the upper and lower portions of the build,Mir was time to bite the bullet and paint the road wheels. These were are all sprayed or airbrushed, in matt black and dunkelgelb. And then glued in position, once some paint had been scraped off to allow the solvent to bond the plastic.


The tank undercoated in math back, ready to receive the wheels. After that, it'll be time to mount the DS tracks... another new departure!


Having made the subject of doing things in threes part of the theme of this post, and having built three Tiger I models, and subsequently this, my third Stug, my next three might just be to build my third Dragon kit, such was the pleasure this afforded! If I go that route, it'll be their Brummbar. And as it happens I have Dragon's Brummbar in both 1/72 and 1/35. I think I'll stick with 1/72 for now, and save the 1/35 for later!