
Airfix 1/76 Panther.
Whilst reading an old thread of mine on TMP (here) I realised that, despite all my WWII German armour posts, I hadn't posted - except perhaps for some incidental pics in which a completed Kettenkrad might be visible - a single finished tank kit!
To remedy this I decided to post these pics, of the first model I built in this recent spate of model-making. This one was made alongside my father, who built an Airfix 1/76 King Tiger. Building these first models proved immensely enjoyable for both of us - mission accomplished! - despite them not being particularly great kits. I mean, a Panther with missing rear stowage boxes? I don't think I've ever seen a picture of a Panther without those funny looking rear boxes, with the kind of 'X' shapes on them.

A Panther in Paris. You can just faintly see
the X-shape thought the zimm.
Of course, as soon as I said I'd never seen a Panther without those stowage bins, I thought I'd better have a look online for documentary evidence. What did I find? These (and plenty more in a similar similar vein!):


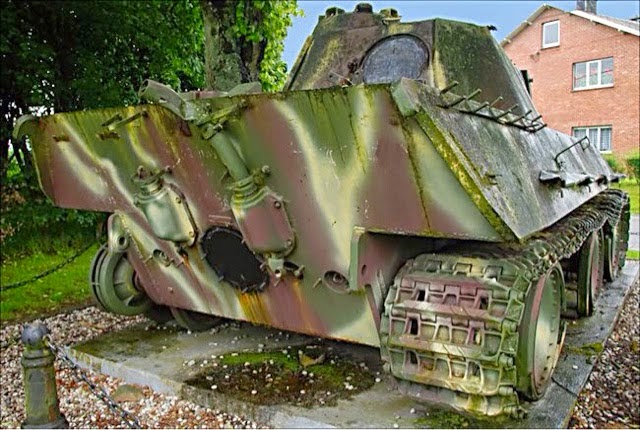
Hey-ho! Never mind, eh? It was probably from such a survivor of the war as one of the above that Airfix designed their kit. And not only did I find plenty of pics of Panther sans stowage boxes, but most of the Panther tanks that did show them have so much zimm you can hardly see the 'X'-shape anyway, as with the rather cool pic below, showing some Rooskies ,ankle-deep in mud gloating over a knocked-out vehicle. It's nice to see the box lid open as well:

Despite not being issued with feet, Russian soldiers
still knock out a Panther, with pure Stalinist glee, by
the looks of this lot.
But I did find this pic:

X marks the spot.
... which is allegedly a genuine Panther Stowage bin, with original camo paint scheme. In this instance the 'X' is clearly visible.
Despite the fact that it's like putting silk slippers on a club-foot, I bought a set of five turned-brass machine guns, substituting one for the plastic monstrosity that came with the Airfix kit (dad took one for his King Tiger).
The model was undercoated with a can of matt black Army Painter spray paint, after which a base-coat of dunkelgelb, using a Humbrol enamel mix of my own concoction, was sprayed over that, with a single-action Badger airbrush. The final paint job, inc. camo and detailing etc, was also done using Humbrol enamels, but finished using brushes, as opposed to an airbrush. And it shows!

Decals were added. Not very well. So badly on the left side in fact that I had to add even more extras. I can't recall exactly what I did now, but I think I might've tried to soften the decal and shape it over the turret detail using white spirit, which just melted it from red and white areas into a pink mess. I decided a Schmeiser machine gun, hanging off a fixture on the turret, might make a plausible and interestingly different/unexpected detail. So I went with that. I had intended to add some track-holding brackets, and a strap for the gun, but never got round to it, simply slapping the gun on with some superglue.
Some bits and bobs in white metal from Sergeant's Mess - spare track, rolled cable, a jerry-can, a spare road-wheel on the turret (I got the odd looking turret position for this from a Bundesarchiv pic), a rolled tarp, etc. - were painted, and then the whole lot given a coat or Army Painter Quickshade and, finally, the whole model was sprayed in Testors Dullcote.

Panther, Panther, pointing right, on my table of delight...
I recently made a new model-making buddy, rather unexpectedly, at a friend's Yuletide/New Years party, and discovered from him that what I should've used for the decals is a specific liquid designed especially to shape them over irregular surfaces. By this time I had also realised that, to achieve the kind of fancy German camo-patterns I want to paint, such as the famous and popular 'ambush' scheme, I really needed to invest in a dual-action airbrush.
Still, this tank will, I hope, always have a place in my heart, it being the first model I completed upon returning to this aspect of the miniature warfare hobbies of my youth. And, truth be told, whilst the perfectionist in me is perhaps somewhat disappointed with it, the rest of me is quite content. Perhaps even, dare I say it, a little proud?
I did a 1/72 armourfast StuG III with the spare wheels in the wrong place on the back of the vehicle. It has turned out a nice model, but I just keep looking at the wheels!
ReplyDelete