Showing posts with label Kubelwagen. Show all posts

Sunday, 14 June 2015

1/72 WWII - Academy Light Vehicles of Allied & Axis During WWII


This little group of vehicles, still in an incomplete state, was actually the first set of 1/72 WWII modelling stuff I got, since getting back into all things wargaming and model-making. It was also my first kit purchase from City Centre Cycles, the shop in Ely that sells all sorts of stuff, including, to my great joy, lots and lots of models.


I seem to have lost the MG from the Willys Jeep (which is, incidentally, my only non-German vehicle so far). The Kettenkrad is in the most advanced state, inasmuch as I've actually added figures, and more or less finished the painting. But I haven't added decals to anything in the group yet! Im not sure if the Willys should be a captured one in German service, or an American, English, or perhaps even a Russian one? 'Lend-lease' and all that. It all depends on what combat zone I eventually plump for. I was intending to do the Ostfront, but as Im doing Russia 1812, in my Napoleonic zones, I might go instead for Italy, post 1943. Hmmm!?

The Kubelwagen, mounted on a champagne cork, 
for painting purposes. [1]

The Kettenkrad, mit riders.
----------
NOTES:

[1] I find the need for an unending supply of corks, strictly for painting purposes - I see them as single use items - creates a lamentable but unavoidable need for a constant supply of fresh booze. Ah me, the trials of the military hobbyists life, eh?

Saturday, 13 June 2015

1/76 WWII - Airfix German Reconaissance set: Sdkfz 222 & Kubelwagen


My local HobbyCraft superstore had a few Airfix kits reduced; I bought this set - the middle box in the above pic - plus an Sdkfz 234 and a Stug III/G, all for just £2.99 each. Score!

This 'reconnaissance set' comprises two models (and includes five figures), an Sdkfz 222 light armoured car, and a Kubelwagen. The kit comes on two sprues with, perhaps a little surprisingly, elements for the two vehicles not confined to the separate sprues - the Kubelwagen is all on one sprue - parts for the Sdkfz 222 are on both. There's a simple decals set, and, of course, the instructions.


My recent efforts to upgrade the AMC SturmTiger have seen me getting more into modifying kits. That particular model involved quite a lot of work. So too - because they're so basic - have these new acquisitions. At the time of posting this I haven't started the Stug yet, but the 234 and the Reconaissance kit have given me plenty of scope for modifications and - I hope! - improvements.

Kubelwagen

These kits are very basic. The Kubelwagen had no floor detail, no internal panelling or door handles, no gear-stick, handbrake, wing-mirrors, or those funny rectangular black doodads on the edges of the windscreens (anyone know what they are?). I added all of this detail, plus wire frames for the two front seats, and a replacement for the the bar that goes across the back and over the top of these seats (and sometimes has an MG or rifle-rack attached). I'm not sure if I'll use the driver and officer figure or not. If I do they'll obscure quite a lot of the work I've done! Other driver figures I've got won't fit into the very confined space.


Above, floor detail added using a combo of plastic card and thin rectangular profiled wire. Wire frames added to the from seats, and a wire replacement made to substitute for the rather fat plastic one supplied with the kit. In the pic. below the front seats ar in place, and wire gear-stick and handbrake have been added, with a mall circular mount for the former being made from surplus sprue.


It might be rather crude, admittedly, but I carved inner door-panel detail into the vehicles inner panels, using some cheap Chinese-sourced carving tools. The sharpened cocktail stick, shown below, was used to apply some PVA, by which means I mounted the small see-through plastic 'window' inside the windscreen frame.


Pictured above and below, the painted lower interior. I really love how the wooden floor panels came out. In a subsequent stage I attempted to add some highlights to the front set of flooring, but I ended up really wishing I hadn't! In the picture below, although its detail that one can't see in the completed model, I love the fact that the flooring has a fairly realistic side profile.


The pictures shown above and below show the Kubelwagen bodywork being assembled.


As with the Sdkfz 234, the wheels went on near the end, unlike most the model armour I've been building. In the background can be seen a Fujimi BMW and sidecar, and an Academy Kettenkrad with added figures taken from a Caesar Miniatures tank crew set.


In the picture above one can see the scale difference between the Academy 1/72 Kubelwagen, and this Airfix 1/76 version. The Academy vehicle has a pretty nicely modelled heard, where as the one supplied with the Airfix model is pretty basic. Perhaps unusably so? In the picture below can be seen the scratch-built wing mirrors, constructed from stiff wire and a very small discs of sprue.


The wingmirrors superglued in situ:


Sdkfz 222

The Sdkfz 222 is a fun looking little thing, almost cute, if an instrument of Blitzkreig can be so described? But this Airfix version of this vehicle - which I built a rather poorly constructed Tamiya 1/35 model of about thirty years ago! - is really terribly basic. 

Three of the four vehicles in this little cache of Airfix models (this, the Kubelwaugen, and the Sdkfz 234) depart from the near universal 'running-gear first' approach that's characterised most of the WWII German armour builds I've been doing so far. Here instead we start with the body.


Then it's the turn of the turret. This mounts on an internal pillar. The interior and gun are pretty woefully under-detailed!


Above, drilling out the barrel. Below, the turret and gun in place.


And, finally, the wheels go on. Removing the seam line from these is hard work! Below, the more or less completed kit.


As can plainly be seen, there's no secondary armament, nor any anti-grenade grills. 

I noticed, looking at the work of others who've built this and similar kits, that there's loads more that people frequently like to add or change, including adding the secondary MG, changing the wheel-hubs, and suchlike. I didn't fancy doing so much work on this, after the SturmTiger and the 234 (which latter build will probably feature in my next post). I looked around and found a company in Dorset selling some photo-etched detailing stuff I thought might be helpful, including the anti-grenade hatches, and some potentially very useful Jerry-can holders.


Above is a pic. of the SMA 'Sdkfz 222 etch set for Airfix'. I got these via scalelink.co.uk, who are a company based in Dorset (at a very similar address to that shown above - now Unit 27, not Unit 19 - albeit under a different company title!), who appear to specialise in model railway stuff. 

Sadly these photo-etched parts, which cost far more than the models themselves, aren't very good. The anti-grenade hatches - clearly allegedly produced specifically for the Airfix Sdkfz 222 model - don't fit very well, being too small, and not matching the turret shape very closely. Without remodelling the gun and its support they can't be modelled closed either, as the gun barrel gets in the way. The annoying thing was that I'd specifically bought these to hide the rather basic gun and the view into the vehicle interior!

I decided to add some wire along the left and right inner edges of the turret (see above pic.), hoping it might look a bit like hinges, so as to make the anti-grenade grills appear to fit a little better. I've glued them in a partially open position, a potentially unrealistic compromise which at least has the benefit of covering up the lack of detail without involving me in a total rebuild of the turret and gun, etc. I saw several people had added some wire to their anti-grenade hatches, which appears to be a form of support and reinforcement. So I added this detail.


I also used the photo-etched jerry-can holders on the Sdkfz 222, and, like the anti-grenade grills, these were quite annoying and therefore rather disappointing. They're annoying because there are no clear instructions on how to use them (there's a few tiny nigh on indecipherable images) - and they don't resemble, as supplied, any I've seen in reference material. In order to use them I needed to snip off an apparently superfluous part, and then what's left could be formed into a reasonable analogue of one type of holder I've seen a lot of pictures of. But, when folding the very fiddly and fragile parts, I found they frequently broke (always in one particular place, which makes it a design flaw in my view), necessitating horrifyingly fiddly and usually very ugly (blobby!) superglue fixes. 

In the end, after trying several different approaches, I've decided that the best way to build them is as a standalone construction, separate from the model, part by part and very slowly. Trying to do them in situ was too excruciating. Then, once assembled, I can add them to the kits. I had so much trouble with these that I decided to 'secure' the Jerry-cans on the 234 with holders made from plastic card. This presents its own set of other and different difficulties! But I'll come to that in a subsequent post on that vehicle.

Photo-etched detailing is a new area of modelling for me, and is proving a very mixed experience. The detailing on the two Special Armour Nebelkraftwagens I've built exemplifies the whole gamut, from very satisfying details (albeit, more often than not, dangerously fragile!) such as the gear-stick and the 'width-whiskers', to stuff that's just too damn fiddly, like the windscreen wipers and door handles. And even the nicer hits, like the width-indicators, aren't rally suited to use as wargaming models, as they'll just get broken off. 

I hate to pan products made by small operations - such potentially useful stuff supplied by and for enthusiasts should be encouraged - but the Sdkfz 222 anti-grenade grills I got are just too wrong to be properly useful. I certainly wouldn't recommend them as they are, or buy them again. I have no idea about the manufacturing processes involved (I know that the tooling costs for styrene kits can be enormous, making re-tooling a big deal), but I do wonder if these sorts of things - photo-etched stuff, resin parts, etc - can more easily easily be changed? If so, then someone really ought to redesign these so they fit the model. The Jerry-can holders could be improved as well. And both sets need decent legible instructions, even if these are provided as an online reference link, rather than with the parts.

Conclusion

Of the two vehicles in this set, it was the dinky little Kubelwagen that I spent the most time and effort on, in terms of modifications and improvements. Perhaps all this is just wasted effort? Making, or at leaf attempting to make, silk purses from sow's ears? I don't know! Nor do I really care, truth be told, as long as I'm having fun! And I certainly did enjoy all of this. All of this, that is, excepting some of the arse-clenchingly frustrating and annoying photo-etch and superglue episodes.There's also the issue of 1/76 vs. 1/72, the scale disparity between which is quite easily apparent to the naked eye when one places the two Kubelwagens I have - one by Academy and one by Airfix - side by side. I'm gradually and haphazardly building a 20mm WWII German army, and I hope to have both 1/76 and 1/72 in it. I don't think the scale difference will be too bad or even too noticeable on the games table.

1/76 WWII - Airfix Sdkfz 234


I got this model in my cache of much reduced Airfix kits from the local HobbyCraft store, and built it at the same time as the Kubelwagen and Sdkfz 222. Like those models it's really very primitive, and even has some real howlers, detail wise. But again, like the other kits, it's been fun to build, and perhaps even more fun thanks to the need to modify it.


A pal of mine has loaned me the above book. I've yet to start reading it (I'm in the middle of several WWII titles, inc. Anthony abeevor's new book, Ardennes 1944), but having been lent the book, and then seeing the reduced Airfix kits... well, I just had to get them! This is a very old kit, dating back , I think, to 1964. The rather attractive cover art dates from the mid seventies.


The kit contains two small and one large sprue, some simple decals, and instructions. I had a look inside all three boxes when I got home, and went with this as my first build, as the green styrene provided a kind of continuity with the rent AMC SturmTiger.


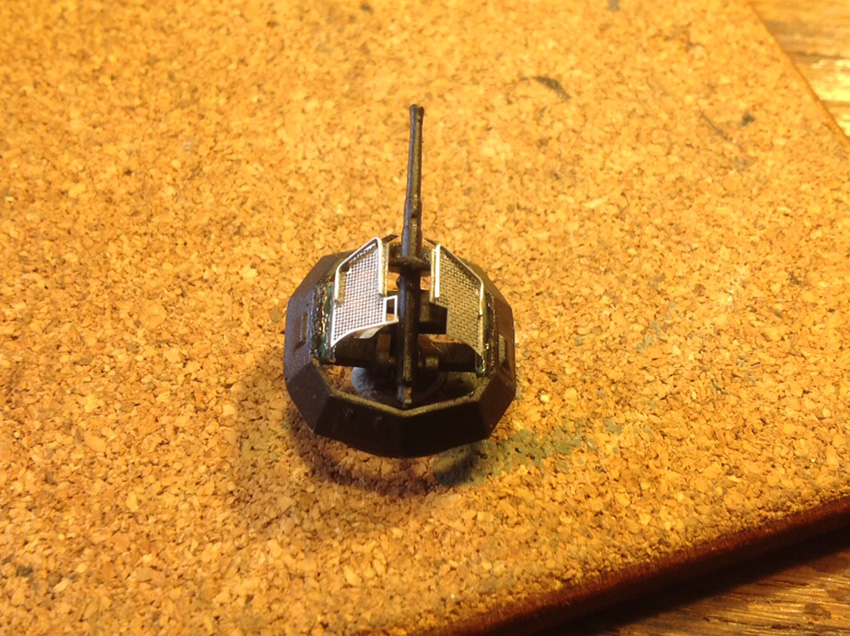
Unlike most kits this build started with the gun, not the running gear. As the pic below shows, a delicate detail of the gun mechanism was rather bent and misshapen, so the first bit of modification was scratch building a new metal replacement; something a lot sturdier! I also opened up the recoil groove and a hole in the muzzle, before assembling the pitifully oversimplified gun mount.


After putting the gun together and mounting it on the inner fighting compartment baseplate, the next step is to assemble the bodywork. This lead to a thoughtful hiatus, as I considered how to approach painting and detailing the internal areas. Having laid out the parts (pic immediately below), I then concentrated on adding bits and bobs to the baseplate and inner sides. 


Detail I added included a driver's seat, from a Plastic Soldier a Company kit (Pz. 38t & Marder Variants), some ammo (from a Hasegawa JagdPanzer kit), for which built a simple rack from plastic card, scratch-built door handles for the two lower mid hull exit hatches, a 'bin' type box on the left side (based on picture research of Sdkfz 234 interiors), some Whermacht personnel gubbins (another useful PSC part), and some structural stuff around the gun and as a frontal plate for the fighting compartment. 


I even spiced up the very dull floor with various bits and bobs, inc. a mechanical doodad (cut up from bits of another kit) which I think might be the top of the transmission housing, or gearbox (again based on photographic ref.). I have to say that I find this part of model building - even if there's a whiff of silk purse and sow's ear - extremely satisfying and pleasurable!


Once this detailing was competed I hand painted it all using Humbrol enamels. Various layers of different washes, and a bit of dry-brushing, helped weather it all a bit, and bring out the detail. I was pretty slapdash about this, I have to confess. But I feel it looks okay, if admittedly not up to the very high standards of many of the modellers whose work frequently spend ages admiring whilst making my own modest little models.


After taking rather too many pics of the resulting fighting compartment and gun - I guess this means I was pleased with result? - it was time to get back to the build. And, finally, it was the turn of the running gear. I'm not sure if this is correct, but I have vague recollections of reading somewhere that the development of wheeled vehicles of this sort, by the pre-war German army, was as a result of some clause in the Versailles treaty. By having wheeled armour sporting guns, the Whermacht could get around energies upon tracked tank numbers. Can anyone confirm this, or elucidate further, perhaps?


Whatever the truth of the above idea, it is certainly true Germany was the pre-eminent multiplier of military design ideas. I think this is a key reason behind my obsession with WWII German fighting vehicles; there are so many, and a lot of them, such as these '8-rad' types, also happen to look real,y cool. Below is the kit with wheels gluing in place. I used my kit-cleaning toothbrush to rest the model as the glue set. I have seen that many modellers build little rigs and formers for this sort of job. I'm cogitation slowly on how I might develop an adaptable approach to such a useful solution myself.


Pictured below is the stage of the build where one comes to the 'big mistake': the 234 variants, which include the popular 'Puma', actually had a single long mudguard arrangement on either side. The double pairings of sharply angular mudguards that Airfix went with - possibly the result of referring to an incomplete vehicle in a UK collection? - hark back to earlier vehicles, like the Sdkfz 231 series. Still, I don't mind this too much. As already mentioned, the multiplicity of designs, and the near Krakatoa-like continual eruption of innovations not German vehicle design, mean this could be a hybrid or experimental prototype. Whilst inaccurate to the informed eye, it still looks quite plausible, I reckon.


Pictured above and below are a few images of the drivers vision hatch, which I decided to modify a little and model in the open position. I had wanted to be a diver figure into the body of the vehicle as (and may still do so), but at present it's still a 'situation vacant'!


I quite like the trio of figures supplied with this model, and I might well use them. Though quite how I don't know! In the pic below one of the crew offers some fraternal support to another, who certainly appears to be a little off balance, perhaps on account of the unaccountable neat circular hole in his back? The commander stands atop the rear engine deck, scoping the field of vision with his binoculars.


And finally, for now, some pics with further added detailing, on the outer vehicle surfaces. The mudguards as spliced were way too sharply defined. Looking at pics of actual vehicles (be they Sdkfz 231 or 234) they all had a far more pronounced softness or curvature to these edges. So I filed these down a bit, using sandpaper and various files.

I also added width-indicators, modelled in three parts: plastic sprue was used as for the mounting points; stiff wire formed the length of rod; and tiny balls Milliput were made for the little white bobbles at the terminal points. Rather unfortunately, I lost one of these tiny little balls. I decided not to make another one, on account of one of the width-indicators being rather too short anyway. I may also bend this one a little, and pass it off as battle damage (the driver has obviously clipped a corner!).


In the above picture you can see that, on this occasion, I have opted to use plastic-card to make the jerrycan holders, having had such a painful experience using the photo-etched ones.


And last of all, the Kubelwagen and Sdkfz internal areas are masked off, ready for base-coating. This was done, as can be seen from the four small balls of Milliput in the Kubelwagen hood, before a I lost one of them, and before a I drilled tiny holes in them, and superglued them to the wire. In the background a Fujimi BMW with sidecar has had a scratch-built headlamp added, to replace (another) lost part.