Showing posts with label Esci. Show all posts

Saturday, 12 September 2020

Kit Build/Review: 1/72 Kfz. 305, Opel Blitz Ambulance, Pt II

Part II of the build of this model.

Ok, so here's a follow up to my recent archival report on an Opel Ambulance Build in 1/72. All of this second post still pertains to the original build, way back at the beginning of the year, during which I started detailing the interior of the ambulance body. In a third post, due soon, I'll be finishing the model with paint and decals.

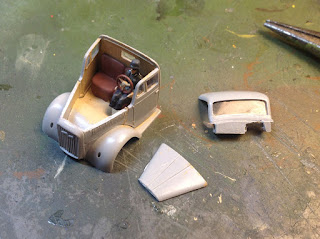
I left off the last post having blocked in some colours for the interior of the cab. Having done quite a few similar builds I felt I was wasting time doing fairly detailed interiors, which wound up nigh on invisible. So I decided to keep this simple. Block colours, no shading, and very little detail.

Introducing a driver figure. Keeping it all very simple.

Starting to put the glazed cab together.

What's with the steering wheel moving 'twixt driver ...

... and dashboard?

Cab more or less completed, next thing was to fix it to the chassis. 

Cab assembled...

... er, that should be fixed to the chassis by now!?

At this stage I decided that, like the British ambulance I built a long while back, this should have opening rear doors and an interior with some detailing/interest. Finding contemporary wartime ref of original German vehicles where the interior was visible seemed nigh on impossible. The image below was the best I could do at the time.

The only view into the interior I could find; poor and limited.

So I wound up referring to this.

In the end I was forced to look at assembly or parts images from 1/35 models, such as the Dragon stuff shown above. More recently I got a load of modelling mags, one of which has a Maultier ambulance with detailed interior as a featured build. That'll be a great help when I get round to finishing the interior, in the third and hopefully final part of this extended build!

Started adding detail to the interior of the ambulance body.

I should've done this before putting the body together!

It's not going to be anything too great, I can see that. Especially since I decided to go down this rabbit-hole after putting the ambulance 'office' space together. Adding detail - and painting it, for that matter - would've been a lot easier whilst this whole assembly remained as separate parts. They say you learn from your mistakes. That's why I make so many... I'm keen to learn!

Tuesday, 8 September 2020

Kit Build/Review: 1/72 Kfz. 305, Opel Blitz Ambulance, Pt I


NB Another old post finally arrives. 'Tonight' was actually some time twixt Jan'-March!

Tonight I started a kit that's been in my stash for a couple of years at least. Somewhere along the line I seem to have discarded the box, save for a cut-out of the 'colour profiles' off the back of it. I think this is the Italeri kit, possibly formerly produced by Esci. 

Laying out the kit and tools, etc.

Step one, the chassis.

Step two, the cab (inc. glazing).

Blocking in interior colours.

At this point my photographic record, like the build itself, gets hazy. I know that I completed the cab, and started detailing the interior of the rear of the vehicle. Hopefully I'll locate the images, and come back with a second instalment on the build soon...

PS - In the interim, I've got hold of a modelling mag (Airfix Model World, Mar' 2016) in which a guy builds a 1/35 Maultier Ambulance. Although the chassis is rather different, the inner detailing of the ambulance should be a great help to me in completing the interior of my own much smaller model.

Saturday, 16 November 2019

Show Report: Scale Model World, Telford, 2019


Under cover of buying opportunities for xmas and birthday goodies, I was able to persuade Teresa to accompany me to Scale Model World in Telford. I first learned of the show, IPMS' flagship event, via model-making pals at the Wisbech IPMS branch. 

I booked us a night in an AirBnB place, near Wenlock Edge, in a very beautiful spot (and at a bargain price!), which turned out, having just had the car washed, to be down a muddy potholed lane. The weather, which had started sunny and turned rainy, had been an almost biblical deluge for most if the latter half of the journey.

We didn't get to see the countryside, or the local historical attraction - the world's first Iron Bridge, built by Abraham Darby III  - due to the poor weather and lack of sufficient spare time. The first day we barely saw anything through the heavy rains and eerie mists! The view across the valleys from the picture window of our B&B, on waking on Sunday, was magnificent in the sunshine. My photos don't really convey the splendour, alas.

The view from our AirB&B bed.

And up by the window itself.

Day One

Having dropped our gear at our accommodation, we headed to the show for the last hour or two of the opening Saturday. A fairly rapid tour of the three enormous main rooms at the Telford International Centre revealed the enormity of the event. Apparently it's the largest model show of its type in Europe, possibly even the world? And there's a strong International presence that tends to back that idea up.

In the end I didn't even look around either the competition area, or the 'kit swap' room. Doh! Nor did I take many, or in fact any, photos of the hundreds, possibly thousands, of models on display. I did briefly say hi to the Peterborough IPMS group, who are local (but I haven't visited), and the Wisbech group, who are even more local, and who I regularly attend.

One item I was very interested in beforehand was the Horton Ho-229, in 1/72 (also available in 1/144, 1/48 and 1/35), by Japanese co. Zoukei-Mura. Sadly for me, at £40 this was way too dear. It's a splendid looking kit, however, and a fascinating modelling subject. But I reckon I'll get a Revell one for now! Some pictures from the show follow.

Two 1/72 examples, and the dinky 1/144 version.

A very funky 1/35 version of the model.

Also available in 1/48! Note very cool wood textures (decals?).

Another view of the 1/72 kit: in both skeletal and skinned form.

The stall that stood out for me on my first dash around was Collect-a-Kit, on account of their vast stock of 1/76 and 1/72 kits, including lots of old Esci, which I feel peculiarly nostalgic about. Almost all of these kits were priced up at £8, which seemed quite reasonable and attractive. In the end I bought quite a few. But, and rather strangely, no Esci kits.

We rounded off our first day at SMW with a delicious Italian meal at Wildwood, followed by a trip to the pictures to see Roland Enmerich's Midway movie, which we both thoroughly enjoyed. After the ordeal of the overly long and foot to the floor oddysey of getting there, this was a great way to complete our first day.

Day Two

The Sunday allowed me to spend more time checking the entire show out more thoroughly. Sometimes I was accompanied by Teresa. But more often she was off doing her own thing. She showed most interest in bigger shinier models, and even suggested I buy her a lunar lander kit as we perused the very impressive NASA SIG stand.

Fool that I am I overspent on both days. And what with fuel, food, cinema and accommodation this proved to be a very expensive weekend. I'm going to have to find some stuff I can flog, to get money back into my haemorrhaging bank account. Pictured below, my haul from the show; all 1/72 or 1/76, except for the 1/35 Tamiya 88mm. The latter, something I always lusted after as skid, Teresa bought me as a b'day or Xmas gift. Bless her!

I do love these old kits; beautiful box art paintings!

More 88mm guns for a battery, and some IBG models (new to me).

Preiser figures, IBG mags (!), and the Tamiya 88mm.

I really love Preiser's 1/72 WWII German figures. I don't often see them on sale anywhere in the UK. A pity, as they're amongst the best for WWII Germans in 1/72. . The set I acquired at the show, whilst rather pricey, are beautifully sculpted. And come in kit form on numerous sprues, giving many assembly options. The Preiser boxes are also jam packed with info, inc 'Gestaltung- und Bemalvorschläge', or design and painting suggestions!

These figures, the IBG Stug, and the Hasegawa Mercedes G4 (inc. saluting Hitler and entourage!) were the first things from the show I unboxed and started working on. I'll be posting on these soon..


Thursday, 26 May 2016

1/72 WWII - Italeri JagdPanzer Hetzer


I'm not exactly sure why, but I've always liked the look of the little Hetzer tank destroyer [1]. This one from Italeri (is this another of their old Esci models, re-released?), has the late-war big exhaust muffler thing, and a remote machine gun on top. As pictured on the box artwork, there are also two crew. More on these guys later!


Three sets of camo and markings are shown on the back of the box [2], with decals included for each variation. 

I built this pretty sharpish, after buying it for £5 at Partizan, in whatever free moments I could grab. And, despite one or two minor niggles, and excepting one or two rather more major gripes, I've enjoyed making this model. Minor niggles include such things as some parts (of the running-gear, in particular) not being sufficiently easy to align correctly, and the bits of spare track mounted on the body requiring their inner 'teeth' removing (a step not mentioned in the instructions), in order that the track retaining parts fit into their holes.

The instructions use photographs of the kit, and are serviceably clear.

To be sung Elvis-style: 'You can do anything you want, just lay offa my two beige sprues!'

The first of the two more major gripes has to do with the extreme difficulty these particular (but perhaps also this style in general?) link'n'length tracks presented. I've tried doing what I did here before - and, as I recall it, with more success previously - whereby I lay the tracks out and glue them together in two segmented lengths, per track, before finally draping them over the running-gear, and adjusting the fit.

It's a pity 1/72 is probably too small a scale for tracks to be supplied as individual links that somehow  clip together, into a fully flexible track, as Dragon's 1/35 'Magic Tracks' do. The closest I've ever seen to such an arrangement is not, perhaps surprisingly, these link'n'length numbers, but the flexible one-part tracks made of normal styrene, thin enough to bend snugly around the running-gear, on Revell's SdKfz 7/1 (the kit with a four-barrelled flak gun on the back, which I posted about here).

As is so often the case, it's the running-gear first.

Then upper and lower chassis/body. Gun cleaned up, barrel drilled-out.

As can be seen in this pic, there's some detail on the gun that will be invisible when the model's completed!


Gluing strips of the link'n'length tracks together, using lolly sticks to prevent them gluing themselves to the work surface, and to keep them properly aligned.

After excruciating agonies - continually dropping individual track links; extreme difficulty in properly aligning the links (on almost every plane/axis!) - the tracks in situ.


At this point I meant to spray the interiors, as I hoped to have hatches open, and crew inside. But, as the crew didn't fit...

Nearing completion of the build.

The second of my bigger gripes is that the two Panzer crew figures supplied don't fit inside the hatch openings. Okay, they're not the greatest figure sculpts, but I would've liked to have used them in this Hetzer model nonetheless. Instead they'll go in the spares box for use elsewhere. I tried to adjust the angle of the binocular holding arm of one of them, but I didn't achieve the result I was after!


I actually really like the crew figures, although, out of the vehicle their poses make them look rather like zombies.

Like all but one or two of my WWII models, this joins the growing armament awaiting proper painting. I finally have a decent dual-action airbrush as well, so it's just a matter of finding the time to get started using it!

My conclusions regarding this particular model? Well, it looks, judging from the figures primarily, like quite an old kit, but it's still pretty cleanly moulded, and - aside from the fiddliness of the tracks - goes together pretty well. 

A nice ref. pic. of the real thing. It'll be fun trying to emulate that rusty patina!

It is a pity the crew don't fit. Although, having said this, it might be possible to assemble them in such a way (stick the torsos through the upper casemate from below, and then glue on the arms!?) as to have them inside the vehicle.

I've docked thus kit one balkenkreuz on account of the tracks, and another 1/2 cross 'cause the figures won't fit inside. But it's still fun to build (tracks apart!), and makes a nice looking addition to my growing fleet of WWII German armour. 

On the workbench, amidst other ongoing stuff, primed in grey.

So, despite the relatively low score 'be given this model, I might well build it again one day. Although if I do I'd prefer to source tracks elsewhere. Oh, and the crew might have to go under the knife, for a bit of waistline weight-reduction surgery! But I think I'll be more likely to try a few from other brands first.

----------
NOTES:

[1] I suspect the reason is something to do with pics of the vehicle in Panzer Colours, a book that fired my imagination and engaged my enthusiasm on this topic as a kid. 

[2] The black and white instructions include colour and marking info on four vehicles. I haven't checked, but I assume that's the three shown in colour on the back of the box, plus one more!?

Thursday, 12 May 2016

Painting Progress: 1/72 & 1/76 WWII German troops

Left and rear, the acrylics I already had, by Vallejo and Howard's Hues. The large group at right, the new stuff. All Vallejo.

A few odd or even downright bad experiences with enamel paints recently [1] have lead me to decide to go for it on the acrylic paint front. I have bought a few acrylics here and there over the preceding years, but on the whole since resuming miniature figure collecting I've stuck with enamels.

But a few days ago, as some grey-green Revell enamel reacted strangely with the Tamiya dünkelgelb basecoats of a few of the German figs I'm currently working on, I decided to pop into the Ely model shop, and get properly tooled up with all the necessary acrylics to make a decisive change in medium.


So, anyways, here are a few more pretty cruddy pics of the mass of German troops, now that I've started blocking in the base colours. This is all a bit experimental and work-in-progress. But I'm liking the Vallejo paints a lot. 

I want some of these guys togged out in the highly attractive and very intriguing camo-patterns the Germans developed. Working these out, so they look right to me, is proving an interesting challenge.

Lilliputians on lollipop sticks.

The foreground three rows here are all Nebelwerfer crews. If anyone knows the name of the brand of the figures nearest the camera, please let me know. I've forgotten who I got them off at whichever Salute it was a few years back! Rows two and three are Esci, rebranded as Italeri. Also visible are some Caesar and Dragon Panzer crewmen, and some Milicast SPG crew.


To the left of the previous pic are these guys. Too many brands here to list! But a lot more green in evidence. Some of the more basic figures, esp. the Airfix ones and similar, are getting the early-war look, with grey trousers and green jackets. But there are also plenty that I'm doing as mid- to late-war, a good few of whom will get some form of camo.

At the very rear are another brand currently unknown to me. Very chunky figs, but nice nevertheless, benefitting from good active poses. They appear to be in winter-sheets style get-up. But I've opted to paint them in grey greatcoats with camo smocks and helmet covers. I dunno, perhaps they might even get an unusual/unofficial (i.e pillaged from some non-German source) camo colour scheme - the Italian pattern, perhaps? - for a bit of interest.

On this latter thread, there's a great pic in the Blandford Uniforms of WWII book I'm using  for ref., of a German soldier in baggy Italian pattern camo. There's also a very interesting post on this topic here [http://souvenezvous44.blogspot.co.uk/2013/02/camouflage-petits-pois-contre.html?m=1], showing that this pattern was used in theatres other than Italy itself.

Even closer in on the Nebelwerfer crews. I think I took this so I could see their back-packs/gear better!?

13/5/'16 I worked into one of the camo schemes on some of the figures today, as pictured below. Still in the 'blocking in' phase... slowly but surely! It's hard work, this four-colour pattern. 

There are a few subtle (i.e. barely discernible) differences in amongst these various groupings, where I've tried different combos of colours, but in search of the same overall look.

I do wonder how best to get the right effect, taking the small scale into account. Obviously the pattern is going to be much simpler, and is - I have to confess - very slapdash and approximate; I'm still essentially experimenting. The next step will be the various coloured dots. And then belts, heads, faces. Weapons, ammo, etc.


I really have no definite plans as yet for shading or weathering, etc. One thing's for sure tho': with the volume of figures I want to paint (and I really need to get back to my Napoleonic hordes!) I can't be too fussy. And I think with the advancing years my eyes tire quicker than they used to. Hey-Ho!

14/5/'16 - Update:

I decided to look into the subject of German camo patterns, and find out what it was I was about. I discovered that I'm gravitating to two particular types, one called (I think?) flittertarn, and another knows as Dot 44 (and numerous other things!). Pictured below is a reproduction jacket in the latter pattern, made by Epic Militaria


Above is a snapshot of my slow progress towards this pattern, on some of my Panzer crew figures. At such a reduced scale the pattern is both very random, and vastly simplified. But I think it's headed in the right direction. Needless to say, it's driving me, er... dotty.

15/5/'16 Today I went pretty dotty, painting little dots. Originally I separated out a bunch of figures with the intention of concentrating on some erbsenmuster  (the Dot 44 or 'pea') pattern. But then I started to work further on some figures I intend to have in splittertarn or splittermuster style gear.

In the pic immediately below the top row (Nebelwerfer crew) have splitter (splinter) patterns, the next row down (Panzer crew) are in erbsen or Dot 44. Then there are the Dragon Tiger Aces figures, in what was also originally meant to more Dot 44, but went a bit more 'Dijon Mustard', and now looks more like platanenmuster herbst, or the Autumn side of the 'plane-tree' pattern camo'. Not sure yet which way to go with the other Nebelwerfer crew, down at the bottom!!


A slightly closer in view of some of the latest camo' work.

----------
NOTES:

[1] It's odd: I only have two or three Revell enamel tinlets. I used one - a kind of grey-blue - on a lot of the helmets... and no probs. But when I tried the grey-green, for jackets, etc., the enamel reacted horribly with the Tamiya basecoat... dissolving it, in fact!