Showing posts with label Dragon. Show all posts

Thursday, 12 May 2016

Painting Progress: 1/72 & 1/76 WWII German troops

Left and rear, the acrylics I already had, by Vallejo and Howard's Hues. The large group at right, the new stuff. All Vallejo.

A few odd or even downright bad experiences with enamel paints recently [1] have lead me to decide to go for it on the acrylic paint front. I have bought a few acrylics here and there over the preceding years, but on the whole since resuming miniature figure collecting I've stuck with enamels.

But a few days ago, as some grey-green Revell enamel reacted strangely with the Tamiya dünkelgelb basecoats of a few of the German figs I'm currently working on, I decided to pop into the Ely model shop, and get properly tooled up with all the necessary acrylics to make a decisive change in medium.


So, anyways, here are a few more pretty cruddy pics of the mass of German troops, now that I've started blocking in the base colours. This is all a bit experimental and work-in-progress. But I'm liking the Vallejo paints a lot. 

I want some of these guys togged out in the highly attractive and very intriguing camo-patterns the Germans developed. Working these out, so they look right to me, is proving an interesting challenge.

Lilliputians on lollipop sticks.

The foreground three rows here are all Nebelwerfer crews. If anyone knows the name of the brand of the figures nearest the camera, please let me know. I've forgotten who I got them off at whichever Salute it was a few years back! Rows two and three are Esci, rebranded as Italeri. Also visible are some Caesar and Dragon Panzer crewmen, and some Milicast SPG crew.


To the left of the previous pic are these guys. Too many brands here to list! But a lot more green in evidence. Some of the more basic figures, esp. the Airfix ones and similar, are getting the early-war look, with grey trousers and green jackets. But there are also plenty that I'm doing as mid- to late-war, a good few of whom will get some form of camo.

At the very rear are another brand currently unknown to me. Very chunky figs, but nice nevertheless, benefitting from good active poses. They appear to be in winter-sheets style get-up. But I've opted to paint them in grey greatcoats with camo smocks and helmet covers. I dunno, perhaps they might even get an unusual/unofficial (i.e pillaged from some non-German source) camo colour scheme - the Italian pattern, perhaps? - for a bit of interest.

On this latter thread, there's a great pic in the Blandford Uniforms of WWII book I'm using  for ref., of a German soldier in baggy Italian pattern camo. There's also a very interesting post on this topic here [http://souvenezvous44.blogspot.co.uk/2013/02/camouflage-petits-pois-contre.html?m=1], showing that this pattern was used in theatres other than Italy itself.

Even closer in on the Nebelwerfer crews. I think I took this so I could see their back-packs/gear better!?

13/5/'16 I worked into one of the camo schemes on some of the figures today, as pictured below. Still in the 'blocking in' phase... slowly but surely! It's hard work, this four-colour pattern. 

There are a few subtle (i.e. barely discernible) differences in amongst these various groupings, where I've tried different combos of colours, but in search of the same overall look.

I do wonder how best to get the right effect, taking the small scale into account. Obviously the pattern is going to be much simpler, and is - I have to confess - very slapdash and approximate; I'm still essentially experimenting. The next step will be the various coloured dots. And then belts, heads, faces. Weapons, ammo, etc.


I really have no definite plans as yet for shading or weathering, etc. One thing's for sure tho': with the volume of figures I want to paint (and I really need to get back to my Napoleonic hordes!) I can't be too fussy. And I think with the advancing years my eyes tire quicker than they used to. Hey-Ho!

14/5/'16 - Update:

I decided to look into the subject of German camo patterns, and find out what it was I was about. I discovered that I'm gravitating to two particular types, one called (I think?) flittertarn, and another knows as Dot 44 (and numerous other things!). Pictured below is a reproduction jacket in the latter pattern, made by Epic Militaria. 


Above is a snapshot of my slow progress towards this pattern, on some of my Panzer crew figures. At such a reduced scale the pattern is both very random, and vastly simplified. But I think it's headed in the right direction. Needless to say, it's driving me, er... dotty.

15/5/'16 Today I went pretty dotty, painting little dots. Originally I separated out a bunch of figures with the intention of concentrating on some erbsenmuster  (the Dot 44 or 'pea') pattern. But then I started to work further on some figures I intend to have in splittertarn or splittermuster style gear.

In the pic immediately below the top row (Nebelwerfer crew) have splitter (splinter) patterns, the next row down (Panzer crew) are in erbsen or Dot 44. Then there are the Dragon Tiger Aces figures, in what was also originally meant to more Dot 44, but went a bit more 'Dijon Mustard', and now looks more like platanenmuster herbst, or the Autumn side of the 'plane-tree' pattern camo'. Not sure yet which way to go with the other Nebelwerfer crew, down at the bottom!!


A slightly closer in view of some of the latest camo' work.

----------
NOTES:

[1] It's odd: I only have two or three Revell enamel tinlets. I used one - a kind of grey-blue - on a lot of the helmets... and no probs. But when I tried the grey-green, for jackets, etc., the enamel reacted horribly with the Tamiya basecoat... dissolving it, in fact! 

Sunday, 10 May 2015

1/72 WWII - Dragon Stug

Three is a magic number...


Having just built three Tiger I models over the recent half-term, I was surveying my rapidly-shrinking stack of unmade models, and wondering what to make next. I picked the Dragon Stug. It was only some time into building it that I realised that this will be my third Stug. So in a way this build follows quite neatly from my recent trio of Tigers. 

But whereas I made all three Tigers back to back, I've had a big break between this and the previous two Stugs. The first Stug I made was an old Airfix kit (I don't think I've posted that build yet?), and I built mine whilst my dad built his version of the exact same model. Shortly after that I put together a Revell Stug. Whilst I still like both models, the Revell was clearly way better, in terms of both detail and quality of moulding/fit of parts, etc.


As mentioned in my posts about the Tigers, I was mildly underwhelmed by the Dragon Tiger I, and felt that, on balance, the Trumpeter and Zvezda were both as good as, and the Zvezda in some ways better than the Dragon model. Dragon are a new brand to me, and internet hype around their products (admittedly much of it singing the praises of their 1/35 models) lead to high expectations on my part.

Another new development in models since my childhood days is the advent of such additions as resin or photo-etched parts. The Dragon Tiger I (late prod. mit Tiger Aces!) had a few metal parts. This Stug doesn't. But it does have DS - 'Dragon Styrene' - tracks. Oh, and decals, of course (extremely minimal, confined only to Balkankreuz!). So this model is pretty simple, being essentially nowt but plastic. Despite the lack of markings options, and the absence of funky little metal parts, I'm happy to say that building this Stug really delivered on the alluring legend that is Dragon.


First of all the level of detail is, to my eyes, stunning. So also is the quality of moulding, and the fit of the parts. The kit is also very cleverly designed, with some lovely touches, such as the road-wheels that come as two parts, allowing one to paint the two elements separately before combining them. Very clever, and very satisfying to construct, which, when building a model, is so very, very important.

There are several steps that are optional, and this results in the spare parts generated by the build exceeding the two parts marked up as such on the instructions leaflet. The instructions are similar to those for the Tiger I kit. Printed in full colour, and showing what appears to be the real kit in various successive stages of assembly, these are certainly amongst the most beautiful instructions I've yet encountered.


I must admit though that there are a few places where the more old school black and white line illustrations favoured by most manufacturers might have been clearer. But then again, as Dragon kits seem to be so well designed, what might be a little unclear on the page is usually abundantly clear in practice, thanks to such elements of design construction as locator pins, holes, and suchlike.

As regards detail, you've got to love it when pieces such as the periscopes are fully moulded, such that you know that although it can't be seen once built, yet nonetheless inside the vehicle these scopes are beautifully realised! Several hatches are supplied in such forms as to let you choose to model them open or closed. If you were to model them open, some additional work on their in- or under-sides and the interior might be entailed. As some hatches are open on my other Stugs, I opted to have all the hatches on this vehicle closed.

Further elements that set my model-making maw a-droolin' were such parts as the tow-cable hooks, the commanders cupola, and the Several little doodads whose names I don't know, all of which are, thanks to the design and construction of the model, just... well, rather special. Also, the way the various elements of the hull and body are built up, it's both beautiful and highly satisfying. What could be better than that? 


Pictured above and below is the construction of the rear hull plate, and late-model design exhausts. Once these are in place the traditional running-gear first routine unfolds. The detailing and crisp clarity of the parts is a joy to both behold an assemble. The spiked idlers are just lovely!


The front hull plate goes on. The level of detail on the hull, as afforded by the multiple parts, and as depicted on the underside of the hull, are simply fabulous. 

Another aspect of this build I enjoyed immensely was where you're presented with the options of keeping the integral front-hull tow-rope anchor points, or chopping them off and fitting others of a different design. To have, built into the basic build of the kit, elements of what feels like a conversion, adds another layer of pleasure to the act of construction. I know I'd definitely like to make some more Dragon Stugs, but perhaps different iterations, e.g. older or different types. 


I set aside the next steps, relating to building and painting all the main road wheels, intending to return to them at a future/later point. This lead me on to the construction of the low-profile casemate. Once again the supremely high quality of the detail and moulding are simply wonderful.


The turret cupola is exquisite. And the gun on this kit puts all the others, but especially the really rather poor Airfix model, firmly in the shade. 


Above and below are 'above and below' shots of the internal gun mount. 


More exquisite detailing, in the form of the rear hull row dale mounts, and the superb vented paneling over the engine compartment.


I opted to use both periscopes, simply because they're such nice little details, and so well executed by Dragon.


One of the only gripes Imhave with this model concerns the fit of the bin for the spare wheels. The angle of the back of the bin and the bottom is 90(degrees), whereas the angle between the mudguards and the side of the casemate is more obtuse. This results in a poor fit when positioning the bin:'shouldmitmsit flat on the mudguards, and therefore not meet the casemate; or should it lie against the casemate, and thereby not sit flat on the mudguard?


Having more or less competed construction of the upper and lower portions of the build,Mir was time to bite the bullet and paint the road wheels. These were are all sprayed or airbrushed, in matt black and dunkelgelb. And then glued in position, once some paint had been scraped off to allow the solvent to bond the plastic.


The tank undercoated in math back, ready to receive the wheels. After that, it'll be time to mount the DS tracks... another new departure!


Having made the subject of doing things in threes part of the theme of this post, and having built three Tiger I models, and subsequently this, my third Stug, my next three might just be to build my third Dragon kit, such was the pleasure this afforded! If I go that route, it'll be their Brummbar. And as it happens I have Dragon's Brummbar in both 1/72 and 1/35. I think I'll stick with 1/72 for now, and save the 1/35 for later!

Saturday, 11 April 2015

1/72 WWII - Dragon Brummbär

Same box art as the 1/35th version.

This is my third Dragon model, and, like the other two so far, in 1/72. I happen to also have the 1/35 version of this same vehicle, again by Dragon. But I'm saving the foray into that larger scale for some future point. The Stug and Tiger that I previously made had full-colour photographically illustrated instructions. This one has the more traditional black and white line style directions, although the book is still a full colour affair.

This was the trickiest Dragon build so far, and not all of that for good reasons. I've found all the Dragon instructions, whilst very nicely presented, not quite as clear (or perhaps I ought to say idiot-proof?) as I would like. This set were even less easy to follow. One of the biggest issues on all the Dragon instructions is their use of compound steps. By that I mean a single picture into which several stages of construction have been compressed.

This causes issues with a lack of clarity - not helped in this instance by several other issues, which I'll go in to in due course - as it can be quite easy to miss something, or difficult to see things properly. The additional issues that further complicated things for me were: some steps that simply weren't given at all; some mis-numbered and/or missing parts; some confusing things in the diagrams themselves.

Can you see, above, the hole I refer to below?

Here are a few examples: 1) In the picture above, note the hole on the left-side of the lower casemate (on the left side of the tank, that is; the right side as you look at it in the pic. above), on the darker shaded angled section. In the instructions there's no hole there. Instead there's a curved protrusion. I found two similar looking parts on sprue A, and chose to use the part most closely visually matching the part in the pic. Although this part looks right, it wasn't included in the assembly instructions, nor was there any 'male' part (to go into the hole), or any other kind of location marking. So I had to more or less guess where it ought to go, the only guide being that it should obscure the hole!

Actually there were rather too many instances, I feel, of parts that would've benefitted from more clarity as to proper fit. The whole upper hull construction, which is comprised of five sub-assemblies - casemate, front deck, rear deck and left and right track- or mud-guards - is, despite a few alignment indicators, ripe for misalignment. Indeed, when I put it all together, and attached it to the lower hull, there were a number of places where the model was not achieving a snug fit. This can be seen in the above pic, where the upper and lower front hull sections meet, a visible gap widening as you scan from left to right.

Inner faces of the hatches, with some nice (if possibly redundant?) detail.

Outer faces of the same hatches.

Some nice but perhaps redundant detail is included on the rear hatch of the casemate. It's redundant chiefly because you'd have to destroy the inner detail in order to attempt to display it open. The two upper casemate hatches also annoyed me, due to the hinges, which are beautifully sculpted and cast, but do get in the way of a clean assembly. These can both be modelled open or closed. And if the larger rectangular hatch is modelled open, it has some supporting struts, and more of that nice (but this time less redundant) internal detail.

Case(mate) closed!

One reason I chose to model the casemate hermetically sealed was that there's no inner gun detail. Indeed, in relation to the gun, I was somewhat disappointed that this kit doesn't allow for any movement at all. As there are no inner casemate fixtures the equivalent of those on the front exterior, if you didn't glue the gun in position, it'd just drop into the hull! If you did model the hatches open, you might just be able to see the rear hatch detail (you'd have to model the entire rectangular hatch open - which isn't shown or suggested in the instructions - i.e. both sides open), but there'd either be no inner gun detail, and that you certainly would see, or else you'd need to scratch built it, along with any other desired interior detail.

All of these gripes, and I'm only just getting to my second point in my critique of what I hold to be rather duff instructions! 2) In the step within the instructions dealing with the open and closed options for the circular upper casemate hatch, close examination of the pics reveals that closed they are shown one way round, and open, the other. If the two halves were identical this would be immaterial. But they aren't. Surely the same part should be placed on the same side regardless of whether the hatch is to be open or closed?

The as yet unattached exhaust system that I screwed up somewhat.

3) This time I refer to the issue of what I'm calling 'compound' stages. At a certain point in the assembly I failed to spot that I needed to add a particular part. This resulted in a number of mistakes. First of all, when assembling the rear upper-deck area it didn't go together quite right, and second, my omission lead in turn to a real panic/bodge/hash when I started to assemble the exhaust elements pictured above. At present this whole assembly is, I believe, a bit wrong. I think some suitably thin slices of the right diameter sprue, or some plastic rod, will sort it (at some point!).

One small but simple instance of plain dumbness on my part, and therefore not something I have enumerated as a gripe, was forgetting to add the single lens periscope (I left out the binocular periscope altogether) until after I'd attached the casemate to the hull. How I missed that I don't know! Getting it into its proper position once the hull and casemate were joined together was a real challenge. Fortunately I hadn't put the hatches on, as I ought to have done had I followed the instructions to the letter. But I'd decided by this stage that the instructions were flawed enough to be departed from!

4) My fourth complaint is not about the instructions, but the model itself: most Dragon stuff I've built, including most of this kit as well, is superlatively well manufactured. There was an issue on this kit, however - at least for me as my model-making techniques currently stand - which is that several very delicate parts are attached to the sprue in such a way that removing them wrecked them. This happened to a number of parts. But the worst cases were the aerial, and the rear chassis wheel racks. All these components were very thin, and the sprue attachment points were too big/coarse.

The original plastic rear wheel racks. I believe I glued these the wrong way around. And perhaps I ought to have tried to add the spare wheels before fixing them to the hull?

I decided to snip off the aerial - which was irretrievably damaged anyway - with a view to perhaps replacing it, either with fine wire or some stretched sprue. That was easy. But the wheel-racks... Ach, mein giddy führer! did they ever cause me grief!? In another instance of lack of instructional clarity, I wasn't sure if I ought to add the spare wheels before attaching the whole sub-assembly to the rear-deck or afterwards. Actually this was a bit of a moot point anyway, for several reasons...

Note: only enough spare wheel parts to make two spares, not the full four. The darker grey wheels (from a different kit/brand) look right, but are too small, and none of the wheels fitted anyway!

Which brings me to point 5) There are sufficient inner-wheel parts (the nicely detailed inserts, shown in the pic. above) for the entire running gear, plus four spare wheels, but there are not the same number of actual wheels. There are 20 of the detailed inner-wheels, but only 18 of the full double outer-wheels! What gives? In the end this proved ultimately to be as much of a relief as it was a disappointment. I did try some road wheels from a Plastic Soldier spares set, but they were significantly smaller. And this is all pretty academic anyway, 'cause none of them fitted! Indeed, my attempts to make them fit simply destroyed the already weak and malformed plastic parts that comprised the storage frames.

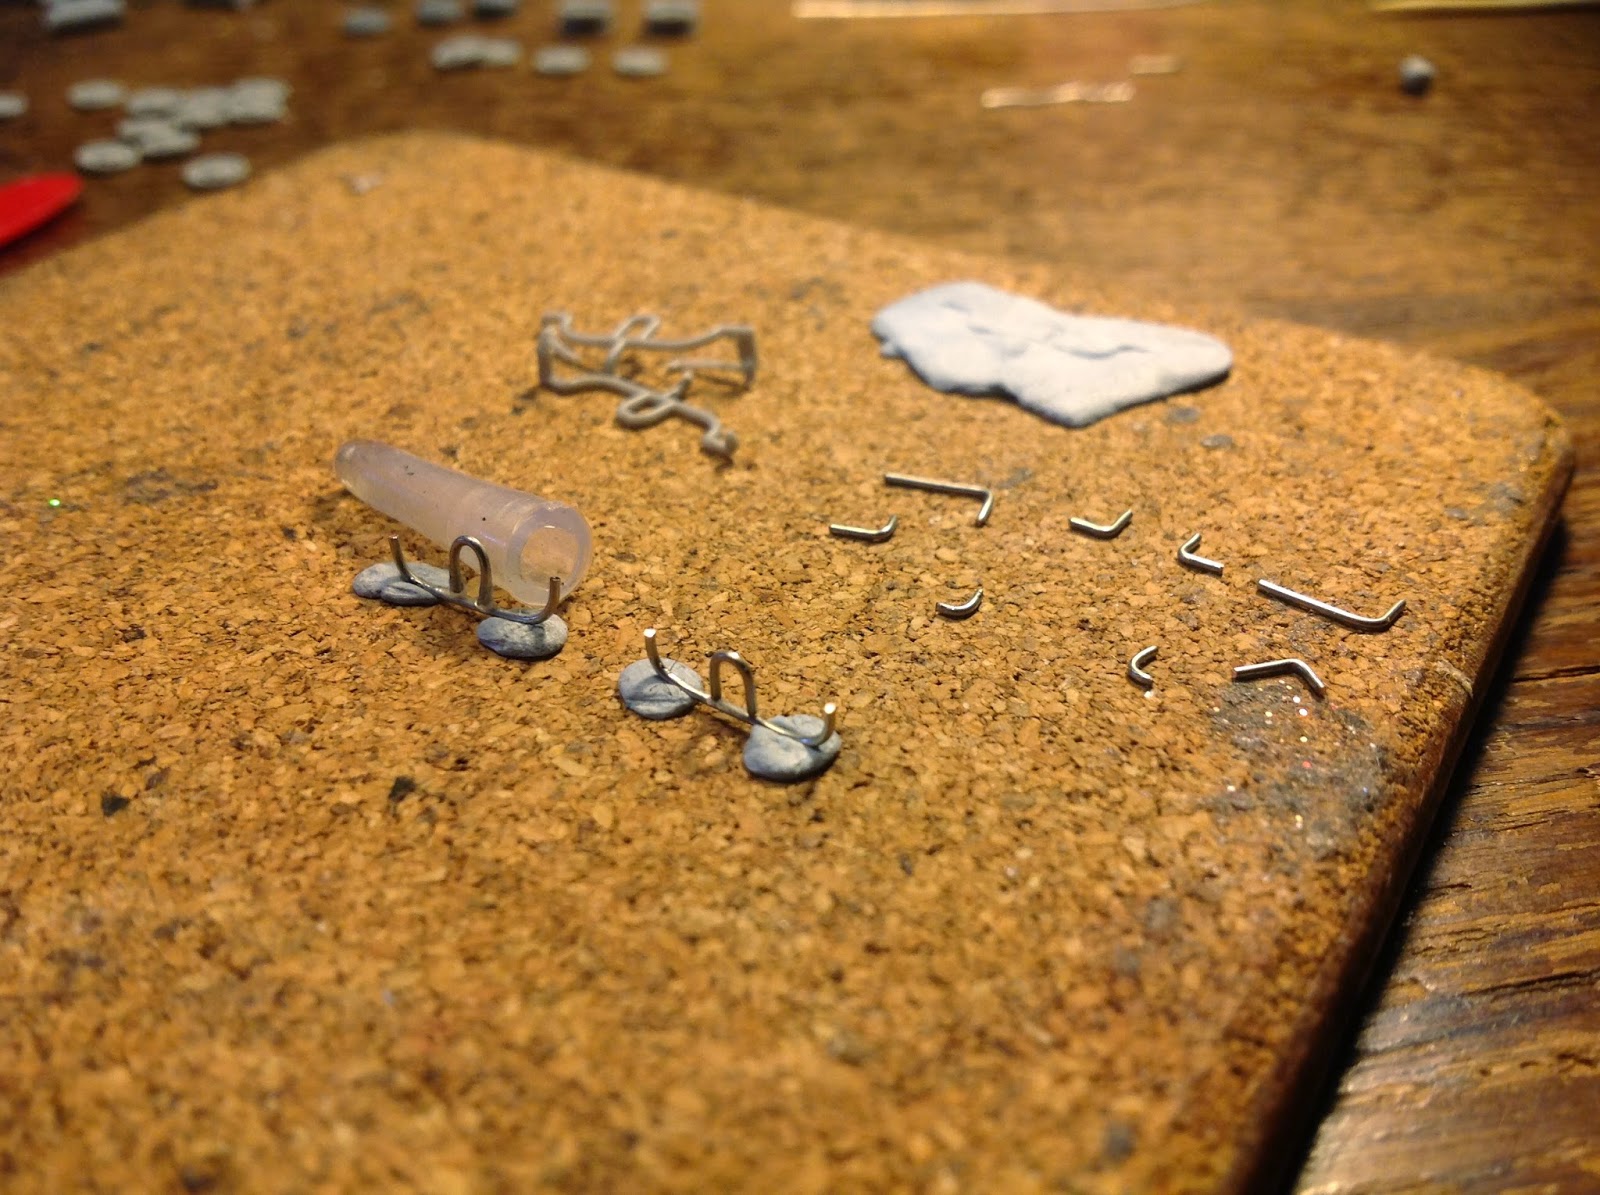
Scratch-building wire replacements: having cut and bent all the elements, modelled on their plastic counterparts...

... gluing begins.

Rather than simply leave out these rather cool looking details, I decided I'd scratch-build my own. Rummaging around a bit I eventually rooted out some appropriately sized and shaped wire. The series of pictures above/below shows my slow and painful progress with making these. Making these took me many hours, and I wasn't even that pleased with how they were turning out. The biggest arse-ache was trying to fix the individual pieces together. I find super-glue immensely frustrating. It's guaranteed to glue together absolutely anything and everything except the bits I want to glue. And even when it does finally glue the the pieces I do want to glue together, it does so in the wrong positions, and usually with horrible blobby accretions of glue. Aaaaarrrrgh!!!!

What a nightmare it was...

... working with cyanoacrylate!

Next time I try this I must see if I can build similar parts using plastic rods. At least they'll glue easily! Bending wire is relatively easy - although getting the right shaped bends is harder - but gluing it is a real mother! I think the basic kit build took two three hours. It took just as long, poss even significantly longer, just to build those two g'damn wheel racks. I tried once again to add spare wheels. But still no dice! I took up modelling for pure pleasure. And most of the time that's just what it is. But trying to glue these wheel-bins. Sheesh... that was certainly purgatory, perhaps even hell!

Attaching whe wheel-storage racks.

Finally, several hours later... in situ.

Just as I started to worry I really was losing my mind, I finally finished the wheel-racks. I popped a few more tiny details onto the model, including one or two bits that broke off whilst I wrestled with gluing the wire, in the process noticing further discrepancies to do with missing or unused parts. And finally I sprayed the whole lot with a black undercoat. Having typed this, I'm gonna go have one last look. I do hope those pesky wheel racks look better with a lick of paint in 'em!?


Well, although this model is as yet unfinished, joining the ever-growing ranks of my WWII German armour pool that awaiting the eventual purchase of a dual-control airbrush, it time for a temporary verdict. Conclusion!? Well, this was certainly not as enjoyable a build as the previous two Dragon kits. They were magic. This is going to be, I hope, a decent enough tank, once finished. But it was, by comparison with the Stug IV or Tiger I, more tragic than magic. I do hope the 1/35 version is more enjoyable!

-----

Since posting this, point 6 occurred to me: of the six photo-etched parts this model contains, only two seemed essential. The other four all had plastic equivalents, and the two nicest photo-etched elements - triangular struts with holes in them (which in order to be used require the removal of plastic counterparts) - are more or less invisible by the time the models completed!