Showing posts with label misc. Show all posts

Thursday, 17 September 2020

Misc: The Postman Sometimes Rings Twice...

Oooh... exciting!

I'd wanted to title this post 'The Postman Always Sometimes Rings Twice', but I couldn't find a way to get the crossed out text in the title of my post. Hey-ho, never mind. Sooo...

Phwoarrr!!!

A couple of days ago I ordered a few models from Hannants, all German WWII, all 1/72, and all of which, I guess, come under the soft-skin/rear-echelon banner: three trucks and a car. These arrived, very well-packaged, this morning.

Chester enjoys the empty box... bless him!

Chester, our new* and still very young kitten, was almost as excited about this as me. Only, rather like Eeyore, in that touching Winnie the Pooh tale, where he gets a burst ballon and an empty honey pot, Chester was more interested in the empty honey pot than the contents!

* Tigger, our super-fluffy moggins, and occasional star of a post or two online, perhaps even on here, alas, passed away earlier this year.

I'm looking for'ard to building these babies.

Whilst I won't be starting in on any of these new arrivals today, I will be continuing to work in detailing my 88s. I refined some of the parts today, sanding, filing, paring back, shaping, etc. I've also constructed a form for my first resin-casting silicone mould. Today I'm planning to pour the first half of said mould. 

Yesterday I used a hot glue gun for the first time, which was interesting. I think the big bag of glue-sticks I have are poss' meant for a different glue gun, as they seem too thin, and don't feed through the gun properly when I pull the trigger... which is annoying!

I bought some foam card from a shop in Peterborough.

And mixed some plasticene, to set the parts into.

The good, the bad and the ugly...

In the above photograph, the three items in the upper left are rejects: a malformed brass shell, ditto the crappy wobbly-holed erdpfahl, and an ammo box lid that melted into a near shapeless blob. The other bits have been improved, and, bar the wicker ammo box and lid - which need a little more detailing - are ready for moulding. 


Ready for moulding? Hmmm... infamous last words. It's now several hours later, and I'm hardly much further on. I used a technique of mixing Milliput with water until it's so dilute you can paint with it. I then loaded the wire 'wicker' several times. The idea being that whereas before it was full of air, in the voids or interstices between wires, it should now still have the woven texture, but hopefully won't trap any silicone, when I pour the mould.

Re-shaped shell, detailed wicker ammo box and lid, etc.

I also decided, on referring to images of real 88mm ammo, that my live shell needed reworking. That was super-fiddly and took ages. I think I need a mini-lathe of some description, so I can make parts like this more easily. My original version took the Hasegawa ammo as it's starting point, which is much more 'stepped' than the real thing. A strap and buckle on the lid and wicker ammo box completes my pre-moulding prep.

I'm having a break now, and thinking about how on earth I'm going to embed and lay out these tiny ultra-delicate parts. Even though I'm getting next to nothing done, it's quite intense work! I feel drained... 

A bizarre looking little kit!?

And to finish this miscellany type post, the above image shows a strange looking little kit from a range of 1/72 kits I'm intrigued to try out. These kits are currently available very cheap at the Tank Museum's online shop (click here to have a look). It was whilst watching one of curator Davis Willey's back garden based Q&As that I was reminded of these oddities - I'd encountered them before online - as he had one on his table, amidst sundry stuff he's trying to help the museum shop flog. 

Saturday, 25 May 2019

Misc: La BĂȘte est Morte, WWII bande-dessinĂ©e.

This morning I got an email from Bovington Tank Museum, under their 'Tank Times' banner, which had an interesting link regarding a recent book donation (read more here). This is something I'd definitely like to know more about; a bit of 'googling' lead me to unearth the following images:

Cover of the first in the two-part edition.

A scene depicting French liberation.

The German war machine invades France.

Here we see the two editions.


The artist who's supplied the illustrations, Calvo, is obviously superb. He's clearly influenced in these artworks by Disney's contemporary style. But despite this obvious indebtedness, the artworks remain fabulous in their own right. 

The British Bulldog bites Hitler's arse!

Some spreads are a series of frames...

... whilst others are fantastic double-page spreads.


At the time of posting these are in a random order, as I found them online. I'll probably return to edit this into a more sequential order at some future juncture. I've captioned the most obvious content. But there are numerous images I need to study more. I've seen originals online for crazy prices. I'm hoping that there are affordable English editions!? Perhaps it's even still in print? Does anyone know?

Churchill's Bulldog vs. Hitler the crazed Wolf!


It looks like all theatres are addressed; here we see North Africa.

Hitler, Goering and Goebbels.


As this shows, the comic doesn't pull any punches.


A small detail from a larger and superb pastiche of Delacroix.


Nazi training.


The global view.

I'll definitely be looking to acquire this. Probably in an English language version, to be honest. It looks utterly fantastic.

Wednesday, 30 May 2018

Building a paint rack

My workspace is, as ever, a real mess, which seriously hampers any efforts to get back into hobby activity. So having recently made a storage dingus for my mini-chisel set, I started making a plywood paint-rack yesterday, and took these pics today, as I glued up. I'll probably put a back-board on it, to help keep it all plumb-square

Main components, glue in place, ready for assembly.

Glueing this lot together was messy, and quite tricky. For starters I had to buy more F-clamps, as I only had two sufficiently large for this job. As is my usual way, I made loads of mistakes. Still, if I learn from them, as I hope I do, it's all good grist to the creative mill.

Had to buy more clamps for the tricky glue-up.

In this third pic I've stood the thing upright, as it's intended to be used. There's room for 60 of those little Vallejo type acrylic paint pots, plus a modest general purpose shelf at the top, for whatever might fit in there.

In its proper vertical orientation.

I'm looking forward to this being finished and, I hope, aiding me in creating a more efficient ordered workspace. Maybe then I can finally get back into painting and gluing!?

Hardboard back-board, cut to size and painted.

By about midnight-ish, and whilst semi-watching a vintage Star Wars double-bill (Star Wars & The Empire Strikes Back), I'd got the backboard cut to size and painted in one of my many favoured shades of green. I also gave the plywood a coat of matt varnish.

Varnishing the shelves.

Now all that remains is to fix the backboard, probably with a combo of glue and panel pins. Sadly the shelves have dried, glue-wise, out of square in both directions, vertical and horizontal! This makes gluing and pinning that much harder. Hey-ho , so it goes! Still, hopefully they'll be completed very soon. I'll need to charge my drill first, and then drill pilot holes for the pins, as otherwise I'll end up splitting the plywood (one of many mistakes from previous projects I have learned from!).

Locating panel pins whilst keeping the shelves clamped square.

Ta-dah! Done, and loaded. I've not yet sorted the paints*.

And finally, it's complete. Above is a quick snap. Already fully laden (well, there are a few more paint holders). I'm pretty pleased. Also visible, my chisel rack, and at left, the normal state of chaos.

* My OCD side requires that at some point soon I sort the paints into some better more logical order. I just slapped 'em in any old how, for the sake of a pic.

Tuesday, 8 November 2016

Misc: Shed Renovation

NB - Apologies for any formatting issues; Apple iOS blogging compatibility is pretty poor! Esp. when posting - as now - via iPhone or iPad.

Our new home has a very delapidated shed in the back garden. But rather than tear it down - we won't be able to afford a replacement for a good while yet - I decided to renovate and refurbish.

My rather primitive router set-up.

The first thing I started to work on were two new windows. Pictured above is my very simple router 'fence': timber clamped to the worksurface, with the wood to be routed screwed down! These first four cuts - the shorter uprights for the window frames - came out very nicely.

Routed uprights for my new DIY window frames. 

Next I removed the old door, which was rotten, and quite literally falling to pieces. I bought a 'new' door - solid wood (none of that horrid UPVC rubbish!) - from our local municipal dump, for £5! And collared a friendly local, asking them if they'd mind helping me get the door home. They agreed, kind souls!

I really love my little MX5, but it does present me with some logistical issues. I offered the old folks who generously helped me get the door back a fiver. But they wouldn't take it, and suggested instead that I give it to charity. Bless 'em! So I gave it to the poppy appeal guy at our local Sainsburys.

My £5 door, before surgery.

The lock and handles combo I bought wouldn't go into the pre-existing holes. Alas, my first attempt to reshape the area - rather foolishly without taking the door down - was an unmitigated disaster. I'd done this once before, when fitting new locks front and back, when we moved in. And I'd done it pretty well then, tho' I say it myself. This time it was godawful!

Oh dear! 

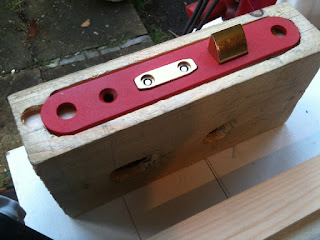
It was so appallingly bad - see above pic - I decided to start again using a block of waste wood that I found laying around, which appeared to be about the right size. What a bugger of a job it was, drilling and chiselling, and drilling and chiselling, and drilling and chiselling, and drilling and chiselling, and drilling and chiselling, and drilling and chiselling, and ... ad infinitum.

A chip or two (more like two thousand!) off the old block.

The lock in situ. Sans faceplate. 

Having done all this work, I then discovered that my lock has no faceplate. It should have come with one in the pack, but it didn't. That's it above, nestled into the laboriously carved insert. I'm tempted to go ahead sans faceplate, only the two ruddy great holes on the lock itself are both huge and are not countersunk, presenting difficulties in fixing it.

Window frame #1: clamped, glued, with the glass sitting on a bead of silicone.

So... having hit something of a dead-end with the door (which I'd already hung, to get the positioning right, only to have to remove it when my in situ carving went agley), I decided to resume making the windows. I'd abandoned them because after the first satisfyingly clean cuts, my attempts to route out the 'rabbet' on the longer horizontal elements of the frames was, initially, as disastrous as my first shot at lock-recess carving.

Reconstructing the window frame with 2" x 4".

Having started out by glueing and clamping the frame for one window, I then put a bead of clear silicone all the way around the recess, to receive the glass. The glass was a very tight fit, causing me some anxiety as I sought to get it bedded in. I probably put too much silicone on, as when I pressed the glass down it oozed out all over the place! Once the silicone had started to set I applied a bead of glazier's putty to the outer surface. Again, I put too much on, making it a very messy process when I tried to finish it neatly.

The new frame (and door, etc!) viewed from outside.

The next stage was to replace the missing cross-beams - the previous ones for the window I was working on had rotted away! - tilting the lower one slightly so that any rain or other moisture will run down and away, off to the outside of the shed/window. I also added some of the excess glazing putty I'd scraped off the window frame to seal a gap between the frame and the external wood cladding.

The window in place.

The dark stained verticals needed some planing to make them flush with the new inserts. The final few pics, one above and two below, are of the window seen at night. Above, looking in, and below, looking out. Tomorrow, as well as constructing the second window, I intend to add some more sealant, and paint this first one with some rain resistant outdoor paint.


The new window, seen from inside the shed.

A second view from inside.

I've been getting into the annoying habit of flying by the seat of my pants, DIY wise, lately. With regard to the windows this has meant that I measured quite approximately for the lumber shopping, and then forgot to measure more accurately for the actual window manufacture. 

The end result? My windows and their frames aren't a proper fit for the gaps they're intended for. Still, thanks to the new frame elements, I was still able to fix the window to the structure.

The last things I did, prior to taking night time snaps of the window in situ, were, clean the glass inside and out, which involved some trimming off of both the silicone and the putty, and add a strip of hardboard to the gap above the window, which would otherwise remain open to the elements. 

I'm certainly going to need to replace some of the shiplap timber cladding, a fair chunk of which is suffering from both woodworm and rot, around the shed  as a whole!

Tomorrow: window #2, and the door!