Showing posts with label German armour. Show all posts

Wednesday, 7 October 2020

Kit Build/Review; 1/72 Forces of Valor Pz III ausf N


This is my second kit from this company (the first was a King Tiger), and I like it. I bought it 'cause I wanted to build a knocked out tank. So I had a look through several of my Panzer Wrecks titles. I was somewhat surprised how few Pz IIIs there are in the editions of the Panzer Wrecks series I happen to have.

The main bits.

Strange how they have the commander figure on the track sprue!

More bitzenbobz...

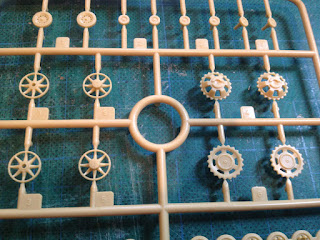
Very nice finely moulded running gear!

And the last bits, inc. instructaloids.

A contender for the most paltry decal sheet ever?

Prepping parts for the running gear.

So I wound up using images of Pz IVs, instead. The kit has schurzen, on both turret and body. I noticed many tanks lose their body armour, and yet retain the turret armour. Numerous wrecked Pz IV in the books I was referring to are in this state: schurzen up top, but not below. 

I also wanted to create battle damage, and this kit, quite chunky, presented some challenges in doing that. I also wanted numerous hatches open. Again, not always easy, with this kit. For example, the styrene behind the turret side hatches is very thick. So instead I had the schurzen open, instead. 

A combo of mine damage and a shell penetration ...

... have upset this side.

This side is mostly unscathed.

The wheels as supplied are mostly on two pairs of large strips, to make construction easier. Sometimes I would go with this type of arrangement. But in this instance I knew I wasn't going to go with it, for two reasons: first, the joining parts would be all too visible, and detract form the realism o' the resulting model; second, as a battle-damaged tank, I want the wheels all wobbly and out of alignment.

Turret cupola surgery.

The bulk is built.

Getting into detailing some battle damage.

The commander's hatch is designed to be open. But I didn't want to use the commander figure. The tank is going to be empty/abandoned. I sawed off the 'bucket' below the cupola. I also modelled the storage bin at the back of the turret open, and put some crew gear in it.

Battle damage wise, this tank drove over a mine, throwing off the track. Once immobilised, it's been hit low in the hull, rught where the mine blew up, more or less. There's a shell penetration in the lower forward hull, which has blow a return roller off, and some bent fenders and schurzen, and a few smaller caliber penetrations in the turret armour. The return roller that's been knocked out of position has also come apart, and some of the wheels near the point of the two impacts are knocked out of alignment.

Starting to add stowage.

Turret bin open...


Some growage of stowage. Plus opening turret schurzen.

Poor scribing this side.

Track sag.

Track sag is always a nice touch. but it's not always easy to achieve, and depends to quite a large degree on the type of track the kit uses. This kit has tracks of the better than average but won't glue with model glue variety. I had to glue them using Gorilla Glue superglue gel. The tracks are decent enough looking, detail wise. And I'm pleased with the overall effect.

Much more drastic track sag.

Adding some detail/interest to the rear engine deck.

I really want to start finishing some of my models. This one is intended to be a diorama. But hopefully also one I can still deploy on a wargame table, if desired. Most of my builds thus far have been with mid to late war stuff in mind. But this is finished in earlier war dark grey. I'm hoping I might learn to get better at single colour paint jobs. At present it's just blocked in. Weathering and shading are yet to be begun.

Started work on a base.

Halford's grey basecoat.

Revell dunkelgrau, decals, and a little blocking in of colours.

I don't think I'll be buying the Revell dunkelgrau spray can I used on this again. It took most of the rather small can to do this one model. And at about £5 a can, or thereabouts, that's simply too much. I don't know if I'll regret it, but I decided to put the decals on - using transfers from my spares box - at this stage. I'll work on shading and weathering over and around them, being careful not to obscure them altogether.

I'll end this post for now with a few more pics of the tank as she looks at close of play today. There's still a long ways to go. But at least I'm further on with her than with most models I post, where I more or less stop once construction is complete. I must get better at finishing stuff!

I'm quite pleased with progress so far.

Markings make such a difference!

The open hatches add some interest.

I like this view from the rear, with added suff, and open turret bin.

Just need to work on making the paint job more interesting!

To conclude, I really like the two Forces of Valor models I've built so far. They're less than half the price of certain other brands; Dragon, for example, have long been very expensive. But more recently, and rather depressingly, Revell kit prices at my local shop have gone up to similarly over-inflated levels. These FoV kits are, currently, cheaper than those hoary ol' Airfix 'vintage classics'!!! And they build into really quite good models, esp. with a bit of effort. It's a shame the range is, at present, really rather limited.

Thursday, 19 September 2019

Book Review: Nürnberg's Panzer Factory, MacDougall & Neely,


Phwooaar!!! This is top quality Panzer-porn, guaranteed to give the hardcore Panzer nutter a raging Panzer horn!

Sorry... (wiping drool from corner of mouth), let's try and be a bit more dignified. What we have here is a fantastic selection of really seriously fabulous photographs, many published here for the first time (albeit this is now a while ago [1]), documenting the WWII work of the M.A.N. factory at Nürnberg, with a particular focus on Panther production.

Actually it's a bit more than just that, as pictorially it starts with M.A.N. Diesel trucks, includes the very unusual Sperrmaschine (only four were ever built) [2], covers M.A.N.'s production of Panzers I, II and III (plus variants), and so on. It's also broader than the title alone might suggest in that it incorporates photos taken at other but related sites/facilities. The text, whilst refreshingly concise, starts with background and pre-war info, and then moves on to brief chapter summaries and picture captions.

Pp. 46-7, detailed images of a badly damaged Panzer in for repairs.

The landscape format suits the contents, each photo getting it's own page [3]. The captions and 'chapter heading' style summaries are great. But it's the images that really seal the deal. The quality throughout is superb. And the subject matter, and depth, breadth and width of detail, are just superlatively brilliant. All told this is as close to perfection in this niche area of publishing as I've yet seen.

I recently watched an American wartime newsreel someone uploaded to YouTube that showed the factory production and proving ground testing of M3 tanks. Despite the rather overdone 'movietone news' style chest thumping war-era propaganda bombast it was fascinating. But for some reason I find the German war effort even more fascinating and compelling. And this superb book documents several aspects of that, Panther production in particular (obviously!), wonderfully well.

I was able to comfortably read the entire text of this terrific book in one day (and that whilst engaged in some reasonably demanding home-renovation DIY!). Fascinating and informative as this was - and I loved it - it's the pictorial aspect that really sets this apart, and which will doubtless provide countless further hours of fascination and enjoyment. Ten out of ten, and definitely very highly recommended.

Pp. 72-3, Panthers under construction. 


NOTES:

[1] 2013.

[2] All four of which you can see here.

[3] This holds true for the vast majority of the pictorial content. Between pp. 182-194, however, the format changes to two or three images per page. This segment covers the bomb damage inflicted by Allied air raids.

Monday, 26 August 2019

Kit Build/Review: 1/72 Forces of Valor King Tiger


I bought this King Tiger kit, by Forces of Valor [sic*], a new brand to me, from the Ely model shop. Partly on account of it being quite cheap, and partly 'cause I want to build a King Tiger and paint it up in the unusual (one known/documented example, I believe?) octopus camo' scheme.

But I also wanted to have it in zimmerit, which the octopus King Tiger isn't. But hell, this is my model, and historical accuracy or authenticity isn't the be all and all. So, goddamnit, I'm going to have a bit of fun with some historical licence, and combine the two things I love in one King Tiger.

All the main bits zimmerit-ed.

The zimm' took bloomin' ages! We have a guest round, and we had a barbecue dinner out in the garden yesterday evening. With all that going on and the intense heat, even though I started on it about 3pm, I didn't finish till about 1.30 am this morning! 

I do my zimmerit using white 'superfine' Milliput, which I spread as thinly as I can. In some places I try to work around detail, preserving the raised profiles of other details if poss'. In other locales - such as the sides of the hull in this instance - I'll remove surface details (tools and cable in this case). 

Once the surfaces are covered in as thin a layer of Milliput as I can manage, I use a very small flathead screwdriver to form every single indentation of the zimmerit individually. It takes aeons, but I like the irregularity. I almost bought some PSC Panthers with zimmerit already on 'em, at the recent Other Partizan, but didn't because; 1) they are to pricey, 2) the zimmerit is just to uniform/regular.

Rubber band tracks, plus... 

... other bits? The commander and two'grommets'.

The running gear sprue.

Running gear assembly is crisp and easy.

Removing some zimmerit to accommodate drive wheel assembly.

The running gear in this kit is very nicely designed and manufactured, being clean and crisp and going together easily and in good solid alignment. One excellent little detail is the way the two drive wheel mounting parts have different sized male/female gubbins. The tracks are some kind of stuff rubber/vinyl typed deal. A bugger to glue, alas. I used superglue, which got me there eventually.

Something I'd never seen before: a vinyl/rubber commander figure, and two grommets, or big fat washers. The latter are part of the turret/gun mount assembly. Without them the gun will just flop and flap around. Being on a different sprue, in a different material, there's a chance you might overlook them.. er, well... I did!

Cleverly designed, with different male/female bits.

Thar she blows!

If I hadn't opted to do my DIY zimm', this'd've been a pretty quick and easy build. With the zimm' and one or two balls-ups, it's wound up being a bit of a marathon. But it's a nice model, and I'd heartily recommend it as a base-kit, for wargamers in particular. Is solid, looks great, and is fun to build.

With the kit more or less completely assembled, you can see where I've removed parts of the mudguards. With just a small missing segment near the front on the  left, and a larger central section on the right. I also added some battle damage, in the form of two shell penetrations, and some dings on the left 'fender'.

King Tiger, sho' has a big butt!

Here's the larger gap on the right side.

Still need to zimmy up the machine gun bulge.

At this point I added one or two tools, to replace those I'd removed before adding zimmerit to the hull. I chose not to use all the spare track on the turret, as I didn't want to cover up all the zimm', or for that matter, the camo'  (when I get round to it). And then it was undercoat time. I noted only afterwards that I still need to zimm the mg!

Basic build and undercoat done.

Note added tools.

What a handsome beast!

Lean? Hmmm... not sure. Mean? Most definitely.

A nice ground level view.

Next step? Paint the beast.


* American spelling, I'm guessing. But then they have '501st SS Schwere Paner Abteilung'! So maybe it is just a typo?