Showing posts with label airbrush. Show all posts

Sunday, 21 July 2019

Kit Build/Review: 1/72 Airfix Spitfire


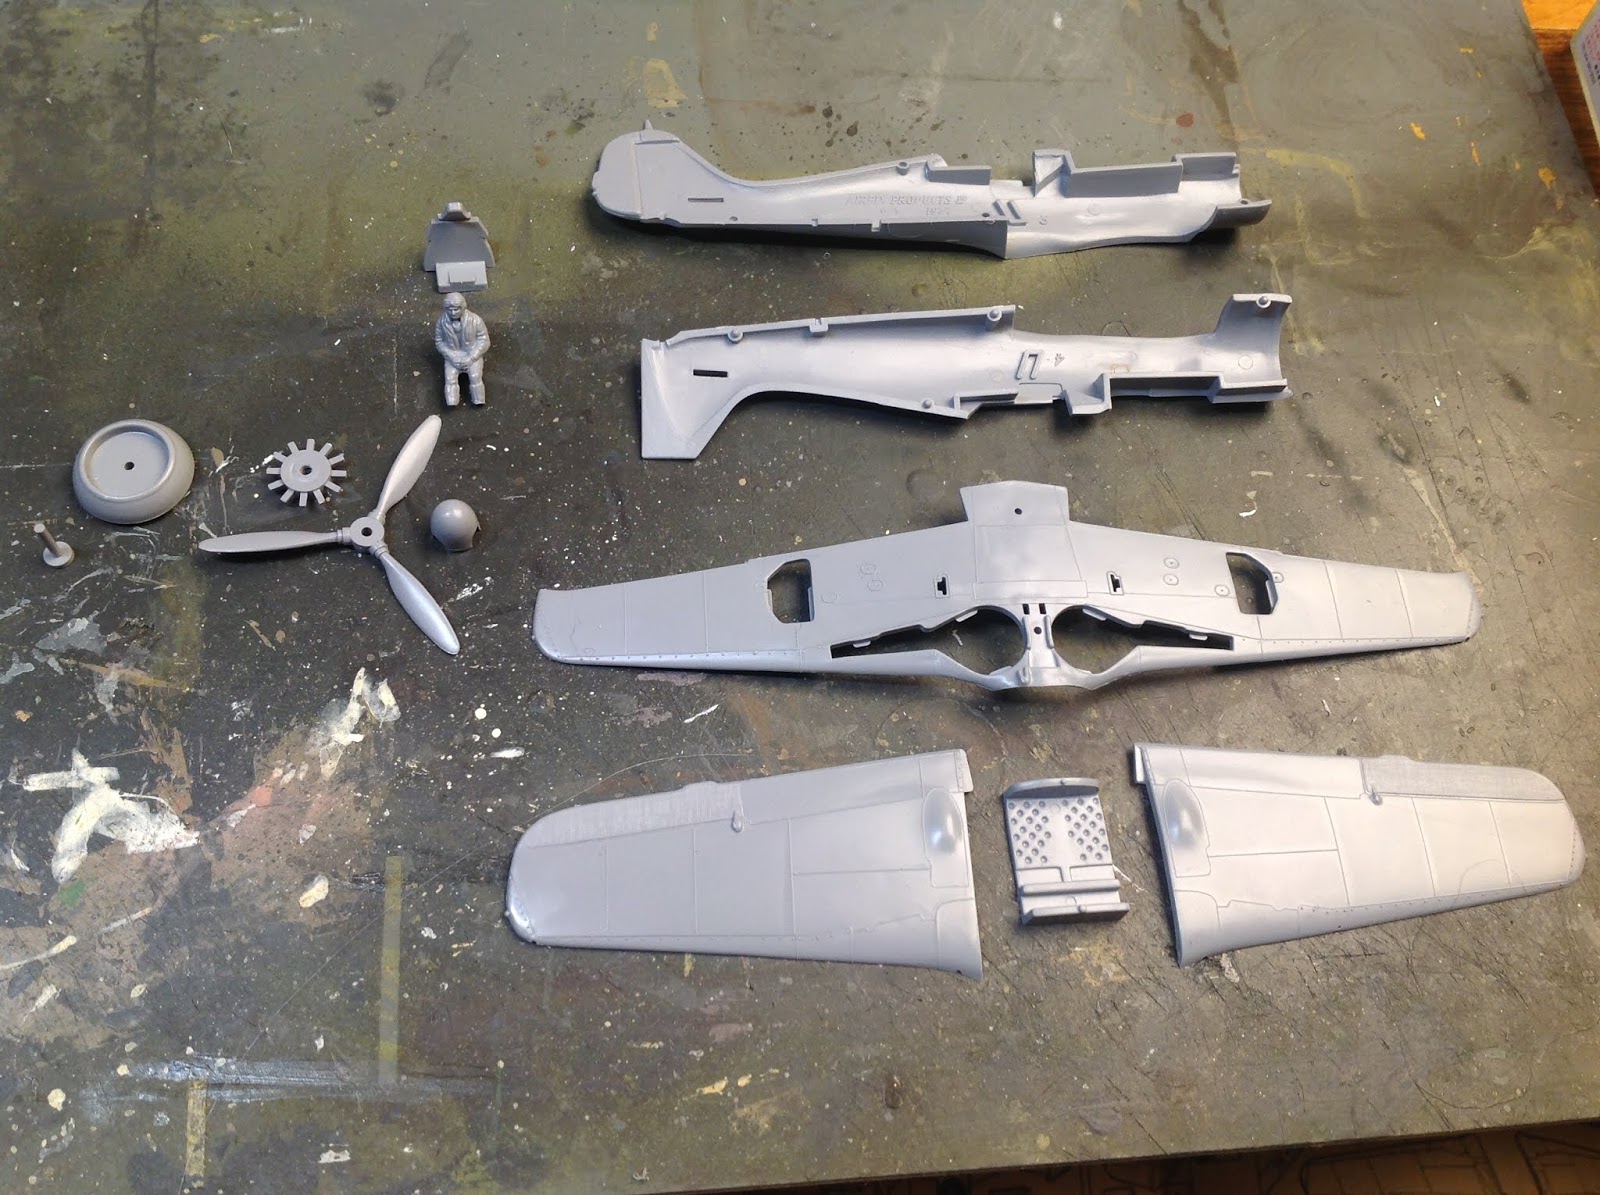
I built this kit, painted the pilot/cockpit, masked the canopy and undercoated it all in Halfords grey primer, some ages ago. In fact, if recall aright, I purchased the kit whilst holidaying in Suffolk many moons past. So it's been a long while gathering dust in the meantime. But as I've dusted off and completed the Me109 I started around the same time, I figured I ought to try and finish this an' all.

Oh dear! Masking bleed agogo!

Rather annoyingly I forgot to take any pics of the various masking stages on the airbrushing shift. The underbelly colour - a beautiful pale eggshell blue - went on pretty nicely. And this was using the cheapo acrylics Airfix supply in some of their 'glue, brush 'n' paints included' kits in my airbrush (with a couple of drops of water added). 

I opted to do the green next, and the brown as the final colour. Again, I used the supplied paints. One reason for this is that all my Vallejo colours are either general purpose, Napoleonic, or WWII German oriented. So I didn't have any of the right shades for RAF WWII, other than the little pots supplied with the aforementioned all in one Airfix kits.

And underneath as well, though less awful.

The Brian and green colours look lovely, and very RAF, and the green even behaved itself well. Only the brown gave me any issues. And I think I must've over-diluted it, as it ran or bled quite badly under the masks. Mind you, I was largely masking using some cheap low-tack decorators masking tape, which has the nasty habit of occasionally coming away from the model surface.

Tidied up with patient brushwork.

Ditto the belly.

Anyway, using leftovers from the little pots of acrylic, I was able to tidy up the paint job with some patient brushwork. I've discovered that I like a flat-head brush for this task. Next I need to get in and paint some little bits 'n' bats, like tires, nose cone, props, etc. Oh, and those little red bits where the guns are, in the wings. And then it'll be gloss-coat and decal time, a step I always enjoy as it brings a certain finish to the look of the model.

The side fuselage markings seem rather oversized!?

I tried airbrushing a gloss coat on. Didn't go well. Humbrol clear gloss bunged up the airbrush something awful, necessitating a comprehensive strip down and clean. I seem to do end as much time doing that as airbrushing. Probably more, in fact. And, ass ever, applying decals was a bit of a bugger. They seem, rather like superglue, to adhere to everything other - fingertips, for example - than the model surface. Even with Decal Fix applied.

I've lost the box and instructions for this kit, so I had to use ref for the placing of the decals/markings. The side fuselage markings seemed rather oversized. And the roundels? Well, I'd have liked some fir under the wings as well as the top surface. The tail fin tricolour will need trimming off a bit with a scalpel.a d there are tons of tiny decals for sundry technical markings, still to be applied. But, as ever, decals do add a nice degree of finesse.

This was handy reference...

... as was this.

Both of the above A4 glossy mag format publications were useful for colour and markings reference. That said, there's still a fair degree lacking, in terms of explanations of different colour schemes, and things like landing-gear, propeller blades, etc. And neither book seems to include all of the myriad  sundry body markings that are supplied in the Airfix kit in Decal form. So I guess I'll have to try and scour the interweb for an online example of the instructions.

I used the supplied decals for the little red squares over the gun ports.

...

Monday, 15 July 2019

Kit Build/Review: 1/72 Airfix Focke Wulf 190A-8/F-8


I recently acquired a batch of 1/72 WWII German aircraft from a chap at the Wisbech IPMS - thanks Sean! - including an ancient Airfix Focke Wulf 190 kit, as pictured above. The instructions look like they're on parchment, and have that ancient musty smell (a smell that, as an old book-sniffer, I rather like!). They look brittle enough that a strong breeze might see them crumbling to dust. The decals are petrified and useless. But the model itself appears ok, and all present and correct, albeit some parts have been removed from or have simply fallen off their sprues.

Fossilised decals and ancient papyrus instructions.

But at least all the bits are here.

Starting to lay out and prep...

I have a few books that might make for potentially useful ref'. I always like to go to something for colour ideas, particularly as I never seem to remember which colours apply in any given situation. The internet's great for this. But I like having hard copy materials to hand. Especially at present, when all my Apple gear is blighted by recharging issues. The glossy A4 magazine style publications you can buy, as I have, on the High Street, such as Luftwaffe Fighters, by Claes Sundin, are my current go to resource for planes such as this.

Very handy.

Onto the build: as usual I forgot to do certain steps. In this instance drilling some holes out in the wings for the appropriate choice of bombs or landing gear, or whatever it might be. And then I make my usual build booboos, such that the propeller on this kit probably won't wind up (boom-boom!) being able to turn. But in all honesty, I'm past caring. I just want to build the models without being too fussily perfectionist, and enjoy the process.

Early stages of assembly.

Painted pilot in situ.

Cockpit canopy frame masked, and inner colour applied.

The state of the decals in this fossilised kit mean I'll be presented with an interesting challenge when's it comes to markings: have I got any/sufficient/appropriate decals anywhere in my stash? Or will I have to paint them with masks, and whatnot? Even if it goes the latter way, I'm not fussed. Indeed, I think it'll be fun. I doubt I'll bother with much cockpit detail in this instance. I have a number of Focke Wulf kits in my stockpile. I'm more interested in getting several built and painted than achieving specialist publication levels of finish.

Two types of masking: sharp and soft-edged.

Post masking reveal... looking you'd.

In the end the prop' on the Focke does turn. The one on the Airfix Me 109 beside it, above, doesn't! You can't have it all, I suppose. But, of more interest to me, I tried a slightly new (to me) painting technique, with raised masks, to create feathered edge camo'. I'm pleased with the results.


After a hiatus of several days, during which I worked on the Revell WWI Fokker Eindecker featured in another recent post, and various house and home type jobs, I got back to this plane, and an old/new (older build, for me, of a newer kit!) Me109.

Yellow markings masked.


The first of the next few steps, prior to a glass coat and then decals, is to mask off and paint the various yellow areas, such as wing tips, rumpfband, etc. Once again the Claes Sundin colour profiles were my general inspiration. But rather than, as some do, trying for a specific pilot's plane, I'm going with a more generic freestyle pick'n'mix approach.

In the end these yellow areas were under-coated white with brushwork, then airbrushed yellow (two coats of a custom non Model Air mix), and then given a final brush coat. I'd have preferred to just airbrush the lot. But I find my airbrush clogs too much when I use my own non Model Air mixes. As I often say, I remain a long, long way from attaining the coveted level of airbrush ninja!

And revealed; cf. with the Bv141.

I believe I painted the Bv141 pictured above with freestyle choices of colour, in terms of the two shades of camo' green. But I didn't write down exactly what colours I used (damn fool that I am!). The more recent Me109 and Fw190 were painted with Vallejo Model Air colours specific to the appropriate German RAL numbers. I have a post somewhere here on the blog about German WWII colours. I intend to improve and expand upon that at some point soon, and include more Luftwaffe colour info'.

And one other very noteworthy thing: during handling I continually broke off everything from delicate extremities - aerials, machine-guns - to larger parts, like flaps, and even tail wings! My pal Paul has a method of working that I can see is useful for preventing or minimising such risks, where he leaves the prop' off and has the whole airframe attached to a stick. Think I might have to adopt a similar strategy!

Anyways, that's it for now. I've got a busy day today, with a large number of my drum pupils at one of my schools performing in an assembly, and a vintage fishing rod to be collected, after which I'll be checking in on the above mentioned Paul. Still loads more to do. But decals and further painting will have to wait for now.


Working on decals.

Another day, and the painting is mostly complete, albeit very basic. Painting the spirals on the nose cone/spinner things was a right old tester. I tried numerous approaches. In the end combining spiral masks with freehand-painting. Phew! I then gloss-coated the two planes, ready for decals.

The balkenkreuz on the sides of the Focke's fuselage are leftover transfers from the Airfix Bv141. On the upper and lower faces of the wings I've used Swiss air force white crosses, as supplied in an Airfix Me109 kit. I'll mask and paint the black parts in later.

Getting the decals positioned correctly - or rather to my own satisfaction - was very tricky, and took ages. I used Humbrol Decal Solution to set them in place, and a Vallejo decal medium to make them confirm to the surface features. There are still a good deal of decals and markings to be added. But that'll have to wait!

Wednesday, 10 July 2019

Kit Build/review: 1/72 Revell Fokker E.III

A nice vivid green!

I started this kit aeons ago, and I'm not even sure if I documented the first part of the build. Not that it really matters one way or another. At this point I've masked off the propeller and cockpit, and I'm airbrushing the base colour for the body. I looked at loads of Eindekker pictures online, and ultimately decided to freestyle in colours of my own choosing, similar to real examples, but according to my own whims.

The undercarriage view.

I liked the designs that have coloured bands around the fuselage, including as illustrated on the box. So I retained that element of the design. I even copied the decals onto masking tape, to try and get approximately correctly sized stripes. But I goofed on this account, resulting in the central white band not being as wide as it should've been. Still, never mind!


Masking fuselage stripes.

As alluded to above, there were in fact decals for the coloured bands (or the black and red ones, to be specific), but I decided I'd prefer to paint them by hand. And that meant brusha-painting them, not airbrushing them. As usual, airbrushing is both a wonderful and yet tricky and annoying process. In this instance the base green for the body of this plane was mixed from ordinary (not Model Air) Vallejo acrylics. It needed diluting a bit to get the right flow consistency. And I used a custom colour mix, as usual forgetting to make a note of the mix colours/ratios. It was easier than normal or expected on this occasion. But the airbrush did clog up, as it so often does, requiring a complete strip down and clean... again. Ah, the joys of the airbrush.

Getting decals ready to apply.

I'm still sufficiently inexperienced that every time it comes time to add decals, it's (usually) a bit of an ordeal. They stick to my fingers, they won't stay put where I want 'em, no matter what decal fix I use they don't want to lay flat or conform to the surface they're being applied to. But as they really do add a certain crisp level of finish, I want to use them. I hope as time goes by and I get more experienced, I'll get more adept at applying them.

Nearing completion.

Far from perfect, but looking ok.

Yet another kit that's fairly well along, but not 100% finished. Still, I'm happy enough with how it's going. Next, another gloss coat - I did one prior to adding decals - then I need to find and add the propeller, and do the rigging. But all in all, I like this kit, it's a fun little thing.

Monday, 11 March 2019

Misc: Resources?

I'm sitting here typing this because I just broke out the ol' airbrush and compressor, and then realised I can't recall which two colours, which particular shades of green and brown, I'll be needing for my three-colour mid- to late-war German camo' schemes. 

The number of times I've gone through the rigmarole of searching online, or amongst my various and ill-organised notes, all add up to too much wasted time. So it occurs to me that I ought to create a resource here on my own website, for my own benefit. And who knows, perhaps for the benefit of others?

Bovington's Tiger II, 104, is beautifully coloured.

These are the kinds of shades I want for my models!

Of course others have done this before me. Why invent the wheel again? Well, it's in my nature to want to do things myself, in my own time and space, and in my own way, however well or badly that may turn out to be. I guess it's just my M.O. And I no longer, if I ever really did, want to fight it.

So, it won't be happening today, as I already have too much else happening: I'll be off teaching soon, and this evening, as well as cooking our evening meal (actually I only have to cook rice and some gravy, as the rest is leftovers!), I'm going to meet the Wisbech IPMS at their fortnightly gathering. 

That'll be a first for me. I'm not exactly club-able. Or at least I never have been before. But perhaps that'll change? I'm definitely feeling the need to extend my camaraderie in life generally, and modelmaking and mini-soldiers in particular.

For now I'll bring this post to a speedy conclusion, as it's probably also a way of my deferring actually getting started with the airbrush.


Some time later the same day...

I did finally actually use my airbrush today, just to add some dunkelgelb to the eldest of my Elefant models, and bring it a bit more into line with the two more recent builds. Above is the result. And below is an older 'before' pic. In the picture below, taken before I'd painted the two more recent Elefant, you can see I'd done some rather clumsy dark wash weathering on the old Fujimi model. I hope the above pic, with the Fujimi Elefant at left, shows that I've softened the look a it a bit?


---------------
20/3/'19

So, I've done a bit of research, and this is what I've come up with, for now, using the Vallejo ranges of acrylic colours.

First, from their airbrush range:
Dunkelgelb RAL 7028 (dark yellow) - Vallejo Model Air 71.025
Rotbraun RAL 8017 (red-brown) - Vallejo Model Air 71.041
Olivgrün RAL 6003 (olive green) - Vallejo Model Air 71.092

As yet I'm undecided re their standard acrylic series:
Dunkelgelb RAL 7028 (dark yellow) - Vallejo Model Color 70.978
Rotbraun RAL 8017 (red-brown) - Vallejo Model Color 71.041*
Olivgrün RAL 6003 (olive green) - Vallejo Model Color 71.092
 (poss 70.894?)

* This is the official RAL 8017 equivalent, but it doesn't seem right to me.

Saturday, 18 April 2015

Airfix 1/76 Panther

This is, so far, my only finished WWII AFV model!


Airfix 1/76 Panther.

Whilst reading an old thread of mine on TMP (here) I realised that, despite all my WWII German armour posts, I hadn't posted - except perhaps for some incidental pics in which a completed Kettenkrad might be visible - a single finished tank kit! 

To remedy this I decided to post these pics, of the first model I built in this recent spate of model-making. This one was made alongside my father, who built an Airfix 1/76 King Tiger. Building these first models proved immensely enjoyable for both of us - mission accomplished! - despite them not being particularly great kits. I mean, a Panther with missing rear stowage boxes? I don't think I've ever seen a picture of a Panther without those funny looking rear boxes, with the kind of 'X' shapes on them. 

A Panther in Paris. You can just faintly see
the X-shape thought the zimm.

Of course, as soon as I said I'd never seen a Panther without those stowage bins, I thought I'd better have a look online for documentary evidence. What did I find? These (and plenty more in a similar similar vein!):


Hey-ho! Never mind, eh? It was probably from such a survivor of the war as one of the above that Airfix designed their kit. And not only did I find plenty of pics of Panther sans stowage boxes, but most of the Panther tanks that did show them have so much zimm you can hardly see the 'X'-shape anyway, as with the rather cool pic below, showing some Rooskies ,ankle-deep in mud gloating over a knocked-out vehicle. It's nice to see the box lid open as well:

Despite not being issued with feet, Russian soldiers 
still knock out a Panther, with pure Stalinist glee, by
the looks of this lot.

But I did find this pic:

X marks the spot.

... which is allegedly a genuine Panther Stowage bin, with original camo paint scheme. In this instance the 'X' is clearly visible.

Despite the fact that it's like putting silk slippers on a club-foot, I bought a set of five turned-brass machine guns, substituting one for the plastic monstrosity that came with the Airfix kit (dad took one for his King Tiger).

The model was undercoated with a can of matt black Army Painter spray paint, after which a base-coat of dunkelgelb, using a  Humbrol enamel mix of my own concoction, was sprayed over that, with a single-action Badger airbrush. The final paint job, inc. camo and detailing etc, was also done using Humbrol enamels, but finished using brushes, as opposed to an airbrush. And it shows! 


Decals were added. Not very well. So badly on the left side in fact that I had to add even more extras. I can't recall exactly what I did now, but I think I might've tried to soften the decal and shape it over the turret detail using white spirit, which just melted it from red and white areas into a pink mess. I decided a Schmeiser machine gun, hanging off a fixture on the turret, might make a plausible and interestingly different/unexpected detail. So I went with that. I had intended to add some track-holding brackets, and a strap for the gun, but never got round to it, simply slapping the gun on with some superglue.

Some bits and bobs in white metal from Sergeant's Mess - spare track, rolled cable, a jerry-can, a spare road-wheel on the turret (I got the odd looking turret position for this from a Bundesarchiv pic), a rolled tarp, etc. - were painted, and then the whole lot given a coat or Army Painter Quickshade and, finally, the whole model was sprayed in Testors Dullcote.

Panther, Panther, pointing right, on my table of delight...

I recently made a new model-making buddy, rather unexpectedly, at a friend's Yuletide/New Years party, and discovered from him that what I should've used for the decals is a specific liquid designed especially to shape them over irregular surfaces. By this time I had also realised that, to achieve the kind of fancy German camo-patterns I want to paint, such as the famous and popular 'ambush' scheme, I really needed to invest in a dual-action airbrush.

Still, this tank will, I hope, always have a place in my heart, it being the first model I completed upon returning to this aspect of the miniature warfare hobbies of my youth. And, truth be told, whilst the perfectionist in me is perhaps somewhat disappointed with it, the rest of me is quite content. Perhaps even, dare I say it, a little proud?