Showing posts with label Milliput. Show all posts

Thursday, 1 October 2020

Kit Build/Review: B&P Sturmtiger, pt 2


The image above conveys how much larger the 1/72 Build & Play Sturmtiger is than the 1/72 ICM model. Not a deal-breaker for me. But it's almost the same degree of difference as you get between 1/76 and 1/72. I've decided to detail the B&P kit a bit. And I've started with zimmerit, the transportation hooks on the casemate, and a little judicious filling here and there.


I need to find a better way of doing zimm than my current m.o. Which is fiddly and frustrating. I'm using superfine Milliput. In this instance I even sanded the super smpoth styrene surface a bit, to try and improve adhesion. But it's a real bugger getting the Milliput both thin enough and covering all the required areas. As you'll see here, I've left a good deal of 'oh, the zimm's been knocked off' areas. Especially on the sides; working round the imtergrated tool detailing was just too much of a headache!


I used the Milliput to fill in the welding lines on the slopes of the casemate front, where the way it's been rendered by B&P is wrong. I'll be going back in to score crevices at the correct angles soon. I also scratched in some weld/plate irregularities, such as you see on these behemoths in museums. I'm hoping all this white Milliput stuff is going to look much better when the monster gets painted.


I also intend to remove the current wedge like grab handles and replace them all with wire, so they look a bit less clunky. The ammo crane, I'm undecided about. An orgy of poring over the actual vehicles, via reference photos, is definitely in order. What I'd love above all else, is for a cache of factory assembly photos to be unearthed and made available. I'd love to see these monsters being build! If anyone knows of such a resource, please direct me to it!

Monday, 26 August 2019

Kit Build/Review: 1/72 Forces of Valor King Tiger


I bought this King Tiger kit, by Forces of Valor [sic*], a new brand to me, from the Ely model shop. Partly on account of it being quite cheap, and partly 'cause I want to build a King Tiger and paint it up in the unusual (one known/documented example, I believe?) octopus camo' scheme.

But I also wanted to have it in zimmerit, which the octopus King Tiger isn't. But hell, this is my model, and historical accuracy or authenticity isn't the be all and all. So, goddamnit, I'm going to have a bit of fun with some historical licence, and combine the two things I love in one King Tiger.

All the main bits zimmerit-ed.

The zimm' took bloomin' ages! We have a guest round, and we had a barbecue dinner out in the garden yesterday evening. With all that going on and the intense heat, even though I started on it about 3pm, I didn't finish till about 1.30 am this morning! 

I do my zimmerit using white 'superfine' Milliput, which I spread as thinly as I can. In some places I try to work around detail, preserving the raised profiles of other details if poss'. In other locales - such as the sides of the hull in this instance - I'll remove surface details (tools and cable in this case). 

Once the surfaces are covered in as thin a layer of Milliput as I can manage, I use a very small flathead screwdriver to form every single indentation of the zimmerit individually. It takes aeons, but I like the irregularity. I almost bought some PSC Panthers with zimmerit already on 'em, at the recent Other Partizan, but didn't because; 1) they are to pricey, 2) the zimmerit is just to uniform/regular.

Rubber band tracks, plus... 

... other bits? The commander and two'grommets'.

The running gear sprue.

Running gear assembly is crisp and easy.

Removing some zimmerit to accommodate drive wheel assembly.

The running gear in this kit is very nicely designed and manufactured, being clean and crisp and going together easily and in good solid alignment. One excellent little detail is the way the two drive wheel mounting parts have different sized male/female gubbins. The tracks are some kind of stuff rubber/vinyl typed deal. A bugger to glue, alas. I used superglue, which got me there eventually.

Something I'd never seen before: a vinyl/rubber commander figure, and two grommets, or big fat washers. The latter are part of the turret/gun mount assembly. Without them the gun will just flop and flap around. Being on a different sprue, in a different material, there's a chance you might overlook them.. er, well... I did!

Cleverly designed, with different male/female bits.

Thar she blows!

If I hadn't opted to do my DIY zimm', this'd've been a pretty quick and easy build. With the zimm' and one or two balls-ups, it's wound up being a bit of a marathon. But it's a nice model, and I'd heartily recommend it as a base-kit, for wargamers in particular. Is solid, looks great, and is fun to build.

With the kit more or less completely assembled, you can see where I've removed parts of the mudguards. With just a small missing segment near the front on the  left, and a larger central section on the right. I also added some battle damage, in the form of two shell penetrations, and some dings on the left 'fender'.

King Tiger, sho' has a big butt!

Here's the larger gap on the right side.

Still need to zimmy up the machine gun bulge.

At this point I added one or two tools, to replace those I'd removed before adding zimmerit to the hull. I chose not to use all the spare track on the turret, as I didn't want to cover up all the zimm', or for that matter, the camo'  (when I get round to it). And then it was undercoat time. I noted only afterwards that I still need to zimm the mg!

Basic build and undercoat done.

Note added tools.

What a handsome beast!

Lean? Hmmm... not sure. Mean? Most definitely.

A nice ground level view.

Next step? Paint the beast.


* American spelling, I'm guessing. But then they have '501st SS Schwere Paner Abteilung'! So maybe it is just a typo?

Tuesday, 23 July 2019

Kit Build/Review: 54mm Airfix Napoleonics, Pt I - Line Infantryman, 1815

Bagged these cool kits!

At last mondays Wisbech IPMS my pal Sean very kindly gave me four old Airfix 54mm Napoleonic figures. I made a start on the Line Infantryman today. I have a yen to do this figure as a soldier from one of the Swiss regiments in French service. I'm even thinking of perhaps doing him as a drummer. But I'm not sure that that might not be a bit too much for me right now?

The box art kind of suggests many figures!

The instructions, showing the two pose options the kit offers.

Laying out the parts, for prepping/cleaning up.

Note Milliput moustache and shako badges pressed into Milliput.

Major body assembly completed. Not sure what to do with his arms?

I've been tidying the figure up a little; removing mould lines, filling in a dimple in the left crotch - some sort of casting defect? - with Milliput. I even added a Milliput moustache. Just like lots of other stuff, superglue, decals, etc, I found the Milliput would adhere to anything and everything except what I wanted, in this case the figures' upper lip!

Going to leave him now, and let the Milliput set. Tomorrow I'll start doing the plastic card straps and equipment. What fun!

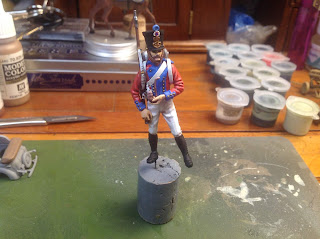
Fully assembled, gun slung over shoulder, and holding a pipe.

As ever, things got pretty tough at various points. Scratch-building a more detailed musket strap was in order. But it turned out to be very tricky. In the end I opted to have his musket sling over his right shoulder, and a scratch-built pipe in his left hand. I guess this makes him a southpaw!? I reckon I'll start painting him today.


Having built the figure, and in a converted pose of my own design, I decided to crack on with painting. After a Halfords matt gray undercoat, I could see a few bits needed filling or sanding. Then it was on to blocking in the colours. And after that came the slow and painstaking work of detailing, and even a bit of shading.


The gray undercoat revealed areas that needed filling.

Starting to block-in colours.

I got so engrossed in the painting I forgot to take any pictures of the various stages. Below are a number of photos showing him as he looks now, at close of play today. I've painted him up as a soldier of the 4th Swiss regiment. I used several reference sources, but chiefly this Carle Vernet. 1812 image, below.

A beautiful Carle Vernet plate depicting the 4th Swiss Regt.

I have to confess I'm actually quite pleased with how he's turned out.

I'm leaving the painting quite basic, not going mad with shading, etc.

I like this angle, 'cause you can see the shape of his pipe.

A slightly closer frontal view.

A change of lighting to add shade/contrast.

Rear view in second lighting scenario.

I'm going to let him dry overnight, then apply a couple of coats of varnish (matt). And then it's a question of deciding how to base him. But that's another challenge for another day.


Cloudy varnish, most obvious on figure's footwear!

Almost looks like shading. 

Bugger! Just sprayed matt varnish on my Airfix 54mm Infantryman, and gloss varnish on a Revell Sopwith triplane. Both have gone 'cloudy'. Its ludicrously hot and humid right now. Plus I didn't shake the cans enough. And it's also very humid. So a 'perfect storm' of causes concatenate and all my hard work painting is jiggered. I've read online and watched some YouTube vids, mostly suggesting either a gloss coat and then another matt coat (if required), or... olive oil! Anyway, I think I'll try gloss coat first, applied with a brush this time... fingers crossed!


Gloss overpainting didn't do the job.

Hmm? Sadly the extra coat of gloss varnish didn't do the trick. The picture above was taken after a hand painted application of gloss varnish to the most affected areas. The shako and shoes/gaiters still look awful. So I'll be overpainting them in black, to remedy this. Hopefully this experience will teach me to be more patient when applying varnish?

Saturday, 9 March 2019

Kit Build/Review: Zvezda 1/72 King Tiger, Ausf. B


Enthused for all things Tiger Tank, by a combo of Bovington, and the book I just read/reviewed, I decided to make a start on my Zvezda snap-fit 1/72 King Tiger, Ausf. B. 

I want this tank to have zimmerit, as I'm modelling it on the King Tiger in the Bovington Tiger Collection. So I've gone and done what I did with the Fujimi Elefant I built ages ago, which is to use a very thin layer of white Milliput and the tip of a tiny flathead screwdriver, to mimic the anti-magnetic mine paste. And boy, is it hard work!

As you can see, no zimmerit on the Zvezda kit.

My DIY white Milliput zimmerit, on the appropriate surfaces.

I cleaned up the zimmerit, removing it from areas where it wouldn't be applied, and opening up various holes that the snap-fit kit requires. Now I'll have to exercise some restraint, and let the Milliput harden overnight.
----------

The next day...

More snooker on TV, and more modelmaking on the sofa. Not the best for posture or lighting. And easy to lose bits of kit down the sofa! Still, fun stuff! Further work in the King Tiger finds me guiding the turret to near completion, and getting the running gear in place.

Prepping parts for turret assembly.

Components ready for the rear of the tank.

The snap-fit wheels and tracks are very interesting. Well designed, overall, but still awkward to install, and requiring trimming. At least that's what I've found. I do this modelling lark for fun. And yet sometimes, as when I was putting the tracks together, I began to wonder if it wasn't actually a form of masochism!?

Very interesting snap-fit wheels and tracks.

Getting the running-gear ready to put in place.

I decided to put all the spare track on the turret. I did consider leaving some off, and making it more like the Bovington King Tiger. But after the hard work on the running gears, I just wanted to take it easy. The barrel is nice and cleanly moulded. I drilled out the muzzle brake. And at close of play, it's a kit of three main parts: upper hall, lower hull, and turret. And then there's a load of stuff to put on the vehicle. The fully in-the-round sculpted tools, etc, look fab.

Next step in turret assemblage.

The basic core elements: lower hull, upper hull, and turret.

State of the model at close of play.

I put the three major elements together. But they remain unglued. It's just nice to see the vehicle taking shape. Tomorrow I'll add the remainder of the parts. Then I'll undercoat it in Halfords grey, and perhaps even get a base coat of dunkelgelb on.

All the various doodads that go on the body.

Assembled and primed.

And the other side.

Some hours and a couple of Columbo episodes later, and I've also dunkelgelbed several models: two Elefant, the Radschlepper Ost, and the King Tiger. My aerosol of Tamiya dark yellow ran out, in fact. But I think I got everything adequately covered.

The colour looks a bit weird under the side lights.

Sort of lemony-green!?

Still, looking pretty good. 

Rear-view.

The King Tiger joins the ranks of ranks and other vehicles awaiting painting and decals. I think I might actually bite the bullet and try and do some painting tomorrow. It'd be nice to finish a couple of these recent builds.