Although I bought a Plastic Soldier German tank detailing set (tank crew figures, stowage, spare-wheels, etc.), a little while back, this box of three vehicles is my first proper kit from this (to me) new brand. I've been reading more on Barbarossa generally, and Stalingrad in particular, and several great pics of Marder variants encountered whilst reading got me thinking about buying some.
And then, rather serendipitously, the day after the reading and pics had got me all excited about Marder self-propelled guns, I saw this set at the model shop in Ely*. 'Twas a no-brainer! The kit was rather pricey, at £16.95, but then again you do get three vehicles. I initially intended to make three identical vehicles, settling on the Sd.Kfz. 138. But after building one I changed tack, and ended up constructing all three of the possible tanks. I figure that's more educational, and certainly it's more fun!
Sd. Kfz. 138, Marder III Ausf H
A working Marder III Ausf H.
First off, I built the 138 variant, a Marder III, Ausf H, sporting the 7.5 cm PaK 40 anti-tank gun.
This, to me, is the most aesthetically pleasing of the three models one can potentially construct using the parts on offer here. It has a lower profile, the front and side armour looking more akin to other small self propelled German guns than the 139, with its rather eccentric almost ziggurat like profile. It's actually the Ausf M variant that I like the look of best though (this latter variant most closely resembles other small self-propelled guns such as the Wespe; I'll have to buy/build the Attack kit for that!).
This build is, for the most part, extremely simple. Plastic Soldier kits are chunky and robust, making them ideal for wargamers who want to handle their models a lot. Their is a corresponding lack of fine detail, especially noticeable on the tracks which, due to the moulding process, don't depict the inner 'teeth' properly. But the advantage is that these tracks come as an über simple one-piece clip-on assembly, with track sag already modelled.
On all of these vehicles I opened holes in the exhausts and muzzle brakes, and on the two Marders I opened up the holes for the barrel on the gun support. On the 138 I did some detailing of the gun, opening the recoil channel, as well as some other holes on the breech end.
At this point the top plate of the fighting compartment is not attached. I'm wondering whether to attach it or not, in part influenced by the need to have access to the inner parts of the fighting compartment in order to paint it all properly.
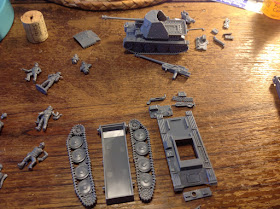
The 138, mostly built, in the background, with a 139 being built in the foreground, and on the left, the various crew figures being cleaned up and assembled. The top fighting compartment plate is not attached yet, but just sitting in situ, helping me to decide whether or not to model it with this part in place or not. I'd also not yet put the rear hull plate or exhaust on the 138 yet.
The 138 the simplest of the three to make, as the turret of the 38t and the gun of the 139 are both more involved. I'd like a few more of these for my Ostfront army, although I'll probably want them to be Ausf M rather than Ausf H variants. I reckon I'll try some other brands next, and go for the more detailed Attack (Ausf M) or Italeri (Ausf H) versions [1].
I will also want to detail them all, with crews and various odds and sods. One thing I see a lot of on old photograph reference material, but are very rarely contained in model kits (in fact I don' think I've ever seen a 1/72 kit with one!?), are buckets!
Panzer 38(t)
I was initially a bit resistant to making this rather poxy looking little Czechoslovakian light tank, feeling to was a bit too 'early war' for my projected late-war Ostfront campaigning. But, as I said above, I eventually opted to build all three variants, for added variety, and just for the fun of it. It's a funny looking beast, all covered in chunky rivets! If you want to know more about the history of this tank, the Wikipedia link (Panzer 38) is informative.
There's the option to add either a closed or an open cupola, and there are two commander figures that kind of 'plug in' to the large sockets in the turret (both cupola and figure plug in to their own respective sockets!). I opted for the figure that protrudes further from his cupola, with his left hand up to his 'cans'. It's a pity this left arm is sculpted/moulded so rigidly in line with the body, as it looks very unnatural!
For the commanders of the other two vehicles - see pics right at the bottom of the post - I'm opting for guys with binoculars, as if the self-propelled guns are out on a hunting patrol. Both are used as supplied. But I did do a minor conversion on one figure, removing his overly long right arm, and turning him into another binocular wielder!
It was actually several photographs of this rather odd looking high profile variant that got me started on this whole Marder III jag. These have a more open topped fighting compartment than the 138, with a bar over the top. Some of the photographic ref I've enjoyed studying shows the fighting compartment shrouded in a wet-weather hood.
There are also numerous photos of these vehicles with various tarps or other things (like camo' nets) over sundry parts, from the muzzle to the gun hinge area, or even the whole fighting compartment. I'd like to attempt to model something along such lines in some form at some point. Some day, eh? But I'll probably save such experimentation for another iteration! And as already mentioned in relation to the 138, I also want to cover these with lots of ephemera, as most the photos of these vehicles show them festooned with all kinds of military gubbins.
This was a more complex build, because of the fighting deck and gun. Wheats the gun for the 138 was a simple one-piece moulding, this [guntype?] was a multiple part affair. What little scope their is for vertical movement is, rather sadly, constrained by the top of the guard. If I build another of these I might try and fiddle with this so as to get more movement. Mind you, the 138 and 38t guns are all fixed.
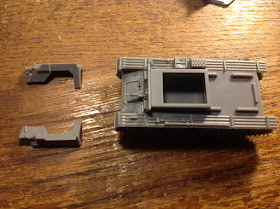
These was a fault - see above pic - with this kit not applicable on the others. This was caused by detail on the right side hull panel (a moulded in place spade) which doesn't allow the part to fit where it's meant to, as the space allocated (behind a moulded in situ box on the mudguard) isn't large enough. My solution was to remove the spade. My cheap chisels totally failed! So I used a scalpel and some files to get rid of the the spade. I would've liked to have lifted it off intact, for use elsewhere, but I failed to do so!
I wish I'd taken more pics of the construction of the gun! It's a fun thing to put together. This vehicle variant sported a captured Russian gun, hence the (r) in Pak 36(r). In fact, should it be Pak 36? Or ought it not be Pak 76? as the gun was a 76mm calibre affair. It has a very distinctively oversized muzzle brake, which looks pretty cool. This gun and the high ziggurat-like profile give this variant a very distinctive and slightly anomalous look, suited to the hybrid nature of its derivation.
The sprues contain some spare track and one or two other bits (rope, a Jerry can), plus I have lots of useful stuff from my previous Plastic Soldier purchase. But I think I'll get some Black Dog stowage, and some sundries like extra helmets, and - if I can find some - some buckets! They'll all be in basic dunkelgelb unit, I can decide on any further camo schemes.
Above and below, the three (more or less) completed models, on parade if you like. In the pics below I added a figure to the two open topped vehicles, just for visual appeal, really. There are various sundry bits to add, inc. a part that looks like the rear basket/net of the 138, which I assume is an equivalent arrangement for the 139. But this is one of the parts (like the seats of the 139) that there are no references to at all in t eh instructions.
* City Cycle Centre, the last and most local of that dying breed, the high street model shop.
----------
NOTES:
[1] The Italeri kit is in fact an old reboxed and rebranded Esci kit.


I'm finding my way with PSC at the moment. I've done a single model from the 231/232/263 set and a single Valentine. Just did the Marder. I agree completely with you about the instructions! What is shown as a "complete" step often is not! I hope PSC will issue another set based on this hull with some of the rear superstructure options like the Marder ausf M and Grille. You always see Hummel's and Wespe as German SPG arty - would be nice to have a Grille as a choice too.
ReplyDeleteOnly just spotted this comment. Thanks for stopping by. And yes, like you, I'd love to see more variants being made available. The sheer number and variety of these German Frankenstein SPGs is mind-boggling!
DeleteJust built a couple of these - also had a mare with the instructions - whole sections omitted!
ReplyDeleteHi, only just stumbled across this comment! It's been a long while since I built these, or indeed any PSC kits. The last time I was tempted was at a show, and it was the Panthers with zimmerit. Cheers, Seb
Delete