A nice looking model tank... plus five very nicely sculpted Panzer commander figures. Cool!
This, my third Tiger I in a week, was also my first model by the much-lauded Dragon brand. Having read many articles and reviews, and watched numerous YouTube videos, all singing Dragon's praises, some with great effusions of hyperbole, expectations were high.
Alas, how true it is that where expectations are high, disappointment is oft-bound to follow. My initial feelings, as I struggled to make sense of the minimal (if colourful) instructions, were that this wasn't living up to the hype. The chief cause of this was a combo of lack of clarity in the instructions, and what I deemed to be the rather ill-fitting 'washer' like parts. But before I get into the meat of it, what's in the box?
The zimmerit on this model is the best I've yet encountered. It's certainly much more realistic (both less regular and just plain better sculpted) than the Trumpeter JagdTiger rendering.
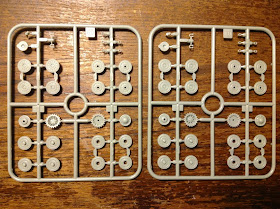
Wheels and whatnot.
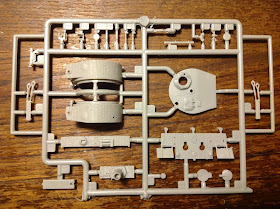
The body parts.
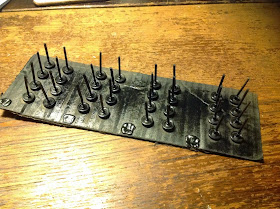
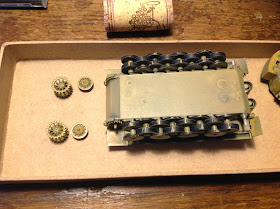
Dragon's proprietary 'DS' tracks, the metal parts, and the decals.
Snazzy colour-photo instructions. Very swank!
But in the end the running gear went together very well, and I realised I'd been getting fussed over nothing. It was more a case of having high expectations, and that in turn causing any minor niggles to get blown out of all proportion.
During a dry-fit of the road wheels I got quite worked up about the tiny 'washer' type bits, seen here, and opened them up a little, as - see pic below - they wouldn't go onto the axles far enough for my liking.
In the end though, the running gear all went on fine, and looked pretty good 'n' all.
Next up was the turret, most of which is covered in that lovely zimmerit. The barrel assembly is rather fiddly, and the danger of gluing the moving parts is, I think, made higher than it ought to be by the design, with the need to glue the two peg-like elevation axles in place through holes in the turret. Even though I didn't glue it all solid, as I feared I might, there isn't as much movement on this barrel as there is on either of the other tigers I've just built.
I've gone for having the commander's hatch open. Alas, none of the 'Tiger Aces' figures, supplied as a secondary or add-on component (and one of the reasons I bought this particular kit) will fit, at least not without some surgery.
Here you can see the integrally cast tools. Eagle-eyed readers may also note that I also took a small notch out of the main hull, centrally, where the headlamp stuck through the back of the front panel.
This Dragon model, like the Trumpeter Tiger I, has most of the tools as pre-cast items integral to the hull, which, compared to the Zvezda tools, fully-formed and separate, lack a certain level of realism. All three models, however, share the use of handles that are cast as raised flanges, another less than realistic feature that can be, with a little bit of effort, as I discovered with my recent Aufsklarungspanzer build, be much improved upon.
The exhaust guards look lovely. And, like the Zvezda, the rear grilles are, thankfully, fully open.
Placing this three-part metal ring section was very, very tricky. I had to rig up this tape-based situation to keep it all in place as I glued it in position.
But it's worth the effort! Neither of the other Tiger I models I've recently built feature this particular hull detail.
This is the only Tiger I amongst the three I've just build to include photo-etched and other metal parts. Three sections of curved [metal: brass?] were a real bugger to get right, as they constantLy moved, and refused to sit properly where they should. In the end it was only thanks to a combination of patience, persistence, and the use of Tamiya masking tape that I succeeded in the construction this ever-so-fiddly part of the build.
Alas, as pretty as they are, the exhaust covers don't sit in proper alignment (unless this in fact was one of the ways late production Tiger Is differed from their forerunners?).
The brass exhaust covers are very nice, being better in proportion, thickness-wise, than the plastic equivalents used in the Trumpeter model. But despite this, they didn't sit at what I felt was the correct angle (unless the design changed in this respect between mid- and late-production Tigers?), due to other hull detail, which forced them out of alignment, as shown the comparison pic above.
In the instructions you're asked to drill locator holes here, for the tiny pegs on these skirting-boards-cum-mudguards. I just sliced the pegs off and aligned these parts by eye!
Cable ends are supplied, but not added to the model in the instructions. Nor are they complete anyway, lacking the other looped half of the tow cable. Rather odd, I thought!
The final parts of the build itself as it currently stands - the two tow cables supplied are marked as being amongst the parts not used in this model, and as EH are supplied incomplete I haven't fitted them yet - were the DS, or 'Dragon Styrene' tracks. These are a new experience for me, and compare favourably in some respects, e.g. in terms of gluing time, to the Trumpeter tracks.
But having said this they didn't fit around the running gear quite so well, and both are, compared to the Zvezda, of a rather approximate/baggy fit. I may, in both these cases, ultimately glue the tracks to the upper side of the wheels, to simulate the weight and the 'sag' of the real thing. But that's a decision for another day!
Various unused bits, for the spares box.
Look at all these lovely U-clips! The four at left were fitted to this model, with the eight on the right going in the spares box.
After completing the build there are several parts to add to the spares box, including a nicely moulded jack, and - best of all (and these could've been very useful had I actually lost these parts, as I so nearly did, during the Zvezda build) - a whole sprue of eight U-clips, to which tow cables can be attached. The spare track, similar to that included in the Zvezda model remains unused at present, mainly because, unlike in the case of the Zvezda kit, it lacks any detail at all on the reverse face.
You can see that the Zvezda spare track, at the top, is fully 3-D, whereas the Dragon spare track is totally flat on the reverse. Never good in my books!
At the time of posting this third Tiger I remains completely unpainted.
-----
My Tiger-Tastic Half-Term Treat:
Building these three Tiger I models during my half-term break has been immensely pleasurable, and - despite the break from my regular teaching work, and in altogether different way - quite educational. Each kit has different strengths and weaknesses, some of which are shared by more than one tank kit - as, for example, with the cut-through grilles of the Zvezda and Dragon models - whilst others are unique to a particular brand, e.g. Dragon's proprietary DS tracks, or Zvezda's very clever clip-on tracks, the latter of which have the great strength of leaving one with the most realistic wheel-hugging heavy-track look.
Building these three Tiger I models during my half-term break has been immensely pleasurable, and - despite the break from my regular teaching work, and in altogether different way - quite educational. Each kit has different strengths and weaknesses, some of which are shared by more than one tank kit - as, for example, with the cut-through grilles of the Zvezda and Dragon models - whilst others are unique to a particular brand, e.g. Dragon's proprietary DS tracks, or Zvezda's very clever clip-on tracks, the latter of which have the great strength of leaving one with the most realistic wheel-hugging heavy-track look.
Chronologically, in both my build order and historical production terms: at left the Zvezda early-production kit, in the middle, the Trumpeter mid-production model, and at right, the as yet unpainted Dragon late-production version. I like them all!
All three models could be improved with numerous upgrades, amongst which the only one I feel tempted to employ on these models, having fully built all three now, might be some wire hatch handles. The Zvezda, which I made the biggest hash of (over eagerness and glue-melting resulted in a whole rack of wheels shearing off the chassis), nonetheless comes out if this, to my mind, extremely well, having the nicest/cleanest rear grilles, the best track fit, and excellent upper deck stowage detail, due to tools all being separate parts cast fully in the round, where the Dragon and Trumpeter models largely rely on integrally cast tools.


